
available on
www.arcticspas.com
Owners Manual
International
Your choice of an Arctic Spa indicates
that you are devoted to excellence. At
Arctic Spas
®
we believe a good foundation is
required to build a superior product, both in
design and philosophy. Canadian built with the
nest materials and advanced technology
to withstand even the harshest of weather
conditions, Arctic Spas
®
are made to perform...
wherever you happen to live. To safely and eectively
use your spa, we recommend that you take the time to
read this manual before you hook-up and operate the spa.
This guide will acquaint you with the operating features, hook-up
procedures, and the maintenance and safety procedures, ensuring an
enjoyable experience right from the start.
If you require additional information, please call your local Arctic Spas®
dealer. A complete list of dealers and international Arctic Spas websites
can be found on the internet at ArcticSpas.com.
IMPORTANT!
In most cities and counties, permits will be required for the installation
of electrical circuits or the construction of exterior surfaces (decks and
gazebos). In addition, some communities have adopted residential
barrier codes which may require fencing and/or self-closing gates on
the property to prevent unsupervised access to a pool or spa by children
under 5 years of age. Your Arctic Spa is equipped with a locking cover
that meets the ASTM F1346-91 Standard for Safety Covers and as a
result, is usually exempt from most barrier requirements. As a general
practice, your local Building Department will inform you of any applicable
barrier requirements at the time a permit is obtained for the installation of
an electrical circuit. Your Arctic Spas Dealer can provide information on
which permits may be required.
IMPORTANT SAFETY INFORMATION
This appliance is not intended for use by persons (including children) with
reduced physical, sensory or mental capabilities, or lack of experience
and knowledge, unless they have been given supervision or instruction
concerning use of the appliance by a person responsible for their safety.
Children should be supervised to ensure that they do not play with the
appliance.
Cleaning and user maintenance shall not be made by children without
supervision.
Congratulations!
22

INTRODUCTION .............................................................................................7
Important Safety Instructions ...........................................................................8
Hyperthermia .................................................................................................10
Installation Instructions .................................................................................. 11
Electrical Instructions.....................................................................................12
Electrical Safety Instructions .........................................................................12
Start Up Procedures ......................................................................................13
Spa Care and Maintenance ...........................................................................15
Custom and Classic Series Drain Tub ...........................................................15
Core Series Drain Tub ................................................................................... 16
Care and Adjust Pillows .................................................................................17
Care of Spa shell ...........................................................................................17
Care of Spa Covers .......................................................................................18
Care of Cabinets............................................................................................19
Winterizing your Spa .....................................................................................19
Water Maintenance .......................................................................................20
Common Spa Water Problems - Cause & Remedy ......................................24
Trouble Shooting Spa Problems ....................................................................26
CUSTOM SERIES ......................................................................................... 28
Specications ................................................................................................29
Spa Overview ................................................................................................30
Jets.......... ......................................................................................................31
Topside Control Panel ..................................................................................32
Quick Reference ...................................................................................... 33
Filtration Settings ..................................................................................... 34
Error Codes .............................................................................................34
How to perform a software upgrade Eco Pak ................................................35
Warranty ........................................................................................................36
CLASSIC SERIES.........................................................................................38
Specications ................................................................................................40
Spa Overview ................................................................................................41
Jets.......... ......................................................................................................42
Topside Control Panel ..................................................................................44
Start up ....................................................................................................45
Water Care Modes ...................................................................................46
Filtration settings ....................................................................................47
Onzen™ Settings With k500 Topside ......................................................47
Audio, Maintence, Maintence Reminders, and Standby ..........................48
WiFi Settings ...........................................................................................49
Stereo Settings ........................................................................................50
Error Codes .............................................................................................51
Warranty ........................................................................................................52
Contents
33

Contents
CORE SERIES .................................................................................................. 5 4
Specications .................................................................................................... 5 6
Spa Overview .................................................................................................... 57
Jets.......... .......................................................................................................... 58
Topside Control Panel ....................................................................................... 6 0
Spa Functions.................................................................................................... 6 1
Start Up ............................................................................................................. 6 2
Filtration settings ............................................................................................... 6 4
Setting Economy Mode ..................................................................................... 6 6
Error Codes ....................................................................................................... 6 7
Warranty ............................................................................................................ 6 8
SPA BOY OWNERS MANUAL ........................................................................ 7 0
Obtaining Technical Data For Your Spa ............................................................ 7 1
What is Spa Boy? .............................................................................................. 7 1
What Does Spa Boy Do?................................................................................... 7 1
What Are The Benets of Spa Boy? .................................................................. 7 1
How Does Spa Boy Work? ................................................................................ 7 2
Spa Boy System Interface ................................................................................. 7 2
Spa Boy Main Components .............................................................................. 7 3
Spa Boy Version Summary ............................................................................... 7 4
How to Determine Spa Production Date............................................................ 7 4
Denitions of Terms........................................................................................... 75
Water Chemistry Abbreviations/Acronyms & Ranges ....................................... 79
Spa Boy Start – Up Guide ................................................................................. 8 0
Spa Boy Start-Up Overview Flowchart .............................................................. 8 0
Fill Spa With Water Power Up Spa and Set Water Temperature ..................... 8 1
Program Filtration Cycles/Filtration Duration ..................................................... 8 2
Stabilize Spa Water .......................................................................................... 8 2
Establishing Correct Water Chemistry............................................................... 8 2
Arctic Spas Spa Boy Salt Dose Guidance Table ............................................... 85
Sanitizer and pH Readings ................................................................................ 8 6
Caring for your Spa Boy System ....................................................................... 8 6
Arctic Spas Spa Boy Version 1 R1 Maintenance Schedule ............................. 9 1
Troubleshooting Spa Boy Low ORP Reading Detected ................................... 9 4
ONZEN™ OWNERS MANUAL ......................................................................... 9 6
Onzen™ Technical Guide ................................................................................. 9 8
Obtaining Technical Data For Your Spa ............................................................ 9 8
Revision Summary ............................................................................................ 9 8
What is Onzen™? ............................................................................................. 9 8
What Does Onzen™ Do? .................................................................................. 9 8
44

Contents
What Are The Benets of Onzen™? ................................................................. 9 8
How Does Onzen™ Work? ............................................................................... 9 8
How to Determine Spa Production Date............................................................ 9 8
Denitions of Terms........................................................................................... 9 9
Water Chemistry Abbreviations/Acronyms & Levels ......................................... 101
Abbreviations Acronyms & Settings .................................................................. 102
Onzen™ Start – Up Guide................................................................................. 103
Onzen™ Start-Up Overview Flowchart ............................................................. 103
Fill Spa With Water Power Up Spa and Set Water Temperature ...................... 104
Establishing Correct Water Chemistry............................................................... 105
Arctic Spas Onzen™ Salt Dose Guidance Table .............................................. 106
Using Sodium Chloride Test Strips.................................................................... 107
Program Filtration & Onzen™ Settings Custom Series ..................................... 109
Sanitizer Readings ............................................................................................ 1 1 0
Onzen™ Cloudy Water Troubleshooting Flowchart .......................................... 111
Onzen™ Frequently Asked Questions .............................................................. 1 1 2
Arctic Spas Onzen™ Maintenance Schedule.................................................... 115
ONSPA® OWNERS MANUAL .......................................................................... 117
How To Download App ...................................................................................... 1 1 8
Setup New Spa.................................................................................................. 1 1 8
Setup WiFi Connect........................................................................................... 1 1 9
Setup MyArcticSpa.com .................................................................................... 121
Locate Registration Code .................................................................................. 122
Adjusting Settings on App.................................................................................. 122
55
For the most up-date Warranty information please go to
arcticspas.com to download the Arctic Spas Manual.
66

Introduction
All Arctic Spas
77
Owners Manual - Arctic Spas®
Important Safety Instructions:
READ AND FOLLOW ALL INSTRUCTIONS CAREFULLY
When installing and using this electrical equipment, basic safety precautions
should always be followed, including:
1) WARNING: To reduce the risk of injury, do not permit children to use this product unless they are closely
supervised at all times.
2) WARNING: A grounding wire connector is provided on this unit to connect a minimum No. 8 AWG solid
copper conductor (USA) No. 6 AWG stranded (Canada) 8.4mm (Europe) between this unit and any metal
equipment, metal enclosures of electrical equipment, metal water pipe, or conduit within 5 feet (1.5 m) of the unit.
3) DANGER: Risk of Accidental Drowning. Extreme caution must be exercised to prevent unauthorized access
by children. To avoid accidents, ensure that children cannot use this hot tub unless they are supervised at all
times. Use the hot tub straps, cover safety and clip tie downs to secure the cover when not in use. This will help
to discourage unsupervised children from entering the hot tub. There is no representation that the cover, clip tie
downs, or actual locks will prevent access to the hot tub.
4) DANGER: Risk of Injury. The suction ttings in this hot tub are sized to match the specic water ow created
by the pump. Should the need arise to replace the suction ttings or the pump, be sure that the ow rates are
compatible. Never operate the hot tub if the suction ttings are broken or missing. Consult your local dealer for
assistance in choosing an appropriate replacement
suction tting.
5) DANGER: Risk of Electric Shock. Install at least 5 feet (1.5 m), from all metal surfaces.
As an alternative, a hot tub may be installed within 5 feet (1.5 m) of metal surfaces if each
metal surface is permanently connected (bonded) by a minimum No. 8 AWG solid copper
conductor (US) No. 6 AWG stranded (Canada) 8.4 mm (Europe) attached to the wire
connector on the equipotential bonding bar which is located on the side of the spa control
pack.
6) DANGER: Risk of Electric Shock. Do not permit any electrical appliance, such as
a light, telephone, radio, television, etc. within 5 feet (1.5 m) of a hot tub. All controls or
devices accessible from the spa must be powered by a maximum of 12 vdc. Do not permit
any electrical appliances powered by 12 vdc or more within 1.5 m of the hot tub.
7) ELECTRICAL SUPPLY: The electrical supply for this product must include a suitable
circuit breaker GFCI (north America) RCD (Europe) to open all ungrounded supply
conductors. The disconnect must be readily accessible and visible to the hot tub occupant
but installed at least 5 feet (1.5 m), from the hot tub water.
8) WARNING: To Reduce the Risk of Injury:
a) The water in a hot tub should never exceed 104ºF (40ºC). Water temperatures between
100ºF (38ºC) and 104ºF (40ºC) are considered safe for a healthy adult. Lower water
temperatures are recommended for young children and when hot tub use exceeds 10
minutes.
b) Since excessive water temperatures have a high potential for causing fetal damage dur-
ing the early months of pregnancy, pregnant or possibly pregnant women should limit hot
tub water temperatures to 100ºF (38ºC). If pregnant, please consult your physician before
using a hot tub.
c) The use of alcohol, drugs, or medication before or during hot tub use may lead to uncon-
sciousness with the possibility of drowning.
IMPORTANT!
This manual was
written to ensure
the proper use and
installation of any
Arctic Spa. Any
modications to the
procedures outlined
may result in
your warranty
being voided.
Please read this
manual to avoid any
unnecessary damage
to your spa and
equipment.
88

Owners Manual - Arctic Spas®
d) Persons suering from obesity or a medical history of heart disease, low or high blood pressure, circulatory system
problems, or diabetes should consult a physician before using a hot tub.
e) Persons using medication should consult a physician before using a hot tub since some medication may induce
drowsiness, while other medication may aect heart rate, blood pressure, and circulation.
9) WARNING: A bonding lug bar is provided on the side of your spa pack to accommodate grounding
of entire spa. To reduce the risk of electric shock, connect the local common bonding grid in the area of
the hot tub to these terminals with an insulated or bare copper conductor not smaller than No. 8 AWG
solid (US) No. 6 AWG stranded (Canada) 8.4 mm (Europe).
SAVE THESE INSTRUCTIONS
WARNINGS!
WARNING: Children should not use hot tubs without adult supervision.
AVERTISSEMENT: Ne pas laisser les enfants utiliser une cuve de relaxation sans surveillance.
WARNING: Do not use hot tubs unless all suction guards are installed to prevent body and hair
entrapment.
AVERTISSEMENT: Pour eviter que les cheveux ou une partie du corps Puissent étre aspires, ne pas
utiliser une cuve de relaxation si esgrilles de prise d’aspiration ne sont pas toutes en place.
WARNING: People with infectious diseases should not use a hot tub.
AVERTISSEMENT: Les personnes atteintes de maladies infectieuses ne devraient pas utiliser une
cuve de relaxation.
WARNING: To avoid injury, exercise care when entering or exiting the hot tub.
AVERTISSEMENT: Pour éviter des blessures, user de prudent en entrant dans une de cuve de
relaxation et en sortant.
WARNING: Do not use drugs or alcohol before or during the use of a hot tub to avoid unconsciousness and possible
drowning.
AVERTISSEMENT: Pour éviter l’évanouissement et la noyade éventuelle, ne prendre ni drogue ni alcool avant
d’utiliser une cuve de relaxation ni quand on s’y trouve.
WARNING: Pregnant or possibly pregnant women should consult a physician before using a hot tub.
AVERTISSEMENT: Les femmes enceintes, que leur grossesse soit conrmée ou non, devraient consulter un médecin
avant d’utiliser la cuve de relaxation.
WARNING: Water temperature in excess of 100ºF (38ºC) may be injurious to your health.
AVERTISSEMENT: Il peut être dangereux pour la santé de se plonger dans de l’eau a plus de 100ºF (38°C).
WARNING: Before entering the hot tub, measure the water temperature with an accurate thermometer.
AVERTISSEMENT: Avant d’utiliser une cuve de relaxation mesurer la température de l’eau à l’aide d’un ther momètre
précis.
WARNING: Do not use a hot tub immediately following strenuous exercise.
AVERTISSEMENT: Ne pas utiliser une cuve de relaxation immédiatement après un exercice fatigant.
CAUTION!
Indicates a situation
in which damage to
equipment or mate-
rial may occur.
DANGER!
Indicates risk of
injury.
WARNING!
Indicates information
of critical importance.
Read and
Follow All
Instructions
It is important to
inform occasional
users of the
spa about the
DANGERS,
WARNINGS, and
CAUTIONS listed
in this manual
before they use the
spa.
99
Hyperthermia
Owners Manual - Arctic Spas®
WARNING: Prolonged immersion in a hot tub may be injurious to your health.
AVERTISSEMENT: L’utilisation prolongée d’une cuve de relaxation peut être dangereuse pour
la santé.
WARNING: Do not permit electric appliances (such as light, telephone, radio, television, etc.)
within 5 feet (1.5m) of this hot tub.
AVERTISSEMENT: Ne pas placer d’appareil éléctrique (luminaire, téléphone, radio, téléviseur,
etc.) à moins de 5 feet (1.5m) de cett cuve de relaxation.
CAUTION: Maintain water chemistry in accordance with manufacturer’s instructions.
ATTENTION: La teneur de l’eau en matières dissoutes doit être conformé aux directives du
fabricant.
WARNING: The use of alcohol or drugs can greatly increase the risk of fatal hyperthermia in hot
tubs.
AVERTISSEMENT: La consommation d’alcool ou de drogue augmente considérablement les
risques d’hyperthermie mortelle dans une cuve de relaxation.
WARNING: People using medications and / or having an adverse medical history should consult
a physician before using a spa or hot tub.
AVERTISSEMENT: Les personnes qui prennent des médicaments ou ont des problémes de
santé devraient consulter un médecin avant d’utiliser une cuve de relaxation.
Prolonged immersion in hot water may induce hyperthermia.
Hyperthermia occurs when the internal temperature of the body reaches a
level several degrees above the normal body temperature of 99ºF (37°C). The
symptoms of hyperthermia include drowsiness, lethargy, and an increase in the
internal temperature of the body. The eects of hyperthermia include:
Unawareness of impending hazard;
Failure to perceive heat;
Failure to recognize the need to exit hot tub;
Physical inability to exit hot tub;
Fetal damage in pregnant women; and
Unconsciousness and danger of drowning.
WARNING!
The use of alcohol
or drugs can greatly
increase the risk of
fatal hyperthermia
in hot tubs or spas.
1010
Owners Manual - Arctic Spas®
1111
Installation Instructions
Site Preparation
Please ensure the following:
• Always put your spa on a structurally sound, level surface. A lled spa can weigh a great deal.
Make certain that the location you choose can support the weight of your lled spa.
• Locate your equipment compartment, which houses all of electrical components, in a place
where you will have easy access for periodic spa care and maintenance.
• Allow adequate access to all other doors for service.
Outdoor Ground Level Installation
No matter where you install your new spa, it’s important that you have a solid foundation for support. If
you are installing a spa with a wooden pedestal oor outdoors, we recommend you place patio stones
underneath spaced out evenly. The stones should be at least two inches thick and twelve inches square (30
cm x 30 cm). Even with stones in place, the spa will possibly settle and become uneven, and may require
re-leveling over time. If you are installing a spa with a Forever Floor
®
outdoors, you may set it on virtually
any surface, as long as it is rm and level.
Deck Installation
To be certain your deck can support your spa, you must know the deck’s maximum load capacity. Consult
a qualied building contractor or structural engineer. To nd the weight of your spa, its contents and
occupants, refer to the Spa Specication chart. This weight per square foot must not exceed the structure’s
rated capacity, or serious structural damage could result.
Your Arctic Spas
®
Dealer can help you with local information such as zoning regulations and building
codes.
All Weather Pool Site Prep
Your new All Weather Pool should be placed on a prepared, uniformly solid and level surface (concrete pad,
properly engineered wood deck, etc.). The AWP should not be placed directly on a lawn, bare ground, or
gravel pad due to irregularities in the surface that may cause structural failure of the cabinet and shell that
could void the warranty.
Balconies, concrete pads, and decks should
be constructed to meet all builder codes and
should be able to or exceed supporting 146
Lbs per square foot (7kPa).
Your Arctic Spa is equipped with access
doors on all four sides. It is the customer’s
responsibility to provide access and ensure
there is a minimum of 24” (600mm) all around
the spa for service person access. Consult
your sales person or service department on the
dierent ways to achieve this clearance.
WARNING! WARNING!
We recommend that the Arctic Spa be installed
above ground. Consult a licensed building
contractor to design or evaluate your custom
decking requirements. Please ensure access to all
doors on all 4 sides of the spa for serviceability.
Owners Manual - Arctic Spas®
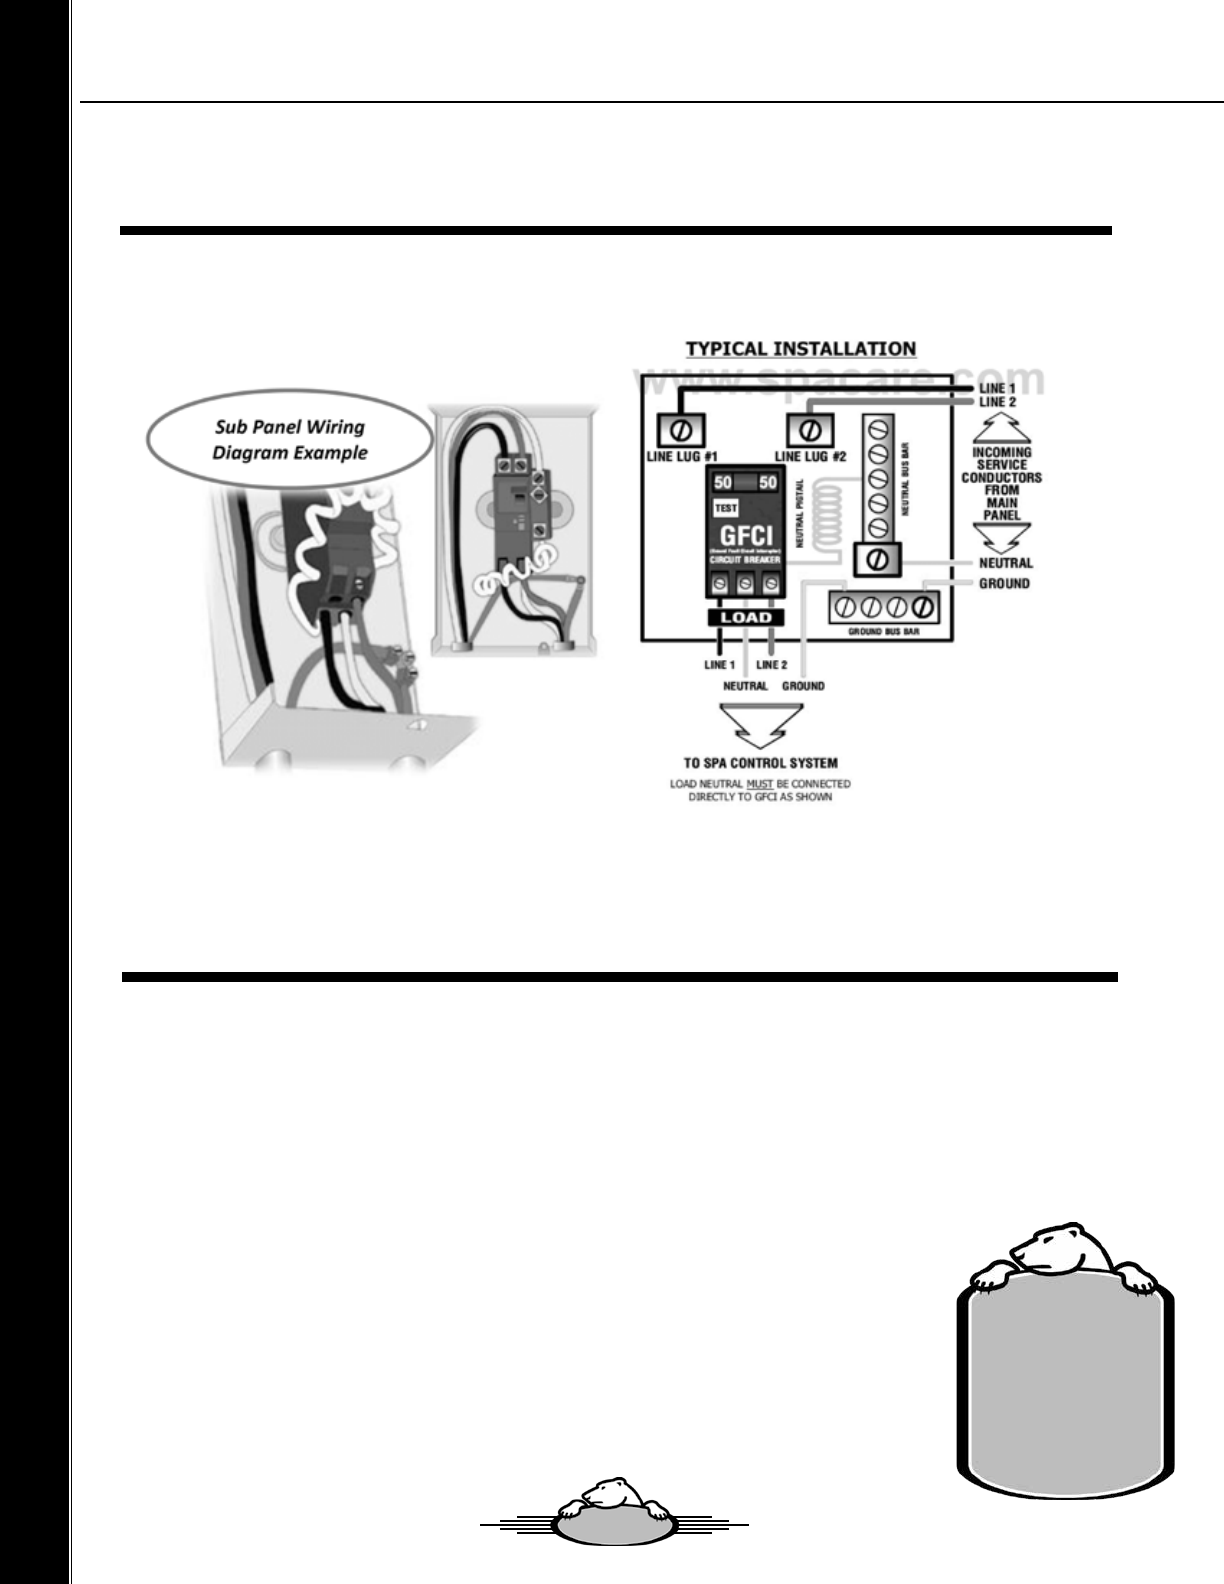
Electrical Specications
Electrical Installation Instructions
DANGER!
Shock Hazard.
DO NOT PROCEED if
you are not a licensed
electrician
. This
diagram is for
reference only!
ARCTIC SPAS
®
MUST BE WIRED IN ACCORDANCE WITH ALL
APPLICABLE LOCAL ELECTRICAL CODES. ALL ELECTRICAL WORK SHOULD BE
DONE BY AN EXPERIENCED, LICENSED ELECTRICIAN
AND APPROVED BY A LOCAL BUILDING/ELECTRICAL
INSPECTION AUTHORITY.
The electrical supply must satisfy the requirements of the spa as marked on the certication label which is
located adjacent to the spa controller (pack). If the ratings are not legible or cannot be found, please contact
the factory for assistance. - DO NOT GUESS!
WARNING: Removing or bypassing any GFCI /RCD breaker will result in an unsafe
spa and will void the spa’s warranty.
IMPORTANT: Your Arctic Spa has been carefully engineered to provide maximum
safety against electric shock. Remember, connecting the spa to an
improperly wired circuit will negate many of its safety features.
1212

Owners Manual - Arctic Spas®
Startup Procedures
IMPORTANT:
Your Arctic Spa
®
has been thoroughly tested during the manufacturing
process to ensure reliability and long-term customer satisfaction. Before
lling the spa, wipe the spa shell clean with a soft rag. Make sure to ll
spa through lter bucket.
The following instructions must be read and followed exactly to ensure a
successful start-up or rell.
1) Ensure the electrical connections have been made in accordance with this manual.
2) Ensure all O-Rings have been installed into unions and unions have been tightened
suciently.
3) Ensure all ball valves are open, and the drain has been closed. The spas drain tting
located on the external cabinet.
4) Using a garden hose in the lter bucket, ll the spa with pre-ltered water to the bottom
of the pillows (or approximately 6”, 15 cm above the base of the oating weir).
5) Once the spa is lled to the proper level, turn the power to the spa on, by turning on the
GFCI /RCD breaker in your panel.
6) The jet pump, heating system and all internal plumbing will achieve a partial prime as the
spa is lled. To check the operation of the jet system and to remove any remaining air from
the plumbing system, follow these steps:
a) All Models: Push the pump 1 button a second time to turn the pump to high
speed. Allow to run for 1 minute.
b) Signature: Push pump 2 button also. This pump runs at high speed only.
Run for one minute.
c) Legend and Legend Select: Push pump 3 also. This pump runs at high speed
only. Run for one minute.
d) SDS Series push pump 4 button once to turn on and run for one minute. Once the jet
system is fully operational (as indicated by strong, non-surging jets), priming of the
spa is complete. Push each pump button once to turn the pumps o.
IMPORTANT: Weak or surging jets can be indication of a low water level, or a clogged lter
cartridge.
7) Adjust the chemicals and balance the water according to your dealer’s instructions. A
guideline is also included in this manual, under the Water Maintenance Section.
8) Set the temperature control to the desired temperature (between 100ºF and 104ºF (38ºC
and 40ºC), then place the insulated cover on the spa and allow the water temperature to
stabilize (approximately 16 hours). Make sure you secure the cover in place using the
cover locks. Periodically check the spa water temperature. When the water temperature
climbs above 85ºF (29ºC), proceed to the next step.
1313
Owners Manual - Arctic Spas®
CAUTION!
Do Not turn on
power to the spa
until the spa is lled
to the required
level. Running the
spa pump without
water could cause
immediate damage
and void your
warranty!
CAUTION!
If your spa or AWP is equipped with Spa Boy or
ONZEN please consult the: Spa Boy Owners
Manual or ONZEN User Guide for further setup
requirements.
9) Test and Adjust Sanitizer level (Health Canada mandates 3 - 5 ppm for residential Hot Tubs Spas).
10) Rotate diverters to centre position and press “Pump 2” button on topside control panel for 5
seconds to activate the “Boost ltration system”. When this system is enabled, “boo”
is displayed on the screen. This will give 45 min of circulation and ltration to disperse the
chemicals.
1414
Spa Care and Maintenance
Your Arctic Spa
®
is manufactured from the highest quality, most durable materials available. Even
so, the spa care and maintenance program you develop will ultimately determine how long your spa
and its individual components will last. Regular maintenance following the advice in this section will
help you to protect your investment.
IMPORTANT: Before performing any maintenance on your spa, make a visual inspection of
the spa to get an understanding of what condition it may be in and if anything looks out of the or-
dinary. If any part appears to be damaged, loose or missing, do not proceed. Contact your Factory
Authorized Dealer immediately.
IMPORTANT: If using traditional chemicals remember to change your water every three to
four months. If using SpaBoy you can get 6 months to two years in between water changes.
Custom and Classic Series Draining the Water
Detergent residues and dissolved solids from bathing suits and chemicals will gradually accumu-
late in your spa’s water. Normally, in about three to four months the water will become dicult to
balance and should be replaced. Showering without using soap prior to entering the spa or using
only the rinse cycle when laundering your bathing suit will help to reduce detergent residue in the
spa water. However, foam problems are more likely to be caused by a build up of organic pollut-
ants in the spa, mostly from body oils. If you’re using your spa frequently with a high bather load
the water will need to be replaced more often. Spa water gradually loses quality because of build-
ups of unlterable pollutants.
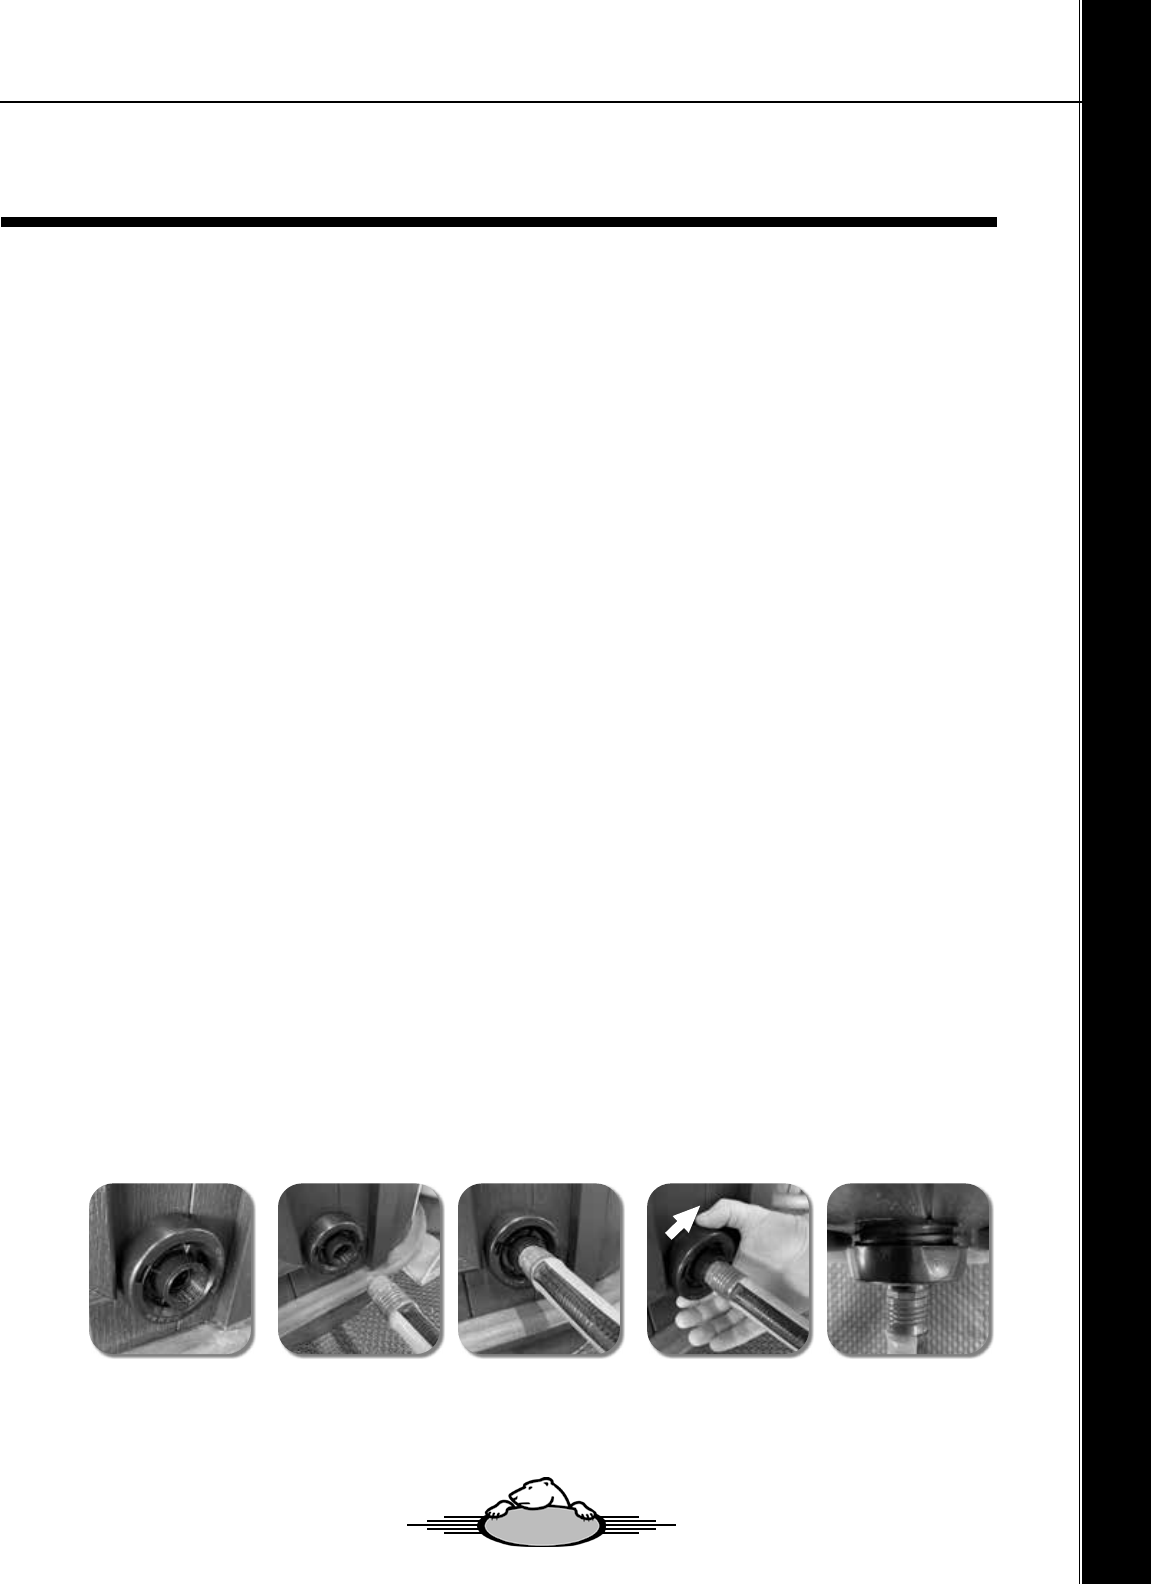
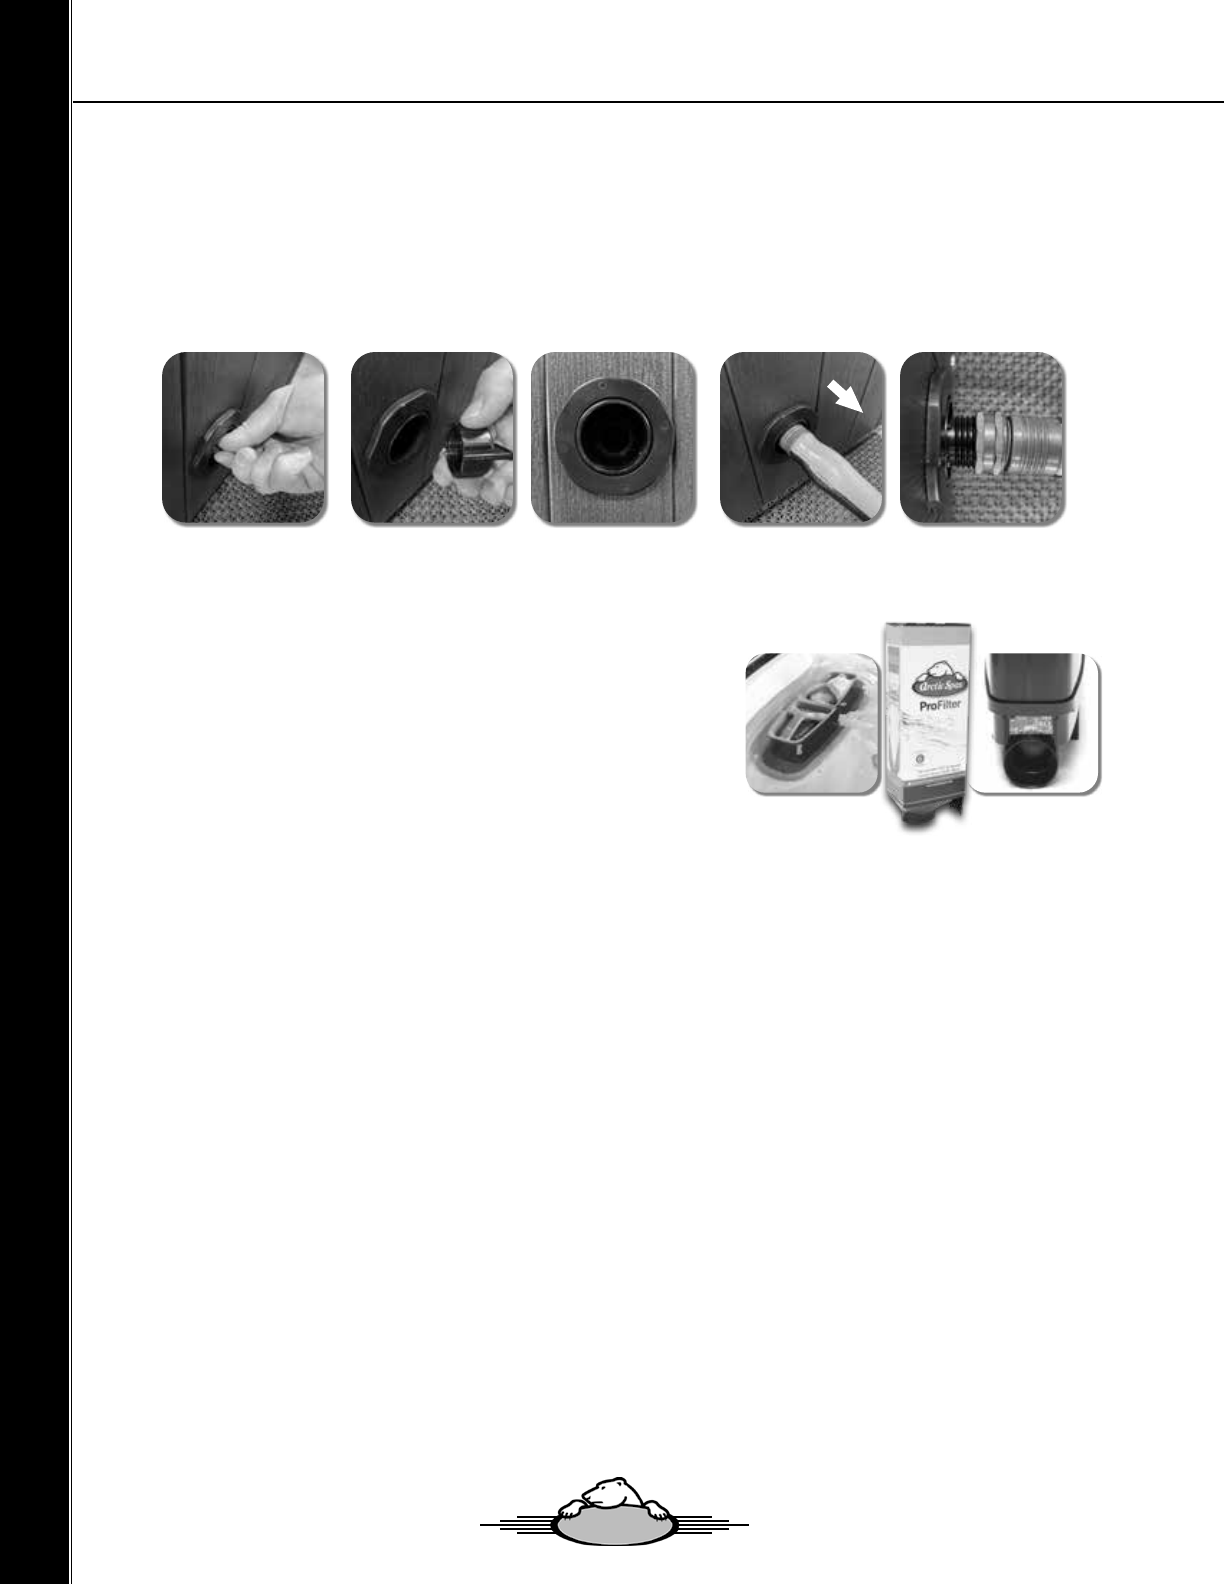
To Drain Your Spa:
1. Shut o the GFCI /RCD breaker located in the sub panel or the quick disconnect.
2. Locate the hose adapter and thread on to your garden hose.
3. Remove the drain plug, and thread in the adapter.
4. When the adapter is threaded all the way in the drain will automatically
open and begin draining.
Note: All Arctic Spas
®
models will drain through the oor drain. Equipment such as the pump(s)
and heater will drain. All models will leave a small amount of water in the foot well. Any water
remaining in the plumbing or equipment after draining will only need to be removed if the spa is
being winterized.
1. When empty, inspect the spa shell and clean as required.
2. Close the drain valve.
3. Rell the spa BEFORE restoring power.
1515
Owners Manual - Arctic Spas®
Core Series Draining the Water
To Drain Your Core Spa:
1. Shut o the GFCI RCD breaker located in the sub panel or the quick disconnect.
2. Locate and remove the drain plug.
3. Thread your garden hose in the adapter.
4. When the Hose is threaded in, pull the hose and the drain will open and begin draining.
Custom Series Filtration System
Filter Cartridge Removal and Installation For Custom
1. Put the Spa in Standby mode using sds button on the
topside control panel.
2. Remove the telescoping lter Insert.
3. Remove Pre-Filter.
4. Grab handle and pull up sharply to remove lter cartridge.
5. Insert new Filter cartridge.
The use of Clariers and Foam inhibitors is not recommended
with disposable lters!
Arctic Spas
®
are equipped with balanced ltration, meaning that the lter cartridges are sized to
meet the needs of the pump system. As with any water ltering system, the lter cartridge may become clogged,
resulting in reduced water ow. It is important to maintain a clean, unobstructed lter system.
Classic and Core Series Filter Cartridge Removal and Installation
1. Put the spa in Standby mode using the on/o button on the topside control panel.
2. Remove the telescoping lter cylinder
3. Unscrew the lter cartridge and either clean the reusable lter or discard the disposable lter.
4. Re-thread the clean or new lter.
5. Slide the telescoping lter cylinder back into the lter bucket.
6. We recommend that your lter cartridge be replaced with an Arctic Pure
®
disposable lter cartridge
every three (3) months.
IMPORTANT: With reusable lters, it is necessary to rinse the lter cartridges weekly. Every
month, and each time the spa is drained for cleaning, clean the cartridges in lter cleaner. (With
Arctic Spas disposable lters, simply replace the cartridge whenever the spa is drained, or about every
three months).
1616
Owners Manual - Arctic Spas®
Care of Spa Pillows
The spa pillows used in many of the Arctic Spas
®
models will provide years of comfort if treated with care. They
have been positioned above the water level to minimize the bleaching eects of chlorinated water and other
spa water chemicals. To extend their life, whenever the spa shell is being cleaned, the spa pillows should be
removed and cleaned. Body oils can be removed with a mild soap and water solution. ALWAYS rinse o the spa
pillows thoroughly to remove any soap residue. The pillows can be conditioned with Arctic Pure
®
Cover and
Cabinet Renew after cleaning. If the spa is not going to be used for a long period of time (that is, during a vaca-
tion or if the spa is being winterized), or when the spa water is being super-chlorinated, the spa pillows should be
removed until the next use of the spa.
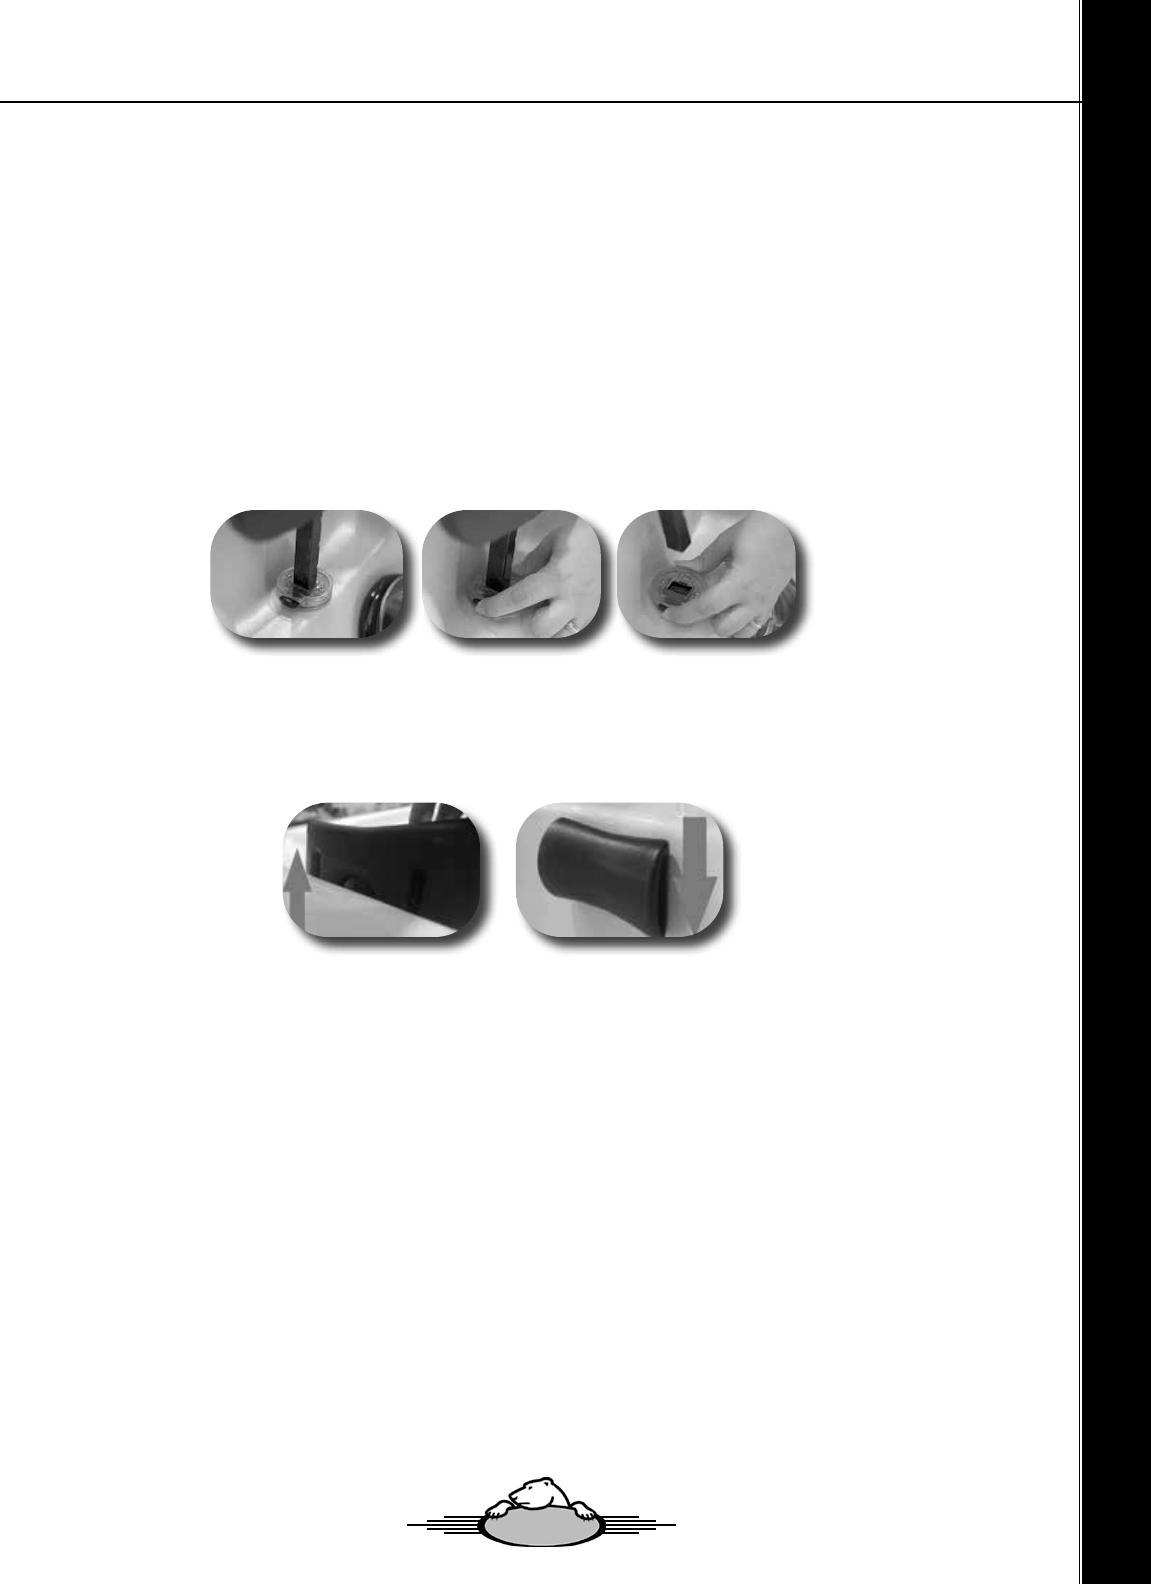
To remove and adjust the Custom spa pillows:
1. Pull the pillow directly upwards until it is fully extended. Next to the acrylic of the shell, there
is a button that you press to allow you to pull the pillow upwards and out completely.
2. To reinstall the spa pillow, push the button and carefully insert pillow.
To Adjust the Core Spa Pillows:
1. Pull up on the pillow to extend to its highest level
2. Push down for its lowest level
Care of the Spa Shell
Your Arctic Spa
®
has a berglass reinforced, Aristech
®
cast acrylic shell. Stains and dirt generally will not
adhere to your spa’s surface. A soft cloth or sponge should easily remove most dirt. Most household chemicals
are harmful to your spa’s shell. Sodium bicarbonate (baking soda) or vinegar can also be used for minor surface
cleaning. Always thoroughly rinse o any spa shell cleaning agent with fresh water.
Service Notes:
1. Iron and copper in the water can stain the spa shell if allowed to go unchecked. Your
Arctic Spas
®
Dealer stocks Arctic Pure
®
Best Defence to use if your spa water has a high
concentration of dissolved minerals.
2. The use of alcohol or any household cleaners other than those listed to clean the spa shell
surface is NOT recommended. DO NOT use any cleaning products containing abrasives or
solvents since they may damage the shell surface. Damage to the shell by the use of harsh
chemicals is not covered under the warranty.
1717
Owners Manual - Arctic Spas®
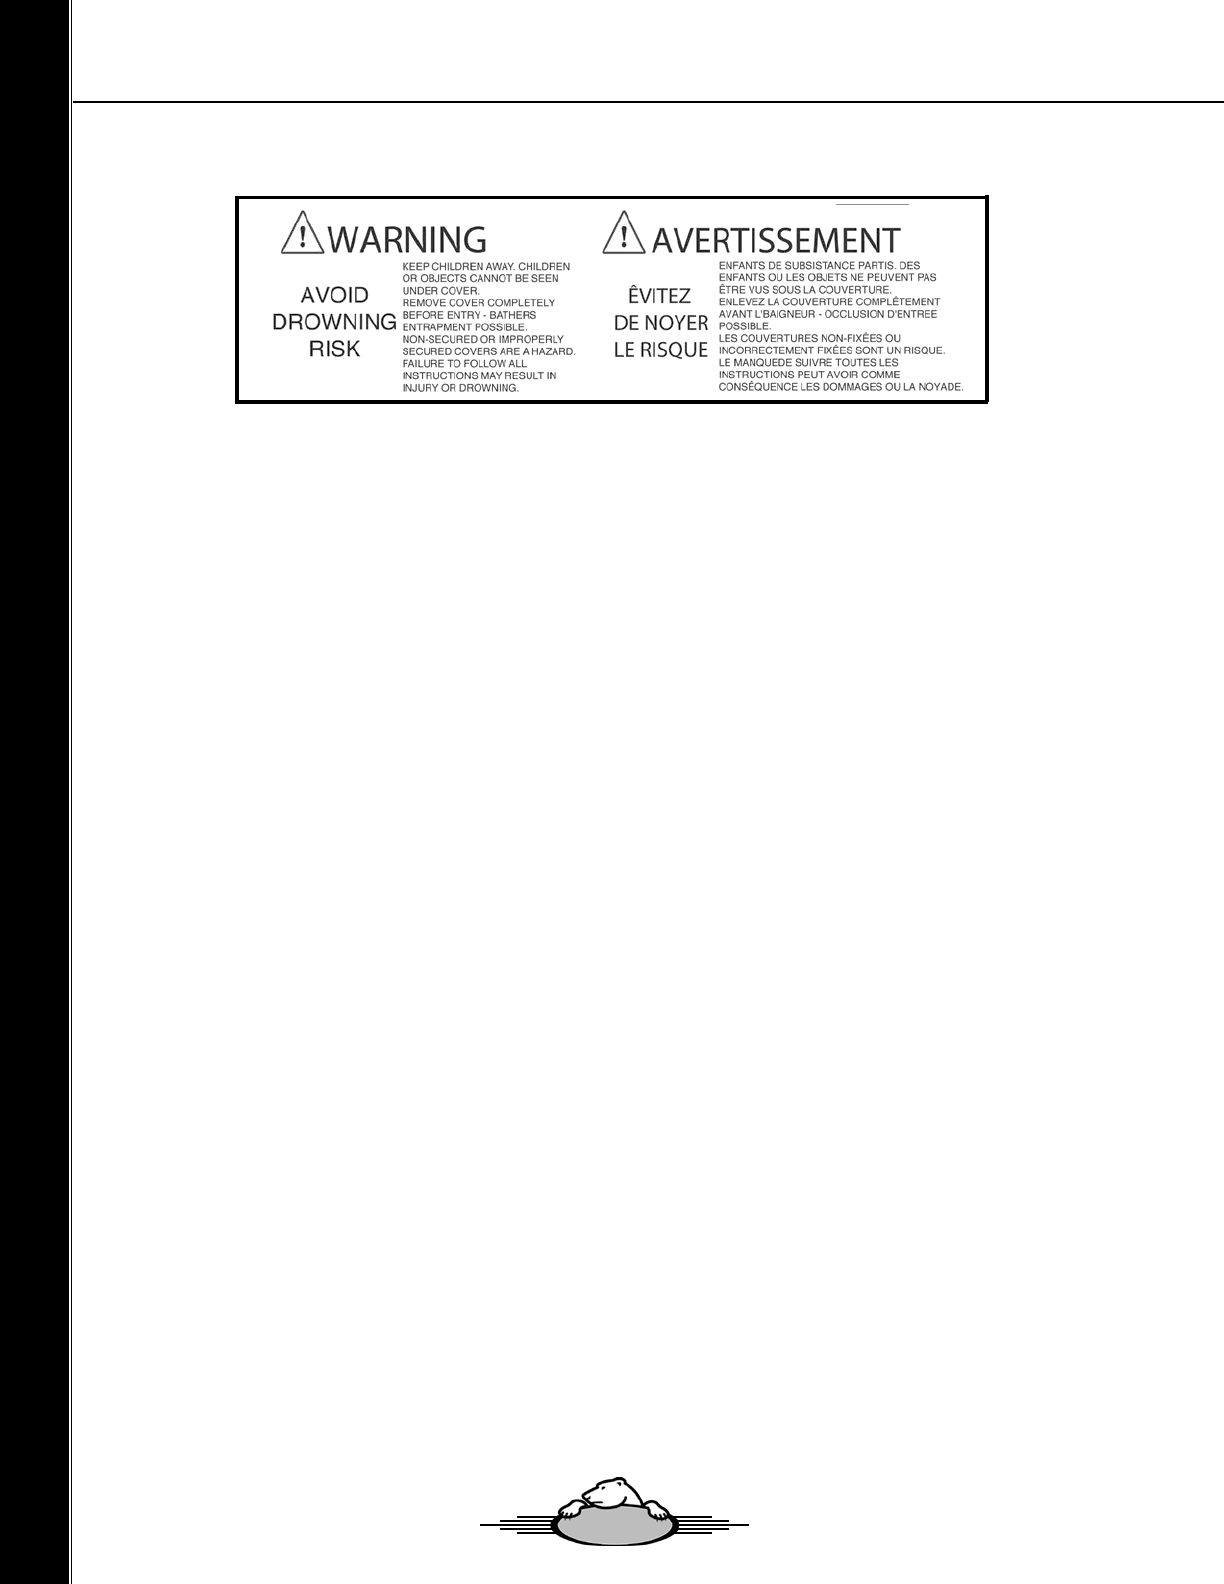
Care of the Spa Cover
WARNING:
The cover is a manual safety cover that meets or exceeds all prevailing requirements of
ASTM Standards for spa safety covers when installed and used correctly as of the date of manufacture. Non-
secured or improperly secured covers are a hazard. Open the cover to its fully open position before use. Be
sure to inspect the cover for premature wear or deterioration. Over time, with use, there is a chance of normal
cover wear and deterioration. To properly maintain your cover see directions below.
Vinyl Cover
The vinyl spa cover is an attractive, durable foam insulation product. Monthly cleaning and conditioning is
recommended to maintain its beauty.
To clean and condition the vinyl cover:
1. Remove the cover from the spa and gently lean it against a wall or fence.
2. With a garden hose, spray the cover to loosen and rinse away dirt or debris.
3. Using a large sponge and/or a soft bristle brush, and using a very mild soap solution or
baking soda, scrub the vinyl top in a circular motion. Do not let the vinyl dry with a soap lm
on it before it can be rinsed clean.
4. Scrub the cover’s perimeter and side aps. Rinse clean with water.
5. Rinse o the underside of the cover with water only (use no soap), and wipe it clean with a
dry rag.
6. To condition the cover after cleaning, apply a thin lm of Arctic Pure
®
Cover and Cabinet Renew to the
vinyl surface and bu.
Weather Shield Care and Cleaning
Weather Shield
The material used to make covers is a solution dyed polyester fabric designed
to be exible and easy to maintain. Its urethane coating enhances the stability of the weave and allows for
greater water resistance, while also minimizing shrinkage and stretching. Weather Shield features a high UV,
water, mold and mildew resistance and has excellent tear and abrasion resistance.
1. Care and Cleaning: Weather Shield is designed to be easy to maintain. It can be washed, or
brushed o and rinsed. Proper care and cleaning is important to maximaize the life of all fabrics.
2. For normal Care and Cleaning: Add 2 ounces of mild soap such a Woolite or Dawn
dishwashering liquid to a gallon of lukewarm water. Clean the fabric with a “soft bristle brush”. Rinse
thoroughly cold water and air dry.
3. For Stubborn Stains: Make a mixture of bleach and water by adding a maximum of 1 cup
of bleach to 1 gallon of water. Spray the mixture on lightly to the fabric face (non-coated side). Do not
soak the fabric. Prolonged exposure to harsh chemicals can damage the coating. Rinse immediately.
Do not leave on for more than 2 minutes. Cleaning with harsh cleaners such as bleach will require a
retreatment like 303 High Tech Fabric Guard.
MANUAL SAFETY COVER
1818
Owners Manual - Arctic Spas®

Care of the Spa Cabinet
Cedar Cabinet:
When properly cared for, the wood cabinet of your spa will maintain its beauty
for many years. Your Arctic Spa cabinet has been specially treated with Olympic Maximum Wood Stain.
Use this stain or a similar product on a regular basis to protect the wood of the cabinet and keep your spa
looking great for years to come.
The easiest method of maintaining your cedar cabinet and to keep your cedar cabinet looking as good
as the day your spa was rst delivered, is to apply one coat of oil to your cedar cabinet twice a year. Just
before summer and again at the end of summer are the best times. In between oiling your cedar cabinet
you can also clean and rejuvenate your cedar cabinet with Arctic Pure Cover and Cabinet Renew.
No Maintenance Cabinet:
Hot soapy water is the best choice for cleaning the NOM cabinets. The NOM cabinets are a hard material
with a non-porous surface, therefore it does not readily stain and most spills do not stick. Any water- based
household cleaner can be used to clean the surface, including Windex, 409, Pledge, Murphy’s Oil Soap,
Simple Green and citrus cleaners. Avoid any cleaner that contains solvents or harsh chemicals. If unsure of
the cleaner, test on a small area before cleaning. Although not commonly necessary, the NOM cabinets can
be pressure-washed.
Winterizing Your Spa
If you plan to leave your spa unused for a long period of time in severely cold weather, you should drain the
spa to avoid accidental freezing due to a power or equipment failure.
We recommend your local authorized dealer winterize your spa. Freezing can severely damage your spa.
Improper winterizing of your spa can void your warranty.
1919
Owners Manual - Arctic Spas®

Water Maintenance
It’s important to have clean water. Water maintenance is one of the least understood, but very important
areas of spa ownership. Your dealer can guide you through the process of achieving and maintaining perfect
water in your spa, given your local conditions. Your program will depend on your water’s mineral content,
how often you use your spa, and how many people use it. Here is our suggested step-by-step program:
General Information
There are three fundamental areas of water maintenance. They are (1) Chemical Balance/pH Control, (2)
Water Sanitation, and (3) Water Filtration.
Although your spa’s lter system is working several hours a day to remove particles from your water, it does
not remove bacteria or viruses. Water sanitation is the responsibility of the spa owner. It can be achieved
through the regular and periodic (daily, if necessary) addition of an approved sanitizer. The sanitizer will
chemically control the bacteria and viruses present in the spa water. Bacteria and viruses can grow quickly in
under sanitized spa water. The water’s chemical balance and pH control are also the responsibility of the spa
owner. You will have to add chemicals to maintain proper levels of Total Alkalinity (TA), Calcium Hardness
(CH) and pH. Proper water balance and pH control will minimize scale buildup and corrosion of metals,
extend the life of the spa, and allow the sanitizer to work at maximum eciency.
For Onzen™ System: Please refer to your Onzen User Guide for direction in
water maintenance. (Pg.96)
For Spa Boy® System: Please refer to your Spa Boy Owners manual for
directions in water maintenance. (Pg.70)
Methods For Testing The Spa Water
Accurate water testing and analysis are an important part of eectively maintaining your spa water. To follow
the Arctic Spas
®
recommended program, you must have the ability to test for:
• Total Alkalinity (TA)
• Calcium Hardness (CH)
• pH
• Sanitizer
Although reagent liquid test kits provide the highest level of accuracy, Test Strips are the most convenient
testing method used by many spa owners. Keep in mind that test strips are susceptible to heat and moisture
contamination, and have limited lifespans which can result in inaccurate readings.Very high sanitizer levels
will also render test strips unreliable.
IMPORTANT: Always read and carefully follow the directions included with the Test Kit or Test Strips
to ensure the accuracy of the test results.
2020
Owners Manual - Arctic Spas®

Owners Manual - Arctic Spas®
Hints For Successful Water Testing
When using the reagent test kit:
• Always take water samples 30-45 cm (12” - 18”) below the water surface.
• Rinse the test cells before and after each use.
• Do not dispose of test samples into the spa water.
• When adding drops of chemicals from the kit (the reagents) into the test block, hold the
bottle vertically and add the drops slowly to be sure the correct quantity is used.
• The reagents should be replaced on a yearly basis to maintain the accuracy of the test
results.
Basic Chemical Safety
When using chemicals, read the labels carefully and follow directions precisely. Though chemicals protect
you and your spa when used correctly, they can be hazardous in concentrated form. Always observe the
following guidelines:
• ALWAYS KEEP CHEMICALS OUT OF CHILDREN’S REACH.
• NEVER MIX CONCENTRATED CHEMICALS TOGETHER.
• ALWAYS THOROUGHLY RINSE ANY CONTAINER USED TO MIX CHEMICALS
AFTER USE.
• ALWAYS RINSE OUT ANY EMPTY CHEMICAL STORAGE CONTAINER BEFORE
DISPOSAL.
• Accurately measure the quantities specied. Do not overdose your spa. Amount required
will vary depending on water condition, quantities to be used are only guidelines.
• Store chemicals in a cool, dry, well ventilated place.
• Always keep chemical containers closed when not in use.
• Don’t inhale fumes or allow chemicals to come in contact with your eyes, nose, or mouth.
Wash your hands immediately after use.
• Follow the emergency advice on the product label in case of accidental contact.
• Never smoke around chemicals. Some fumes can be ammable.
• Don’t store any chemicals in the spa equipment compartment.
Adding Chemicals to the Spa
Most chemicals (does not include any slow dissolving chemicals) can be added directly to the spa while the
pump(s) is running on high speed, for a minimum of 10 minutes.
IMPORTANT WHEN USING ARCTIC PURE
®
BOOST OR REFRESH TREAT-
MENT
NOTE: After administering a super chlorination treatment or non-chlorine shock to your spa, leave the
cover open for a minimum of 20 minutes to allow the oxidizer gas to vent. A high
concentration of trapped oxidizer gas which may exist as a result of the shock treatment (not daily sanita-
tion) may eventually cause discoloration or vinyl degradation to the bottom of the cover. This type of dam-
age is considered chemical abuse and is not covered under warranty.
The Arctic Pure
®
Water Maintenance Program
Following the Arctic Pure
®
water maintenance program will save you time and frustration and ensure clear,
clean spa water.
2121

Owners Manual - Arctic Spas®
Remove Excess Minerals
Most tap water has minerals such as Calcium, Copper, Iron, Manganese and Sodium in it, and the
circulation of water can cause the erosion of metals from spa equipment which can present possible scaling
and staining problems in your spa. Cases of source water with high minerals (such as some well water):
- 1. We recommend you add 3 1/2 tablespoons (48 grams) of Arctic Pure
®
Best Defense
per 1000 litres (265 gallons) of water while lling your spa.
Balance the Total Alkalinity (TA)
1. The recommended Total Alkalinity (TA) for your spa water is 80-120 ppm.
2. Total Alkalinity is a measure of the total levels of carbonates, bicarbonates, hydroxides, and
other alkaline substances in the water. TA is referred to as the water’s “pH buer”. In other
words, it’s a measure of the ability of the water to resist changes in pH level.
3. If the TA is too low, the pH level will uctuate widely from high to low. Fluctuations in pH
can cause corrosion or scaling of the spa components. Low TA can be corrected by adding
Arctic Pure
TM
Perfect Balance.
4. If the Total Alkalinity is too high, the pH level will tend to be high and may be dicult to bring down. The
pH can be lowered by using Arctic Pure
®
Adjust Down.
5. Once the TA is balanced, it normally remains stable, although some sanitizers, and the
addition of more water with a high or low alkalinity will raise or lower the TA reading of the
water.
6. When the Total Alkalinity is within the recommended range, proceed to the next step.
Balancing the pH
1. We recommended a pH range for your spa water of; 7.2-7.6
.
2. The pH level is the measure of acidity and alkalinity. Values above 7 are alkaline; those
below 7 are acidic. Maintaining the proper pH level is extremely important for:
• Optimizing the eectiveness of the sanitizer.
• Maintaining water that is comfortable for the user.
• Preventing equipment deterioration.
• Preventing cloudy or odorous water.
3. If the spa water’s pH level is too low, the following may result:
• The sanitizer will dissipate rapidly.
• The water may become irritating to spa users.
• The spa’s equipment may corrode.
If the pH is too low, it can be increased by adding Arctic Pure
®
Adjust Up to the spa water.
4. If the pH level is too high, the following may result:
• The sanitizer is less eective.
• Scale will form on the spa shell surface and the equipment.
• The water may become cloudy.
If the pH is too high, it can be decreased by adding Arctic Pure
®
Adjust Down to the spa water.
5. It is important to check the pH on a regular basis. The pH will be aected by the bather
load, the addition of new water, the addition of various chemicals, and the type of sanitizer
used.
6. When the pH is within the recommended range, proceed to the nal step.
2222

Owners Manual - Arctic Spas®
Calcium Hardness (CH)
Most spa manufacturers recommend a Calcium Hardness (CH) level for your spa of 150-200
ppm. However, we do not recommend adding calcium to your spa if your spa water is
above 100 ppm, or if your incoming water has a very low level of calcium hardness.
Warning: When calcium falls out of suspension it can collect on the heater and pump, and
shorten their life.
Sanitize the Spa
Sanitizer is extremely important for killing algae, bacteria and viruses, and preventing unwanted organisms
from growing in the spa. At the same time, you don’t want too high a sanitizer level, or it can irritate your
skin, lungs and eyes.
1. Always maintain the sanitizer level in your spa at the recommended level for each type of
sanitizer.
2. We recommend the following sanitizers:
Chlorine System:
• Arctic Pure
®
Chlorine Tablets
• Arctic Pure
®
Refresh
• Arctic Pure
®
Boost
Important: Sanitizers are acidic and will decrease the Total Alkalinity. Regular testing and balancing of
TA is extremely important with these products.
Important: Always remove the oating dispenser while the spa is in use.
Remove dispensers with a plastic bucket (keeping submerged) and store out of reach of children until spa
use has ended.
Using Chlorine System
CAUTION: The use of personal protective equipment (rubber/latex/vinyl gloves, eye protection) is
recommended while handling the dispenser or the pucks.
Start-up:
1. Add pucks to oating dispenser and open to setting 4.
2. Add 7 tablespoons (100 grams) of Arctic Pure
®
Refresh per 1500 litres (396 gallons) of
water.
3. Add 1 tablespoon (14 grams) of Arctic Pure
®
Spa Boost per 1000 litres (265 gallons) of
water.
4. Test the Chlorine level. Once the chlorine reads within the ideal range (1-3 ppm) turn tablet
dispenser down to 1 - 2 (more or less according to bather load).
Weekly:
1. Add pucks to oating dispenser and reset the setting if necessary.
2. Add 7 tablespoons (100 grams) of Arctic Pure
®
Refresh per 1500 litres (396 gallons) of
water.
Important: Arctic Pure
®
Refresh signicantly reduces pH and TA. One hour after adding Arctic
Pure
®
Refresh test and adjust TA and pH as needed.
2323
Common Spa Water Problems~Cause & Remedy
A. High concentration of contaminants using up sanitizers
B. Test kit reagents ineective
NO CHLORINE
READING
A. pH too low
B. Combined chlorine due to high concentration of organic contaminants
C. Allergic reaction to sanitizer
D. Bacterial contamination
EYE/SKIN IRRITA-
TION
A. High level of organic contaminants, combined with chlorine
ODOR
A. High Calcium level, high pH, high alkalinity
SCALE DEPOSITS
A. High concentration of oils and organics being agitated by the jets and/or
Therapy Air
FOAMING
A. Dissolved metals from water source
B. Low chlorine levels
C. Fragrance
COLOURED WATER
A. Poor Filtration
B. Suspended particles
C. Organic contaminants build up
D. pH high
E. Total alkalinity high
F. Combined chlorine in the water
G. High dissolved solids
H. Hardness too high
CLOUDY WATER
POSSIBLE CAUSES
PROBLEM
2424
A. Add sanitizers until levels are up to the recommended levels
B. Replace test kits at least once a year
C. Chlorine level very high and is bleaching test reagent, Allow sanitizer levels to recede by open-
ing cover and running jets.
A. Add Arctic Pure
®
Adjust Up until level reads 7.2 - 7.6 ppm
B. Add Arctic Pure
®
Refresh, add Boost.
C. Change from Bromine to Chlorine.
D. Drain and rell spa.
A. Check pH and adjust as required.
B. Shock with Arctic Pure
®
Refresh, add Boost.
C. Dilution of water will reduce contaminants and odor.
D. Check any ozone system is operational
A. Drain partially, add Arctic Pure
®
Best Defence, correct pH level to 7.2 - 7.6 and alkalinity to 100-
130 ppm.
A. Shock treatment with Arctic Pure
®
Refresh.
A. High concentration of oils and organics being agitated by the jets and/or
Therapy Air
A. Use Arctic Pure
®
Best Defence and have your dealer check your water balance
B. Add Arctic Pure
®
Boost treatment to raise chlorine levels and test chlorine levels.
C. Stop the use of fragrance
A. Dirty Filter. If you are using a pleated lter clean with Arctic Pure Filter Restore. If you are us-
ing a disposable lter you may need to change the lter for a fresh one. If you believe the lter is
ok then try increasing the ltration times via the topside control, app, or via the web portal at
myarcticspa.com
B. Add Arctic Pure
®
Easy Clear (Not with disponsable Filter)
C. Shock treatment with Arctic Pure
®
Refresh
D. Add Arctic Pure
®
Adjust Down until level reads 7.2-7.6
E. Add Arctic Pure
®
Adjust Down to adjust TA level to 80-120 ppm
F. Shock treatment with Arctic Pure
®
Refresh
G. Empty spa and rell
H. Add Arctic Pure
®
Best Defence until level reads 100-280 ppm
SOLUTIONS
2525

2626
Troubleshooting Spa Problems
1. Nothing functions: The GFCI Breaker has tripped or there is a power failure.
Test GFCI Breaker. Turn breaker back on and see if spa powers up, if not contact your
factory authorized dealer.
2. Spa does not heat: Check to see if the heat indicator is on or there are any error
messages on the topside control panel. If the heat indicator is on and no error
message appears contact your factory authorized dealer.
3. Poor Jet Pressure: First check to see that the jet(s) are turned on fully. Check your
lter to see if it’s clogged or dirty. Next, check to see if the jet(s) are obstructed or if the
venturi air dial is turned on. Finally, check to see if the jet(s) are surging. If so, your
pump is cavitating (sucking in air). This usually occurs when the water level is too low
and can be solved by adding water to the spa. If the problem still persists, contact
your factory authorized dealer.
4. Light is not functioning: Follow the LED replacement section.
5. Spa comes on by itself: This function is normal when heating and ltering.
No action required.
6. Spa doesn’t drain completely: The spa is drained by gravity. It will not always
drain fully. It is not necessary to drain the spa in its entirety except when winterizing
the spa. If you wish to remove the last little bit of water, we recommend you vacuum it
out with a wet/dry vacuum.
Technical Support:
Instructional videos are available to assist you at http://www.arcticspas.com/support/
Owners Manual - Arctic Spas®

2727
Important
This manual and its contents are subject to change without notice. Although Blue Falls Manufacturing has
prepared this manual as accurately and precisely as possible, Blue Falls Manufacturing will not be liable for
loss, injury or damages caused by improper servicing or by use of spa (improper or otherwise).
Arctic Spas
®
are Canadian built with the nest materials and advanced technology to withstand the harshest
weather conditions. Performance and Reliability is the Arctic Spas
®
Customer Guarantee. If your spa cannot
be repaired under our extensive warranty, Arctic Spas
®
will provide a replacement spa equal in value to the
original purchase price of the defective spa. Our philosophy Guarantees you Customer Satisfaction. These
are words we will stand behind in writing.
Owners Manual - Arctic Spas®
2828
Uncompromised Excellence
Unsurpassed Comfort, Construction and Technology
completely custom built to your needs
Custom Series

Specications
Owners Manual - Custom Series
Outside
Dimensions
Height
Heater
(watts)
Water
Capacity
Dry
Weight
Electrical
Requirements
North America
A = actual / B = breaker
Electrical
Requirements
Europe
Summit XL
117’’ x 93’’
297 x 235 cm
39’’
98 cm
NA / Euro
5500 / 2x3600
537 Gallons
2033 Liters
1057 Lbs
479 Kg
240 Volts / 6 Gauge Wire
1 Pump / A32amp / B40amp
2 Pumps / A40amp / B50amp
3 Pumps / A40amp / B50amp
4 Pumps / A48amp / B60amp
115 Volts / 14 Gauge Wire
1 Pump / A12amp / B15amp
1Øx32 Amp
3Øx16 Amp
(4 pumps = 1Øx40 Amp
3Øx-16 Amp /
3Øx20 Amp /
3Øx25 Amp)
Summit
93’’ x 93’’
235 x 235 cm
39’’
98 cm
NA / Euro
5500 / 2x3600
360 Gallons
1363 Liters
935 Lbs
424 Kg
240 Volts / 6 Gauge Wire
1 Pump / A32amp / B40amp
2 Pumps / A40amp / B50amp
3 Pumps / A40amp / B50amp
4 Pumps / A48amp / B60amp
115 Volts / 14 Gauge Wire
1 Pump / A12amp / B15amp
1Øx32 Amp
3Øx16 Amp
(4 pumps = 1Øx40 Amp
3Øx-16 Amp /
3Øx20 Amp /
3Øx25 Amp)
Tundra
93’’ x 93’’
235 x 235 cm
39’’
98 cm
NA / Euro
5500 / 2x3600
411 Gallons
1556 Liters
951 Lbs
431 Kg
240 Volts / 6 Gauge Wire
1 Pump / A32amp / B40amp
2 Pumps / A40amp / B50amp
3 Pumps / A40amp / B50amp
4 Pumps / A48amp / B60amp
115 Volts / 14 Gauge Wire
1 Pump / A12amp / B15amp
1Øx32 Amp
3Øx16 Amp
(4 pumps = 1Øx40 Amp
3Øx-16 Amp /
3Øx20 Amp /
3Øx25 Amp)
Kodiak
93’’ x 93’’
235 x 235 cm
39’’
98 cm
NA / Euro
5500 / 2x3600
342 Gallons
1295 Liters
973 Lbs
441 Kg
240 Volts / 6 Gauge Wire
1 Pump / A32amp / B40amp
2 Pumps / A40amp / B50amp
3 Pumps / A40amp / B50amp
4 Pumps / A48amp / B60amp
115 Volts / 14 Gauge Wire
1 Pump / A12amp / B15amp
1Øx32 Amp
3Øx16 Amp
(4 pumps = 1Øx40 Amp
3Øx-16 Amp /
3Øx20 Amp /
3Øx25 Amp)
Klondiker
93’’ x 93’’
235 x 235 cm
39’’
98 cm
NA / Euro
5500 / 2x3600
373 Gallons
1412 Liters
944 Lbs
428 Kg
240 Volts / 6 Gauge Wire
1 Pump / A32amp / B40amp
2 Pumps / A40amp / B50amp
3 Pumps / A40amp / B50amp
4 Pumps / A48amp / B60amp
115 Volts / 14 Gauge Wire
1 Pump / A12amp / B15amp
1Øx32 Amp
3Øx16 Amp
(4 pumps = 1Øx40 Amp
3Øx-16 Amp /
3Øx20 Amp /
3Øx25 Amp)
Frontier
93’’ x 85’’
235 x 217 cm
39’’
98 cm
NA / Euro
5500 / 2x3600
335 Gallons
1268 Liters
785 Lbs
356 Kg
240 Volts / 6 Gauge Wire
1 Pump / A32amp / B40amp
2 Pumps / A40amp / B50amp
3 Pumps / A40amp / B50amp
115 Volts / 14 Gauge Wire
1 Pump / A12amp / B15amp
1Øx32 Amp
3Øx16 Amp
(3 pumps = 1Øx40 Amp
3Øx-16 Amp /
3Øx20 Amp /
3Øx25 Amp)
Yukon
85’’ x 85’’
217 x 217 cm
41’’
104 cm
NA / Euro
5500 / 2x3600
334 Gallons
1264 Liters
735 Lbs
333 Kg
240 Volts / 6 Gauge Wire
1 Pump / A32amp / B40amp
2 Pumps / A40amp / B50amp
3 Pumps / A40amp / B50amp
115 Volts / 14 Gauge Wire
1 Pump / A12amp / B15amp
1 phase x 32 Amp
or
3 phase x 16 Amp
3 pumps
Cub
85’’ x 85’’
217 x 217 cm
41’’
104 cm
NA / Euro
5500 / 2x3600
275 Gallons
1041 Liters
741 Lbs
336 Kg
240 Volts / 6 Gauge Wire
1 Pump / A32amp / B40amp
2 Pumps / A40amp / B50amp
3 Pumps / A40amp / B50amp
115 Volts / 14 Gauge Wire
1 Pump / A12amp / B15amp
1 phase x 32 Amp
or
3 phase x 16 Amp
3 pumps
Arctic Fox
69’’ x 85’’
174 x 217 cm
39’’
98 cm
NA / Euro
5500 / 2x3600
208 Gallons
787 Liters
611 Lbs
277 Kg
240 Volts / 6 Gauge Wire
1 Pump / A32amp / B40amp
2 Pumps / A40amp / B50amp
115 Volts / 14 Gauge Wire
1 Pump / A12amp / B15amp
1 phase x 32 Amp
or
3 phase x 16 Amp
2 pumps
Ocean
172’’ x 93’’
436 x 236 cm
51’’
129 cm
NA / Euro
5500 / 2x3600
1347 Gallons
5100 Liters
1910 Lbs
866 Kg
240 Volts / 6 Gauge Wire
1 Pump / A32amp / B40amp
2 Pumps / A40amp / B50amp
3 Pumps / A40amp / B50amp
4 Pumps / A48amp / B60amp
115 Volts / 14 Gauge Wire
1 Pump / A12amp / B15amp
1Øx32 Amp
3Øx16 Amp
(4 pumps = 1Øx40 Amp
3Øx-16 Amp /
3Øx20 Amp /
3Øx25 Amp)
Okanagan
172’’ x 93’’
436 x 236 cm
51’’
129 cm
NA / Euro
5500 / 2x3600
1347 Gallons
5100 Liters
1910 Lbs
866 Kg
240 Volts / 6 Gauge Wire
1 Pump / A32amp / B40amp
2 Pumps / A40amp / B50amp
3 Pumps / A40amp / B50amp
4 Pumps / A48amp / B60amp
115 Volts / 14 Gauge Wire
1 Pump / A12amp / B15amp
1 phase x 32 Amp
or
3 phase x 16 Amp
3 pumps
2929
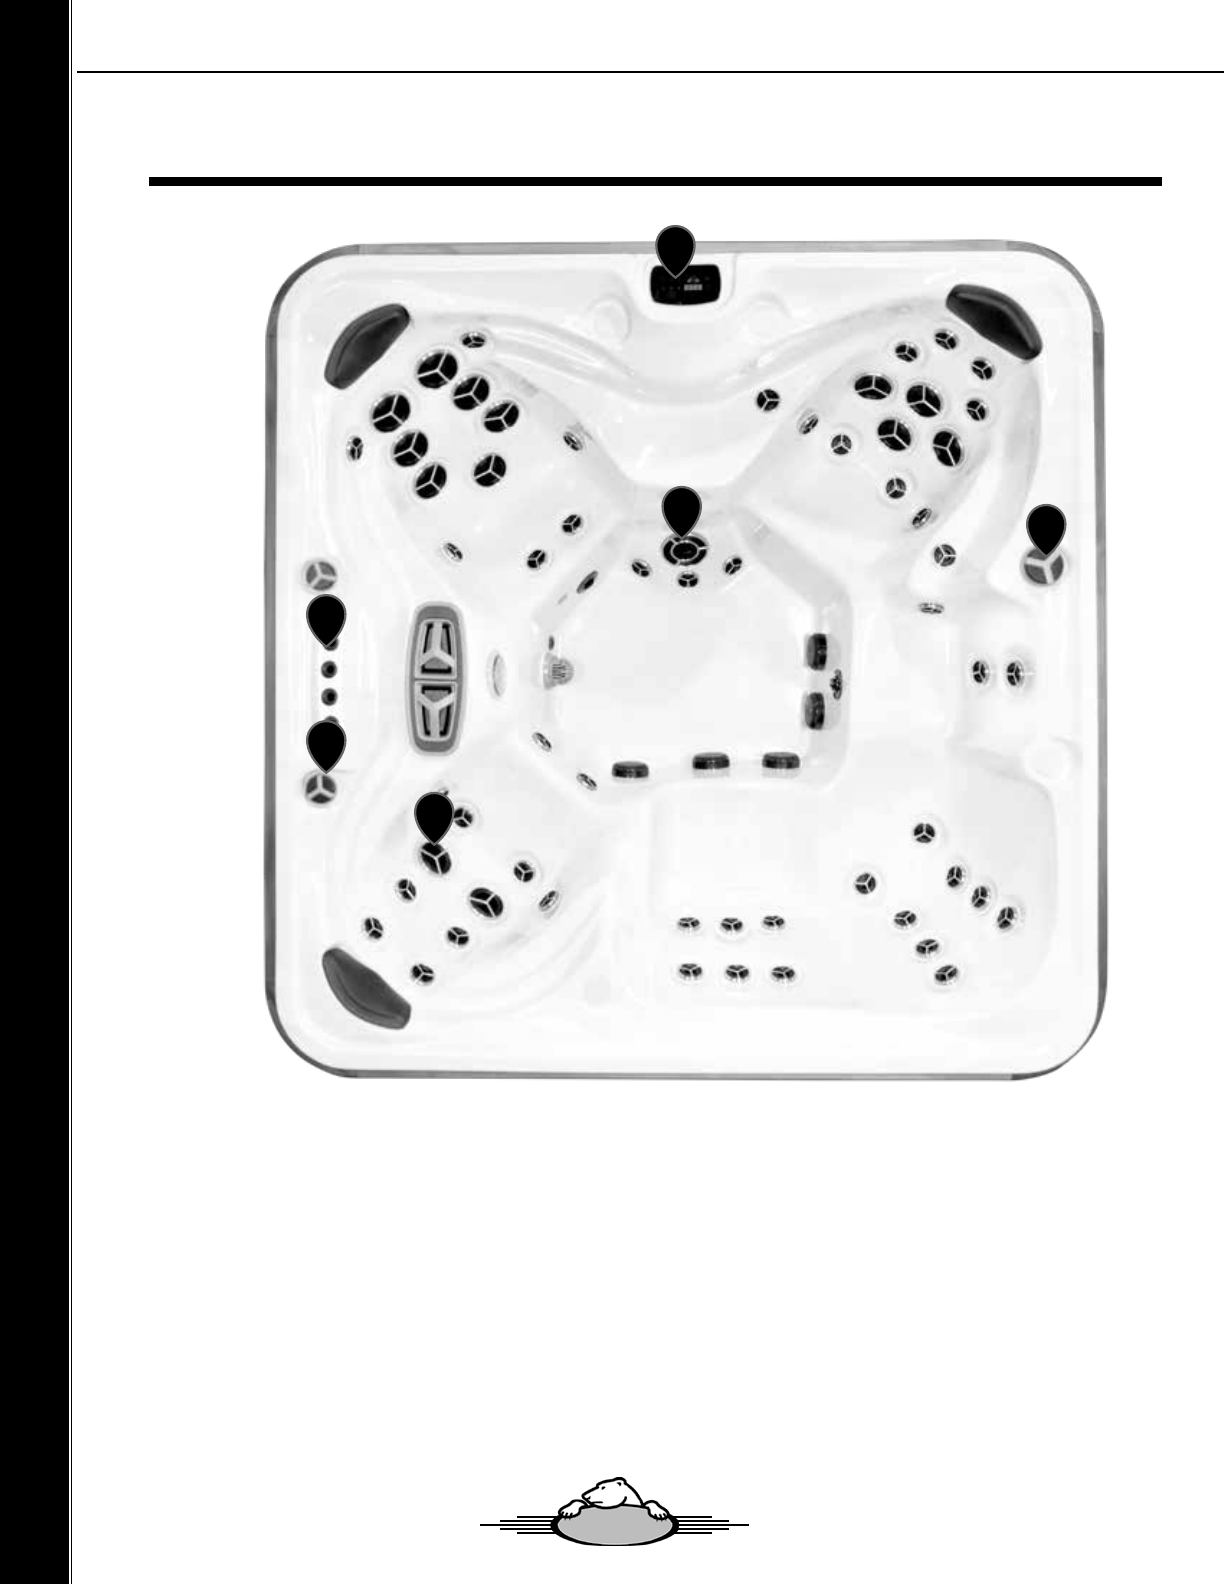
A: Topside Control | See Topside Control Overview section in this manual.
B: Waterspouts | Control by an ON/OFF valve.
C: Monsoon Jet
D: Jets | All jets are adjustable and can be turned ON/OFF and can also be locked in the fully ON position,
simply by rotating the Jet face.
E: Diverter | If your spa is equipped with a Diverter, its purpose is to distribute water pressure to varying
jets or provide water pressure to the Monsoon Jet or both.
F: Venturi | Allows air into jets to boost jet performance when Pump 1 is on. Leave in the “closed” position
when spa is not in use.
Spa Overview
A
F
E
B
D
C
Owners Manual - Custom Series
3030
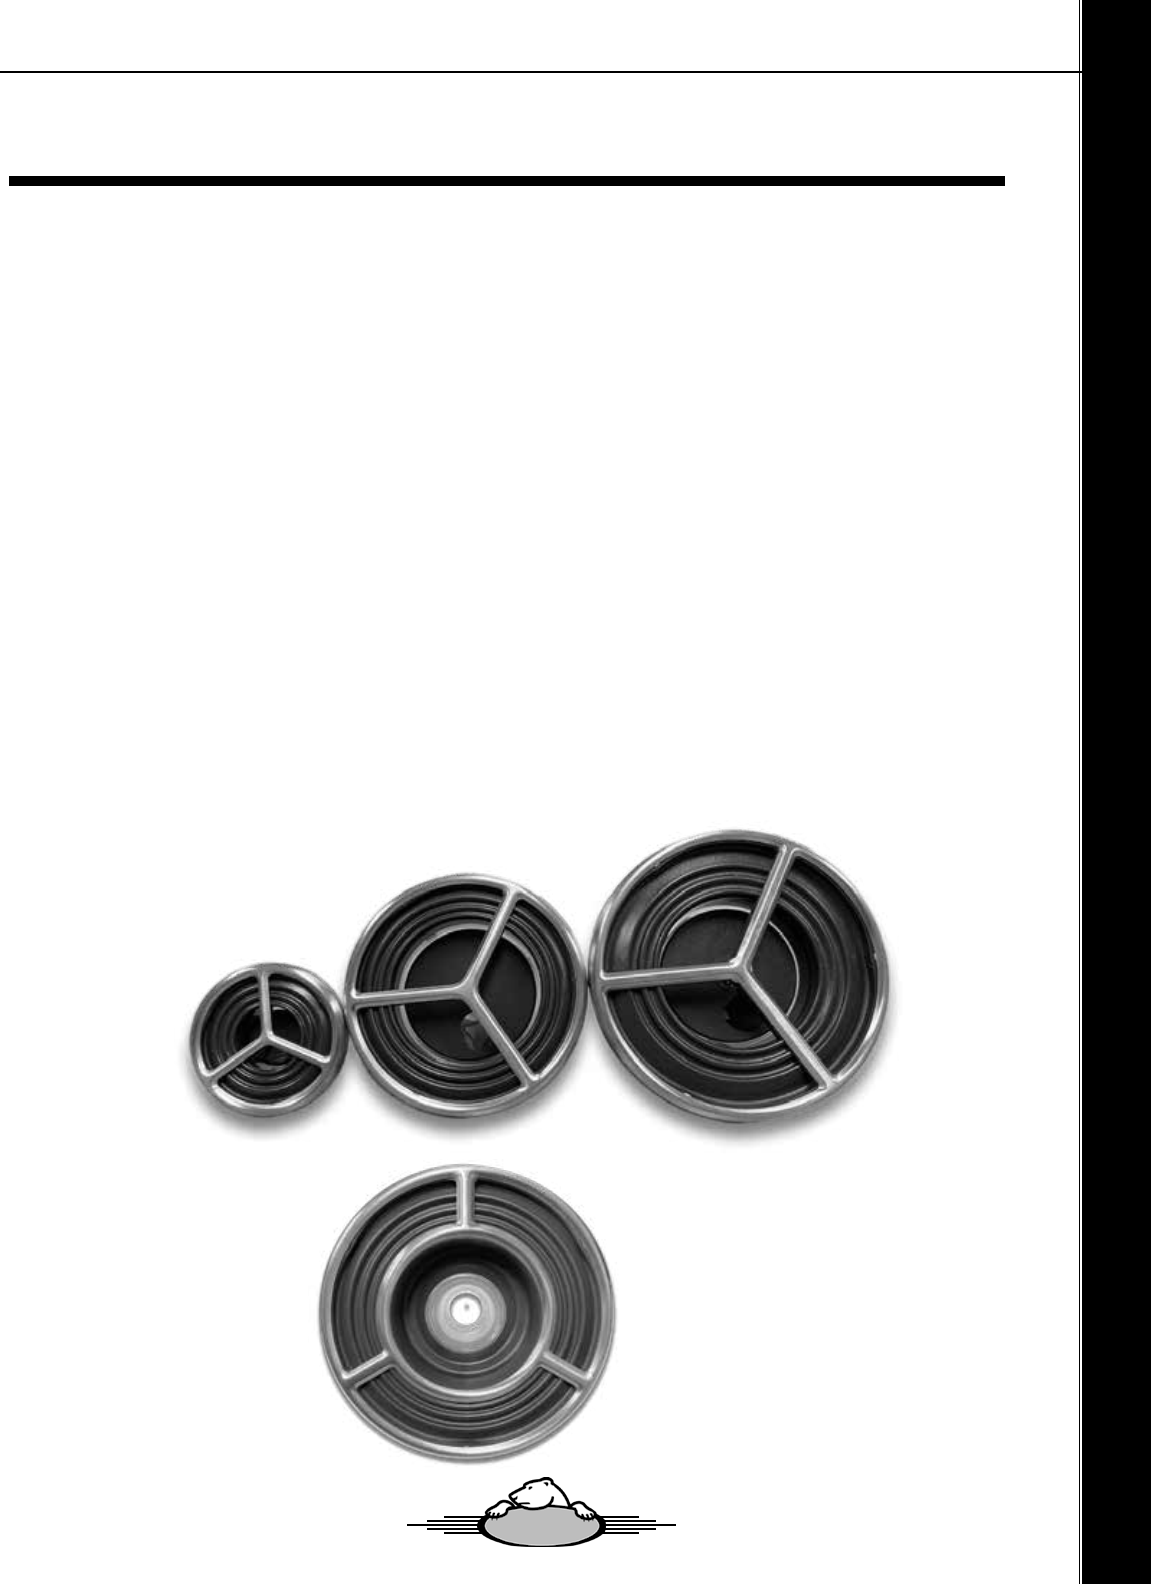
Jets
Three Inch (3”) Jets
The Single jets give a wide circular massage. The 3-inch jets are designed for a thorough massage of the
muscles in your upper back, shoulders and neck. These jets are adjustable by turning the face of the jet
clockwise for a stronger ow and counter-clockwise for a softer ow and eventually o. The Jet can also be
locked in the fully ON (open) position by turning the face of the jet clockwise until it does not go any further.
Then rotate again to allow the jet to override the lock stop.
Five Inch (5”) Jets
The ve-inch Hydro-massage jets give a wide circular massage. These jets are adjustable by turning the
face of the jet clockwise for a stronger ow and counter-clockwise for a softer ow and eventually o. The
Jet can also be locked in the fully ON (open) position by turning the face of the jet clockwise until it does not
go any further. Then rotate again to allow the jet to override the lock stop.
SDS (7”) Jets
With the SDS jetting conguration there are 6 large 7” jets with a dedicated pump driving just those 6 jets.
It is the ultimate massage for those that need to dig a little deeper to take away those aches and pains.
Monsoon Jet
The Monsoon Jet is a large hydro-massage jet designed to maximize massaging action on a specic area
of the body. It is located in the lower part of the spa to allow easy access for massaging feet, legs, hips and
lower back. The intensity of the Monsoon Jet can be altered using the Diverter (the location varies depend-
ing on spa model). Consult your local dealer regarding which diverter lever or just jump in and experiment for
yourself.
Owners Manual - Custom Series
3”
5”
7”
Monsoon
3131
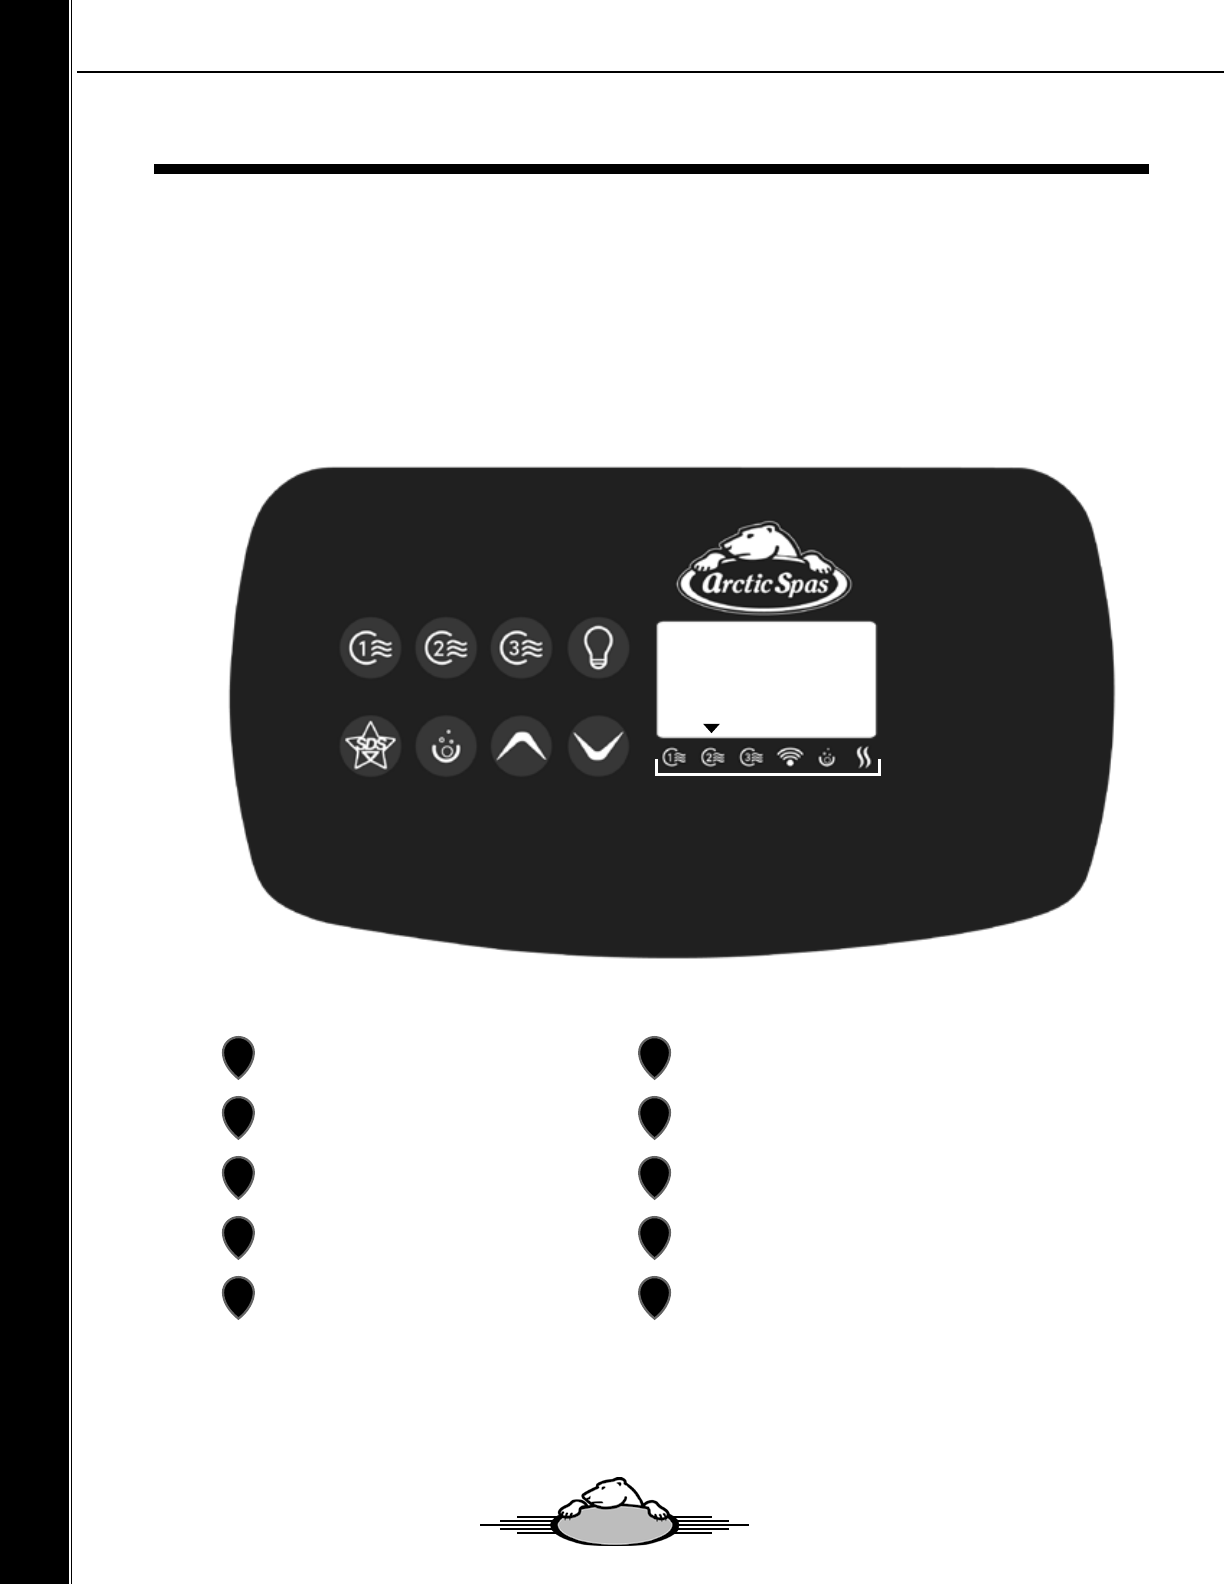
Topside Control Panel
Your spa control has been specically designed so that by simply connecting the spa to a properly
grounded source, and following the start-up procedures in this manual, the spa will automatically heat to the
set temperature. Many other functions, such as ltration, safety checks and maintenance reminders have
been automated so that your spa experience will be as carefree as possible.
But you’re in charge! The topside control (TSC) panel allows you to set the temperature, initiate the
ltration cycle, control the lights, and activate or deactivate the pump(s). The TSC display responds to let
you know you have pressed a button, and that the selected function has been performed.
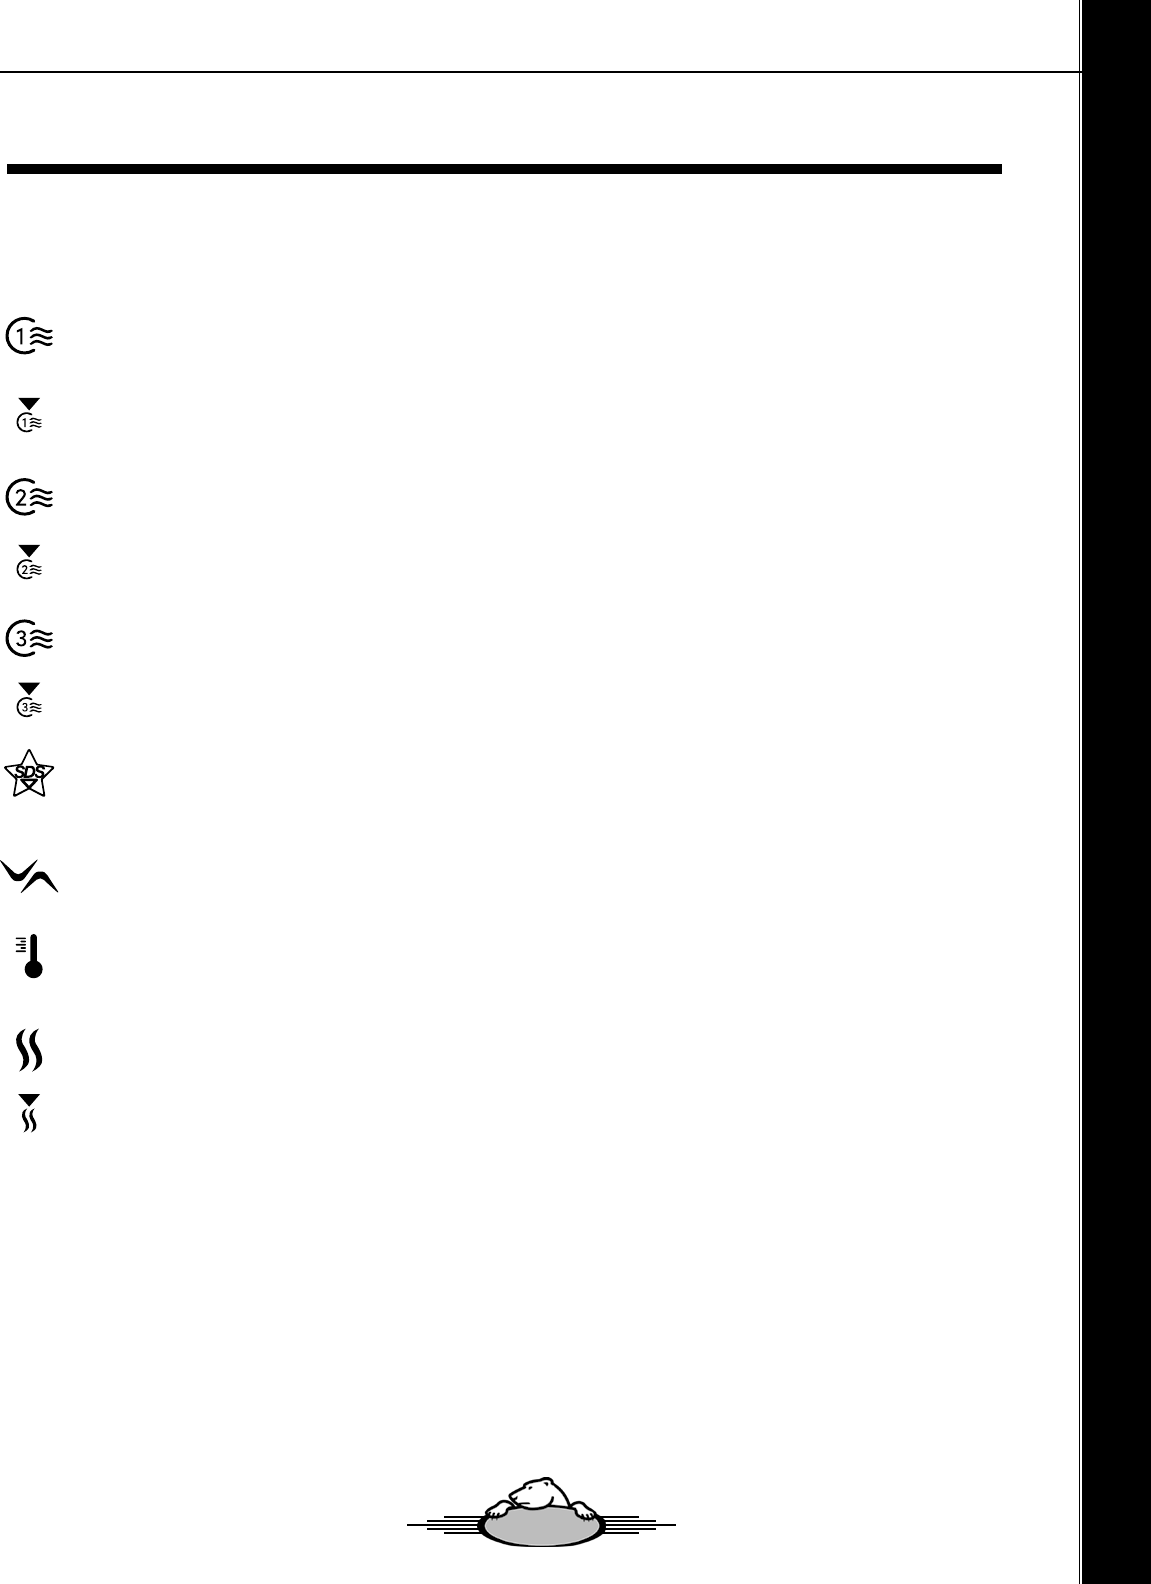
Pump 2
Pump 3
Light Control
SDS Control
Pump 1
A
B
C
D
E
Setting / YESS
Up Arrow
Down Arrow
Display
Function Indicator Section
A small inverted triangle over the symbol indicates
that the corresponding function is active.
F
G
H
I
J
A
E
B
F
C
G
D
H J
I
Owners Manual - Custom Series
3232
Quick Reference Guide
Starting Pump 1
Press Pump 1 button to turn on at low speed. Press a second time
to turn Pump 1 to high speed. A third time turns the Pump 1 off. A
built in timer automatically turns Pump 1 off after 20 minutes,
unless it has been manually deactivated.
The Pump 1 indicator lights up when Pump 1 is on high speed and
flashes when Pump 1 is on Low speed.
Starting Pump 2
Press Pump 2 button to turn on Pump 2. Press a second time
turns Pump 2 off. A built in timer automatically turns Pump 2 off
after 20 minutes, unless it has been manually deactivated.
The Pump 2 indicator lights up when Pump 2 is on high speed.
Starting Pump 3
Press Pump 3 button to turn on Pump 3. Press a second time
turns Pump 3 off. A built in timer automatically turns Pump 3 off
after 20 minutes, unless it has been manually deactivated.
The Pump 3 indicator lights up when Pump 3 is on high speed.
Starting SDS
Press SDS button to turn on SDS. Press a second time turns SDS
off. A built in timer automatically turns SDS off after 20 minutes,
unless it has been manually deactivated SDS.
Setting Water Temperature
Use the Up or Down Arrow button to regulate water temperature.
The temperature setting will be displayed for 5 seconds to confirm
your new selection.
Water temperature can be adjusted by 1˚ increments from 59˚F to
104˚F (15˚C to 40˚C). The temperature symbol indicates the
desired temperature, NOT the current water temperature.
Automatic Water Heater Start
When water temperature is 1ºF (0.5ºC) lower than the Set Point,
the water will automatically turn on & heat until the water tempera-
ture reaches 1ºF (0.5ºC) above the Set Point.
The Heater indicator lights up when the heater is on.
Spa Boy® Boost (if equipped)
Press and hold the Pump 2 key for 10 seconds to initiate Spa
Boy® Boost which runs the Spa Boy®electrode for 30 minutes
regardless of the ORP setting. When activeted “Sbb” will be
displayed.
Temperature Unit
Press and hold the light button for 5 seconds to toggle between ˚F
and ˚C.
Turning The Lights On
If your spa is equipped with an original lighting package, you can
toggle through the color options by pressing the Light button
on/off. Press Light button to turn on. Press a second time to turn
lights off. A built in timer will automatically turn the lights off after
2 hours unless it has been deactivated. The Light indicator is
displayed when the lights are on.
Boost Mode
Press and hold Pump 2 button for 10 seconds to enable Boost
Mode. In this mode, Pump 1 high speed and the ozonator will run
for 45 minutes. When this is enabled, “boo” is displayed on the
control Pad. This mode is used to speed up filtration after inten-
sive use of the spa or to help chemicals just added to the spa.
Pressing any button will exit Boost Mode.
Fogger Waterfall
The Fogger Waterfall is controlled by pressing and holding the
Light Button for 2 seconds. This will activate the Lights, Fogger
and the small Pump that operates the system. Pressing the “Light
Button once will turn the Fogger/Waterfall off. The system will stay
activated for 2 hours unless it has been manually turned off using
the Light button.It is advisable on first start up or restart that water
is put into the opening of the Fogger/Waterfall to fill up the area to
prevent premature damage to the Fogger unit.
Pad lockout:
There are two modes you can choose from: Full or Partial lock.
Full lock means that all keypad functions are locked. Partial lock
means that only the basic functions will remain accessible
(pumps, blower, light).
Locking your digital control pad:
Press and hold SDS button for 5 seconds. The display will show
”LocP”, with “P” representing partial lock. Release the button and
the keypad will be in Partial lock mode. Keep button pressed
down for 5 more seconds if you want to be in Full lock mode. The
“LocF” message will then be displayed.
When control pad is locked, all automatic functions will run as
usual. If a button is pressed down, a “LocP” or “LocF” message
will be displayed for 1 second. To unlock the keypad, simply press
and hold SDS button again for 5 seconds.
Owners Manual - Custom Series
3333
Please note: You will see the options that are applicable to your spa. If you have neither ozone nor onzen, you will
proceed directly into setting your Filter Duration. Also, though an Epic topside is of a dierent design, the steps are as
shown. You can move backwards through the settings by pressing the Pump 3 button (Pump 4 on Epic series spas).
The Pump 1 button will allow you to exit without saving any changes. When you get to the end of the options, press the
lter key one last time to save changes and begin a lter cycle immediately. If you do not press the lter key again your
changes will be saved and the lter cycle will begin when you have programmed it to do so.
During a lter cycle
- Pump 2, Pump 3 and the blower run for 20 seconds, then
- Pump 1 runs at low speed for the programmed number of hours (see below), and
- The ozonator is turned on.
45 Minute lter cycle time-out: If you turn a pump, blower or light on during a lter cycle, the cycle will be
interrupted and will only resume 45 minutes after you ( or the system ) have turned the last active output o.
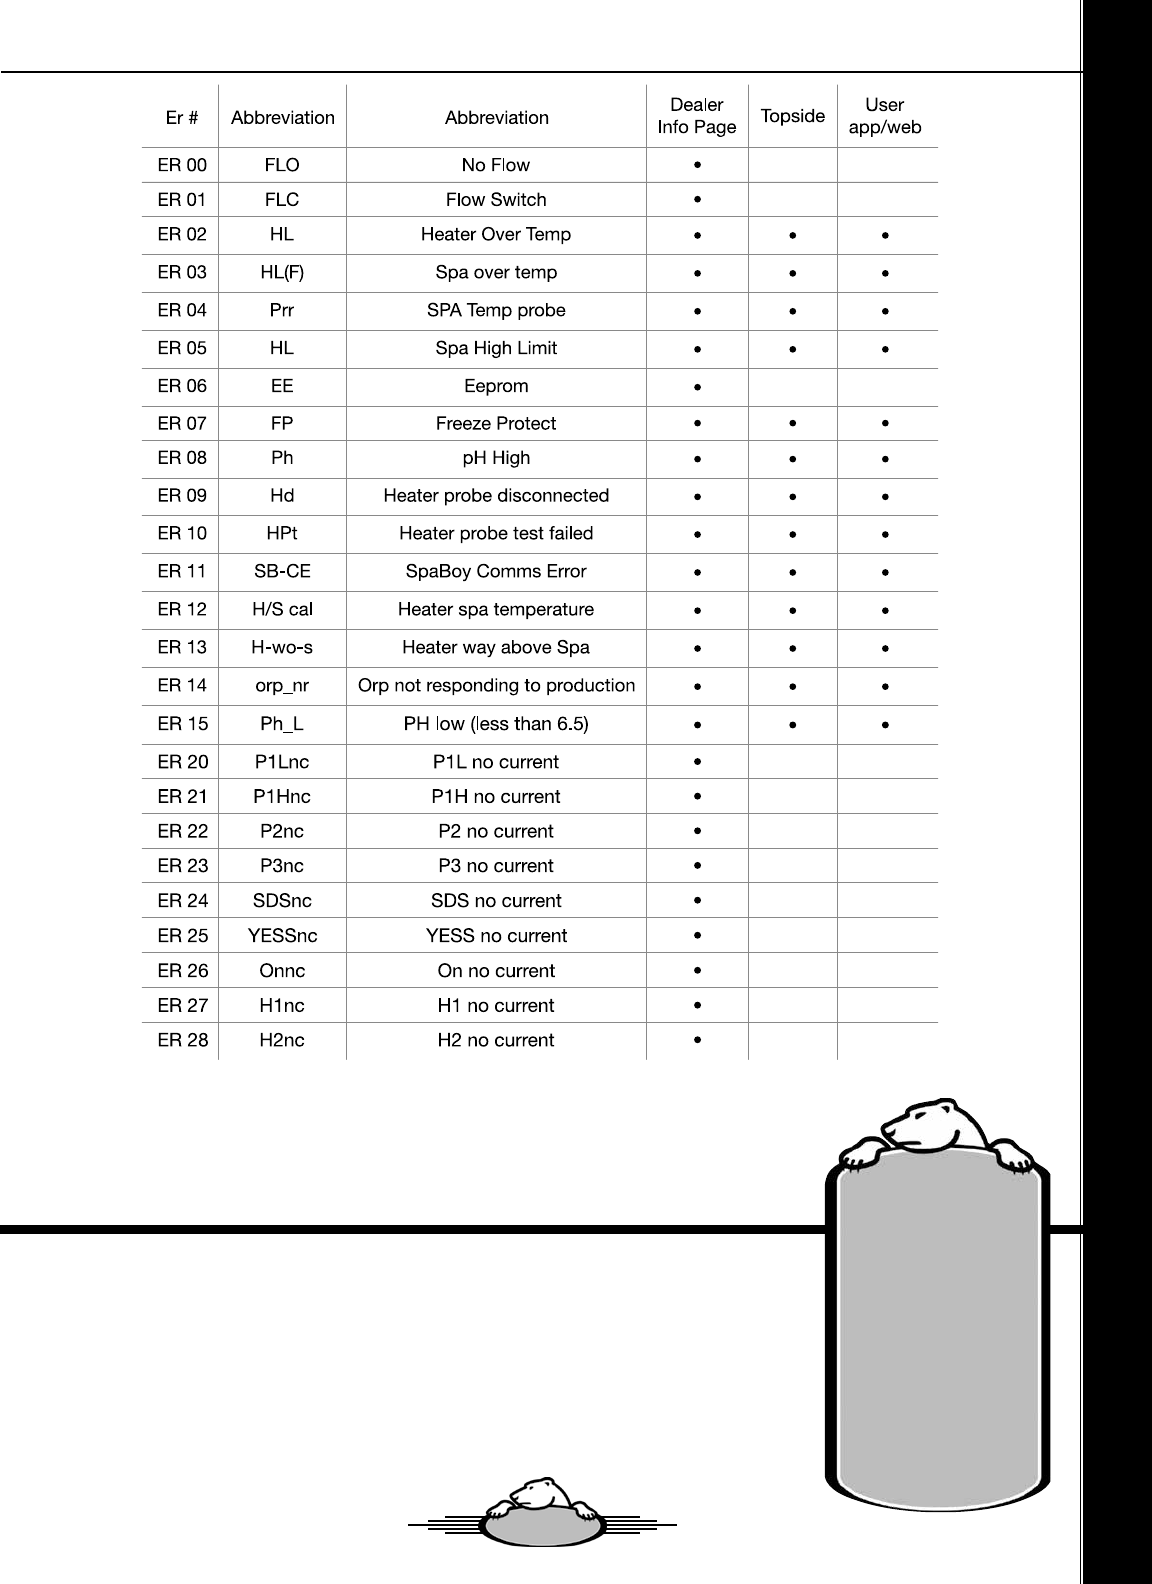
ER01 – Flow Switch ER03 - Spa Over Temp
ER02 - Heater Over Temp ER04 – SPA Temp probe
Error Codes
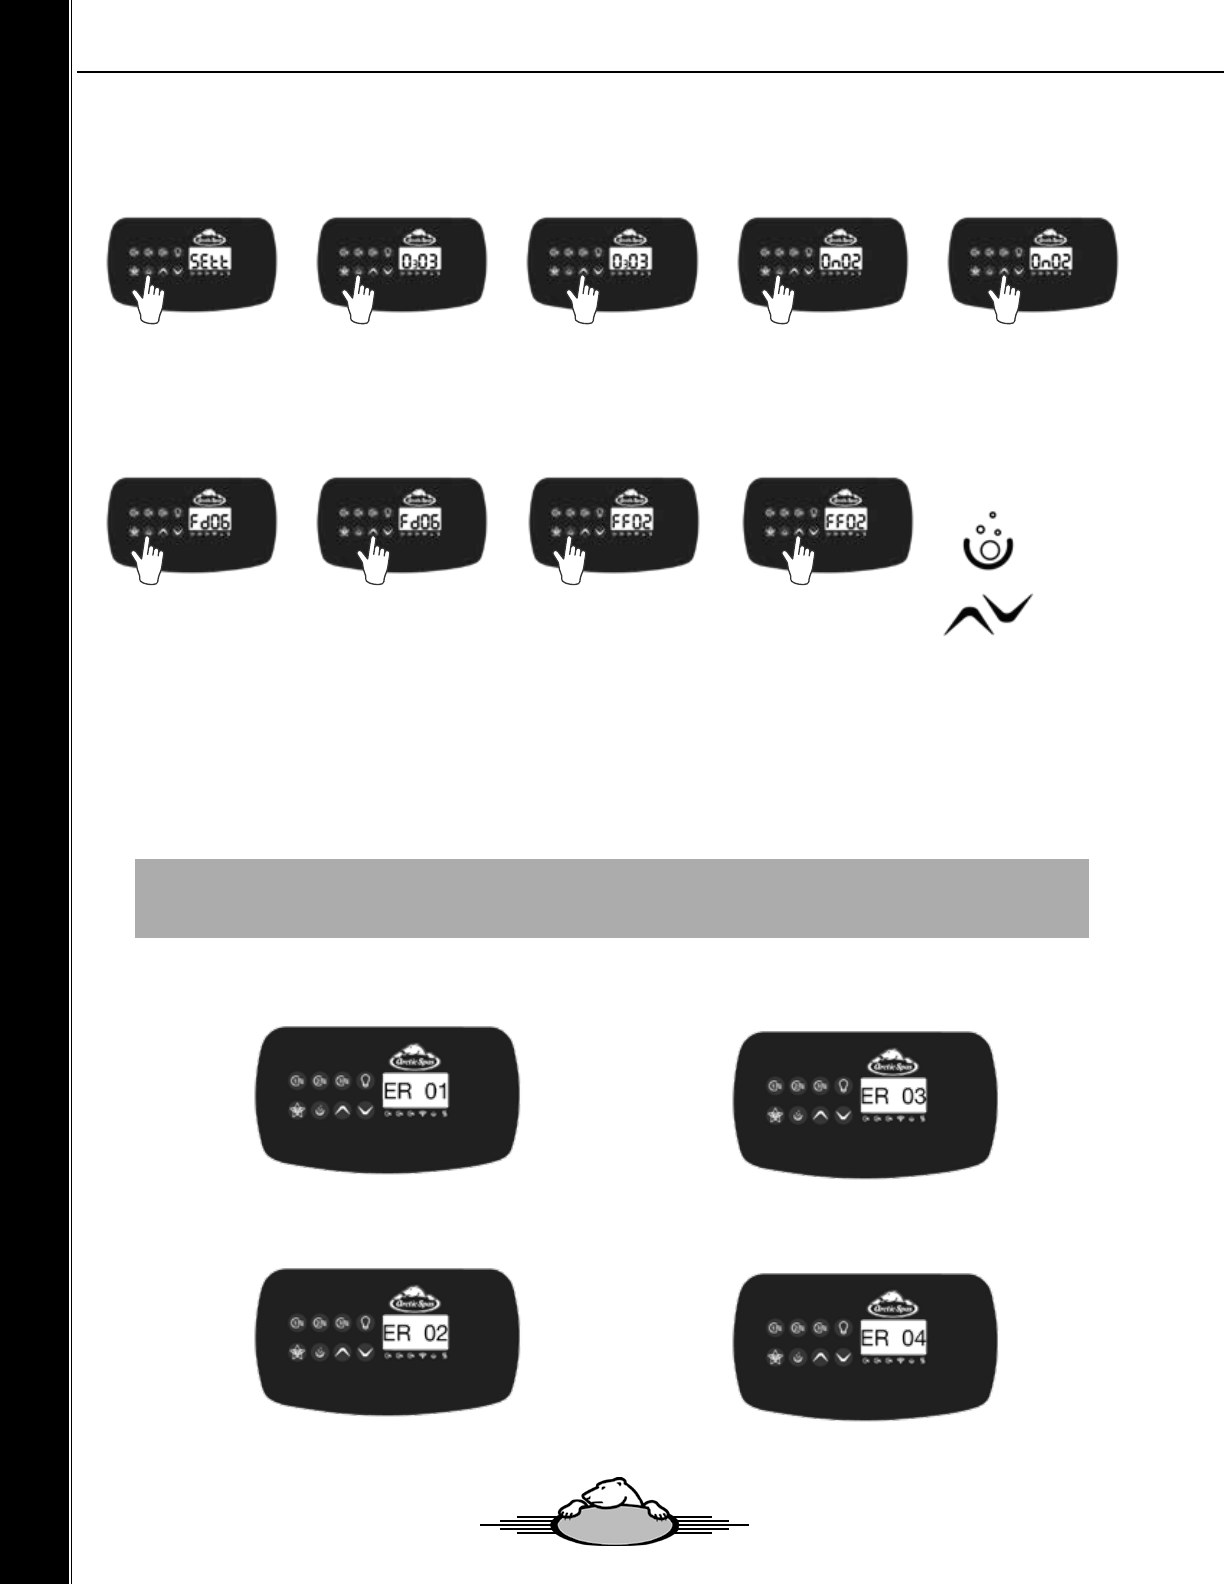
Programming the Filtration Settings
Press your Filter but-
ton again. Your dis-
play will now show
the settings for your
Filter Duration.
Use your arrow keys
to select your Filter
Duration in hours.
You can select from 0
to 6 hours.
Press your Filter but-
ton again. Your dis-
play will now show the
settings for your Filter
Cycle Frequency.
Use your arrow keys
to select your Filter
Cycle Frequency from
1 to 4 times per day.
Press the Filter but-
ton to enter into your
ltration options. Your
display will show
“Sett” and from here
you will be able to
choose your settings.
Press your Filter but-
ton again to display
your rst option. This
is your Ozone Cycle
Duration
(if equipped).
Use your arrow keys
to select your Ozone
Cycle Duration. You
can select from 1 to
24 hours per day.
Press your Filter but-
ton again. Your dis-
play will now show
the settings for your
Onzen
(if equipped).
Use your arrow keys
to select your Onzen
Cycle Duration. You
can select from 1 to
24 hours per day.
Filter button
Arrow keys
Owners Manual - Custom Series
3434
How to perform a software
upgrade on your spa’s Eco Pak
There are three ways to update your Arctic
Spas® Software
1. Download through the Arctic Spas App
2. Download through the myarcticspas.com website
3. Go to bit.ly/arctic-spas and follow instructions
Owners Manual - Custom Series
CAUTION!
Spaboy Technical Guide
See Page 70
Onzen™ Technical Guide
See Page 96
OnSpa Technical Guide
See Page 117
3535

Warranty
Spa Shell~Lifetime
Arctic Spas® warrants the spa shell to the customer against water loss due to
structural failure for as long as the original customer shall own the spa.
Forever Floor®~Lifetime
Arctic Spas® warrants the Forever Floor® against rotting and structural cracking
for a lifetime to the original customer from the original date of delivery. Includes
parts and on site labour necessary to repair. This warranty only applies if there
is a solid level pad.
Cedar Cabinet~10 years
Arctic Spas warrants the cedar cabinet to be free from defects in material and
workmanship for 10 Years to the original customer from the original date of
delivery. It includes parts and onsite labor to repair. This warranty excludes the
surface stain or fading.
Equipment & Plumbing~5 years
Arctic Spas® warrants the spa’s electrical equipment components ~ specically
the pump(s) *(please refer to detailed pump warranty on the reverse under
“Detailed Pump Warranty”. Factory installed Peak I, Skyfall fogger components,
YESS, RossExhaustTM, Ultimate Lighting controls and LED’s, Heater and
control system against malfunctions due to defects in materials and workmanship
for a period of ve years to the original customer from the date of delivery. This
warranty includes all parts and on site labour necessary to repair the spa.
Other Components~5 years
Arctic Spas® warrants the fuses, lights (blue LED, northern lights), WIFI, jet
inserts**, topside control overlays, weir assemblies, diverter handles and caps,
air control handles and caps, plastic cover clips, chrome trim to be free of defects
in workmanship and materials for a period of ve years to the original customer
from the original date of delivery. Includes only parts necessary to repair, not
labour. **jet inserts (including Titanium) are not warranted against discolouration,
rusting or fading.
Shell Surface Acrylic~5 years
Arctic Spas® warrants the shell surface to the customer against water loss due
to material failure including cracks, blisters, peeling and delaminating for a period
of ve years to the original customer from the original date of delivery. Includes
parts and on site labour necessary to repair.
Cover~3 years
Arctic Spas® warrants the Castcore® cover against malfunctions due to defects
in materials and workmanship for three years to the original customer from the
original date of delivery. Includes parts necessary to repair. (Normal wear and
tear is not included in this warranty, when used with a cover lifter seam damage
will be considered normal wear and tear)
Weathershield Cover~3 years
Arctic Spa warrants the weathershield cover to be free from manufacturer
defects for 3 years to the original customer from the original date of delivery.
Includes parts only warranty. Fading of vinyl and thread is not considered a
defect and will naturally occur due to normal chemical maintenance, exposure
to the elements and aging
Onzen™ System ~ 2 years
Factory-installed Onzen™ systems will have a 2 year warranty on labor and
components, with the exception of the electrode. The electrode has a 30 day
parts warranty against defects in materials and workmanship. The electrode is
a consumable part that needs to be changed periodically by the spa owner.
Onzen™ systems that are retro-tted (installed after manufacture of the spa) by
authorized Arctic Spa technicians will have two year parts warranty and it will not
include a labor component. Not to exceed the spa warranty whichever comes
rst. Note, in order to process a warranty claim the Arctic Spas factory warranty
department may need to contact the spa owner directly via email or phone. It
is the responsibility of the Arctic Spa dealer to provide this contact information
to the warranty department. This warranty may be void if the spa is operated
with water salt concentrations outside the recommended level of 2000 to 2500
parts per million (ppm). Damage to other spa components unrelated to the
Onzen™ system as a result of leaking pump seals are specically not covered
by this warranty. For example, heaters, heater barrels, jets, grab rails, pump
seals, and pump motors are not covered in this case. Spa water quality and any
damage caused by water chemistry imbalance are not covered by this warranty.
Warranty work must be completed by an authorized Arctic Spa dealer. The
Onzen™ system is not a fully automatic water treatment system. It is designed to
minimize water maintenance under typical user loads and may therefore require
supplemental chlorination and water chemistry balancing. (Arctic Pure brand
spa chlorine is called Boost). The spa owner is responsible for ensuring safe
water chemistry and conditions.
The Onzen™ system must be used with Arctic Pure brand salt blend, which has
been developed to protect the spa components. The use of alternative brands
of salt may damage the spa components, can be detected by spa technicians,
and will void this warranty.
Spa Boy~ 5 years
Arctic Spas warrants the Spa Boy system against malfunctions due to
defects in materials and workmanship for 5 years from the original date of
delivery to the original customer on factory installed systems, except the
user replaceable Spa Boy Electrode which has a 30 day warranty, needs
to be replaced annually. This warranty includes parts and on site labour
necessary for the repair. Spa water quality and other damages resulting
from water imbalance are specically not covered by this warranty.
Warranty work must be completed by authorized Arctic Spas retailers only.
Spa Boy retro tted kits (installed after manufacturer of the spa) will have a
5 part only warranty. Not to exceed the spa warranty, witchever comes rst.
No labour warranty is provided by Arctic Spas for retrotted Spa Boy systems.
Disclaimer: This is not an automatic water care system. The system is set
up for typical spa use. The spa user is ultimately responsible for maintaining
proper sanitary water conditions. Use of salt other than Arctic Pure Sea Salt.
Blend will damage the Spa Boy components and void the warranty. The Arctic
Pure Sea Salt blend has been developed to protect Spa Boy components
from damage and the use of alternative salt blends will be easily detected by
technicians. This warranty may be void if the spa is operated with water salt
concentrations outside the recommended level of 2000 to 2500 parts per
million (ppm). Damage to other spa components unrelated to the Spa Boy
system as a result of leaking pump seals are specically not covered by
this warranty. For example, heaters, heater barrels, jets, grab rails, pump
seals, and pump motors are not covered in this case.
Aquatremor® ~ 3 years
Arctic Spas® warrants the factory installed Aquatremor® Bluetooth sound
system against malfunctions due to defects in materials and workmanship for
three years to the original customer from the original date of delivery. Includes
parts and on site labour necessary to repair. iPod® and waterproof case are
manufacturer direct warranties. Aquatremor retro tted kits (installed after
manufacturer of the spa) will have a 3 part only warranty. Not to exceed the spa
warranty, witchever comes rst.
DETAILED PUMP WARRANTY
Pump(s) are warranted against material and component failure. The pump shaft
seal is covered under warranty. Damage resulting from a neglected leaking shaft
seal is not covered under warranty. This includes but is not limited to bearing
seizure, end bell failure, start switch failure, impeller failure and capacitor failure.
It is the responsibility of the customer to report shaft seal failure before further
damage can occur. Any pump component failure determined to be the result of
defective material will be replaced under warranty. Arctic Spas® reserves the
right to replace pump components, rather than the complete pump assembly.
Vibration noise associated with normal pump operation is excluded from this
warranty.
PERFORMANCE
To obtain service in the event of a defect or malfunction covered by this Limited
Warranty, notify your Arctic Spa dealer as soon as possible and use all reasonable
means to protect the spa from further damage. Upon proof of purchase, Arctic
Spas®’ agent or its designated service representative will correct the defect
subject to the terms and conditions continued in this Limited Warranty. Pre-
Aproved claims must be executed within 60 days of Pre-approval, All existing
claims expire upon expiration of warranty. *Please note that union connection
leaks are considered to be user serviceable and are expressly excluded from the
Limited Warranty. Damage resulting from union connection leaks are expressly
excluded from the Limited Warranty. There will be no charge for parts and on site
labour to the customer for a period of ve years from the date of original delivery
or six years from manufacturer’s ship date, whichever comes rst. Specically
equipment, plumbing and shell surfaces against malfunctions due to any defect
in the material and workmanship within the Limited Warranty. Travel costs are
the responsibility of the customer. Your limited warranty will cover a maximum
of $60 towards on site labor per each approved warranty claim. Service and/
or travel costs are covered within the rst 30 days of ownership to a maximum
distance of 100KM from dealership or designated service outlet. If Arctic Spas®
determines that repair of the covered defect is not feasible we reserve the right to
instead provide a replacement spa equal in value to the original purchase price
of the defective spa. Spa replacement is done only at the discretion of Arctic
Spas®. Reasonable costs for the removal of the defective spa, and delivery and
installation will be the responsibility of the spa customer. Freight will be paid to
the nearest Arctic Spas® distribution centre while in the warranty period.
3636

CONDITIONS OF WARRANTIES
All warranties provided hereunder extend only to the original customer
of the spa if purchased by an authorized Arctic spas dealer and
originally installed within the boundaries of the country where it was
originally purchased. All warranties hereunder terminate upon transfer
of ownership of a spa from the original customer or product leaving
the country that it was purchased in. This warranty only applies within
the service area where the spa was originally installed. Your limited
warranty does not include repair travel mileage or for shipping cost
assessed by your Factory Authorized Dealer or service agents. All
events covered by this Limited Warranty hereunder must be repaired
by a Factory Authorized Dealer of Arctic Spas®. The warranties will not
include any costs of repair incurred by a non-factory authorized agent.
To obtain service, the customer must contact the Factory Authorized
Dealer in his area. In the event that a spa or component thereof must
be returned to Arctic Spas® distribution centre, all freight costs are the
responsibility of the spa customer. In all cases Arctic Spas® has sole
responsibility for determining the cause and nature of failure of the spa
and Arctic Spas® determination with regard thereto shall be nal.
EXCLUSIONS
All warranties hereunder are void if the spa has been subject to
alterations (including after- market accessories), misuse or abuse
or any repair of the spa has been attempted by anyone other
than a Factory Authorized Dealer of Arctic Spas®. Alterations
include but not limited to, any change to the components,
replacement of components or addition of components without
the written authorization from Arctic Spas®. Misuse includes
careless handling of the spa, damages caused by improper and/
or non-certied electrical hook- ups, failure to operate the spa in
accordance with the instructions contained in the owner’s manual
provided with the spa, including incorrect start-up procedures or
dry ring of the spa, any use of the spa or any of its components
in an application for which it was not designed, and damage
caused by improper chemical balance (including any damage to
spa components caused by scale build up to due to poor water
chemistry), ice in the spa, overheating the spa or spa water,
damage to the spa surface by allowing undissolved sanitizing
chemicals to lie on the surface or if our spa has been used for
commercial purposes. Spa covers are not warranted against
chemical burn or discolouration. Spa covers are not warranted
against water absorption or any damage resulting from water
absorption.. Any damage resulting from the mishandling of the
spa cover in any way is not covered under warranty. Any damage
caused by moving of the spa or improper installation (including
insuciently prepared or uneven ground) is considered abuse and
any damage to the material or workmanship of the spa cabinetry
and oor in shipping or handling are expressly excluded from the
Limited Warranty. All Weather Pool must be placed on concrete
pad or properly engineered deck.
Arctic Spas will not be responsible for power company issues
or improper electrical installations, Damage and/or lack of
performance resulting from high or low voltages outside operating
parameters. Arctic Spas will not be responsible for software and
product upgrades throughout the life of the spa.
Arctic Spas® expressly excludes warranty coverage on any of
the following: Acts of nature including but not limited to damage
resulting from lightning, storm, ooding, freezing, re and any
other acts of nature. Any spa installed in a commercial application.
Any failure caused by improper cover use or or damage to the
spa surface by leaving the spa outdoors without the hot tub cover
in place. The heat created by leaving the spa in direct UV light
without a cover may cause surface issues with the acrylic and
may also cause plastic parts to warp, some ttings will leak or
cease working as a result. These occurrences are not covered
under warranty. The hot tub cover must be kept on the hot tub
when not being used.
Scratches or micro-crazing in the spa shell reported after the
day of installation are not covered under warranty. Micro-crazing
is dened as an area of tiny shiny lines visible in areas on the
surface of some thermoplastic sheets. This phenomena, although
rare, is known to occur in many types of plastic sheet materials.
The surfaces of thermoformed acrylic hot tubs are not immune to
this possibility.
Damaged caused by unapproved sanitizers such as tri-chlor,
acids, calcium hypochlorite, sodium hypochlorite, peroxides,
any sanitizing chemical that may remain undissolved on the spa
surface. Any and all sanitation systems or chemicals used in your
spa must be factory approved by Arctic Spas or your warranty is
void. You can check for a list of approved systems and chemicals
at arcticspas.com. Installation of not factory approved salt
systems will void the warranty related to pump seals, metal part,
jets, etc. Damage caused by any item(s) attached to or installed
onto the spa, including but not limited to gazebos, cover lifters and
cedar accessories. Any options or additional components that are
not factory installed are not covered under warranty. Any damage
or failure due to improper preparation for winter storage is not
covered under warranty. Damage to pillows reported beyond the
day of delivery will not be covered under warranty. Pillows are to
be removed from the spa when not in use. Onzen and Spa Boy
are the only factory approved salt system. Any damage resulting
from the use of cover removing mechanisms is not covered under
warranty. The Onzen and Spa Boy cell are considered a user
serviceable component, replacement will be the responsibility of
the customer.
DISCLAIMERS
Arctic Spas® will not be liable for loss of use of the spa or other
incidental or consequential costs, expenses or damages that
may include but not limited to, the removal of a permanent sun
deck, sunroom, gazebo, or other custom xture, any crane costs
associated with the removal of the spa for service or replacement.
Arctic Spas® shall not be liable for costs arising from water, lter
cartridges and chemical loss. Under no circumstances shall Arctic
Spas® or any of its representatives be liable for any injury to any
person or damage to any property, howsoever arising from the
spa. Arctic Spas® warranties are limited to a maximum amount
of moneys received by Arctic Spas® with respect to the sale of
the spa.
ALL WARRANTIES
The warranties contained herein are all of the warranties provided
by Arctic Spas® to the customer, and to the extent permitted
by law. Warranty registration (within 30 days of delivery) is the
responsibility of the customer and is a condition of warranty
coverage. This Warranty is oered as an extra benet and does
not aect your statutory rights. All warranties herein require that
any claim must be submitted to Arctic Spas® within ten days of
the time the defect is discovered, and must be accompanied by
the original customer’s receipt conrming purchase of the spa,
which shows the date of purchase. All warranty claims must be
submitted within the warranty period. Failure to provide such notice
and information invalidates all warranties provided hereunder.
Arctic Spas® reserves the right to repair or replace components
or materials at its option. In certain cases, photographs may
be required for proper evaluation before warranty coverage is
determined. In the event a customer is unable to either obtain
parts or satisfactory service from a Factory Authorized Dealer of
Arctic Spas®, notice should be given immediately to the service
department of the agent where the spa was purchased and to
Arctic Spas®.
Arctic Spas® expressly excludes warranty coverage on splitting,
fading or warping of the cedar or no maintenance cabinet beyond
the date of delivery. Any damage resulting from handling of the
cedar or no maintenance cabinet is excluded from this warranty.
This warranty will not cover any labour for WIFI/Bluetooth
connection assistance/issues, onSpa® App initialization &
connection assistance/issues from a smartphone, or assistance
with actually connecting any of these devices.
3737
3838
Classic Arctic Engineering
25 years of Engineering Excellence
built into every Classic Series
Classic Series
3939
Outside
Dimensions
Height
Heater
(watts)
Water
Capacity
Dry
Weight
Electrical
Requirements
North America
A = actual / B = breaker
Electrical
Requirements
Europe
Mustang
93’’ x 93’’
235 x 235 cm
39’’
98 cm
NA / Euro
4000 W
370 Gallons
1400 Liters
973 Lbs
441 Kg
240 Volts / 6 Gauge Wire
1 Pump / A32amp / B40amp
2 Pumps / A40amp / B50amp
Upgraded Classic
240 Volts / 6 Gauge Wire
1 Pump / A40amp / B50amp
2 Pumps / A40amp / B50amp
115 Volts / 14 Gauge Wire
1 Pump / A12amp / B15amp
1 phase x 32 Amp
or
3 phase x 16 Amp
McKinley
93’’ x 93’’
235 x 235 cm
39’’
98 cm
NA / Euro
4000 W
449 Gallons
1700 Liters
951 Lbs
431 Kg
240 Volts / 6 Gauge Wire
1 Pump / A32amp / B40amp
2 Pumps / A40amp / B50amp
Upgraded Classic
240 Volts / 6 Gauge Wire
1 Pump / A40amp / B50amp
2 Pumps / A40amp / B50amp
115 Volts / 14 Gauge Wire
1 Pump / A12amp / B15amp
1Øx32 Amp
3Øx16 Amp
Totem
85’’ x 85’’
217 x 217 cm
41’’
104 cm
NA / Euro
4000 W
360 Gallons
1360 Liters
735 Lbs
333 Kg
240 Volts / 6 Gauge Wire
1 Pump / A32amp / B40amp
2 Pumps / A40amp / B50amp
Upgraded Classic
240 Volts / 6 Gauge Wire
1 Pump / A40amp / B50amp
2 Pumps / A40amp / B50amp
115 Volts / 14 Gauge Wire
1 Pump / A12amp / B15amp
1 phase x 32 Amp
or
3 phase x 16 Amp
Eagle
85’’ x 85’’
217 x 217 cm
41’’
104 cm
NA / Euro
4000 W
313 Gallons
1885 Liters
741 Lbs
336 Kg
240 Volts / 6 Gauge Wire
1 Pump / A32amp / B40amp
2 Pumps / A40amp / B50amp
Upgraded Classic
240 Volts / 6 Gauge Wire
1 Pump / A40amp / B50amp
2 Pumps / A40amp / B50amp
115 Volts / 14 Gauge Wire
1 Pump / A12amp / B15amp
1 phase x 32 Amp
or
3 phase x 16 Amp
Timberwolf
69’’ x 85’’
174 x 217 cm
39’’
98 cm
NA / Euro
4000 W
234 Gallons
884 Liters
611 Lbs
277 Kg
240 Volts / 6 Gauge Wire
1 Pump / A32amp / B40amp
2 Pumps / A40amp / B50amp
Upgraded Classic
240 Volts / 6 Gauge Wire
1 Pump / A40amp / B50amp
2 Pumps / A40amp / B50amp
115 Volts / 14 Gauge Wire
1 Pump / A12amp / B15amp
1 phase x 32 Amp
or
3 phase x 16 Amp
Athabascan
172’’ x 93’’
436 x 236 cm
51’’
129 cm
NA / Euro
5500 / 2x3600
1347 Gal-
lons
5100 Liters
1910 Lbs
866 Kg
240 Volts / 6 Gauge Wire
1 Pump / A32amp / B40amp
2 Pumps / A40amp / B50amp
Upgraded Classic
240 Volts / 6 Gauge Wire
1 Pump / A40amp / B50amp
2 Pumps / A40amp / B50amp
115 Volts / 14 Gauge Wire
1 Pump / A12amp / B15amp
1 phase x 32 Amp
or
3 phase x 16 Amp
Hudson
172’’ x 93’’
436 x 236 cm
51’’
129 cm
NA / Euro
5500 / 2x3600
1347 Gal-
lons
5100 Liters
1910 Lbs
866 Kg
240 Volts / 6 Gauge Wire
1 Pump / A32amp / B40amp
2 Pumps / A40amp / B50amp
Upgraded Classic
240 Volts / 6 Gauge Wire
1 Pump / A40amp / B50amp
2 Pumps / A40amp / B50amp
115 Volts / 14 Gauge Wire
1 Pump / A12amp / B15amp
1 phase x 32 Amp
or
3 phase x 16 Amp
Kingsher
172’’ x 93’’
436 x 236 cm
51’’
129 cm
NA / Euro
5500 / 2x3600
1347 Gal-
lons
5100 Liters
1910 Lbs
866 Kg
240 Volts / 6 Gauge Wire
2 Pumps / A48amp / B60amp
Upgraded Classic
240 Volts / 6 Gauge Wire
1 Pump / A40amp / B50amp
2 Pumps / A40amp / B50amp
115 Volts / 14 Gauge Wire
1 Pump / A12amp / B15amp
1Øx32 Amp
3Øx16 Amp
Wolverine
172’’ x 93’’
436 x 236 cm
51’’
129 cm
NA / Euro
5500 / 2x3600
1347 Gal-
lons
5100 Liters
1910 Lbs
866 Kg
240 Volts / 6 Gauge Wire
3 Pumps / A48amp / B60amp
Upgraded Classic
240 Volts / 6 Gauge Wire
1 Pump / A40amp / B50amp
2 Pumps / A40amp / B50amp
115 Volts / 14 Gauge Wire
1 Pump / A12amp / B15amp
1Øx32 Amp
3Øx16 Amp
Owners Manual - Classic Series
Specications
4040
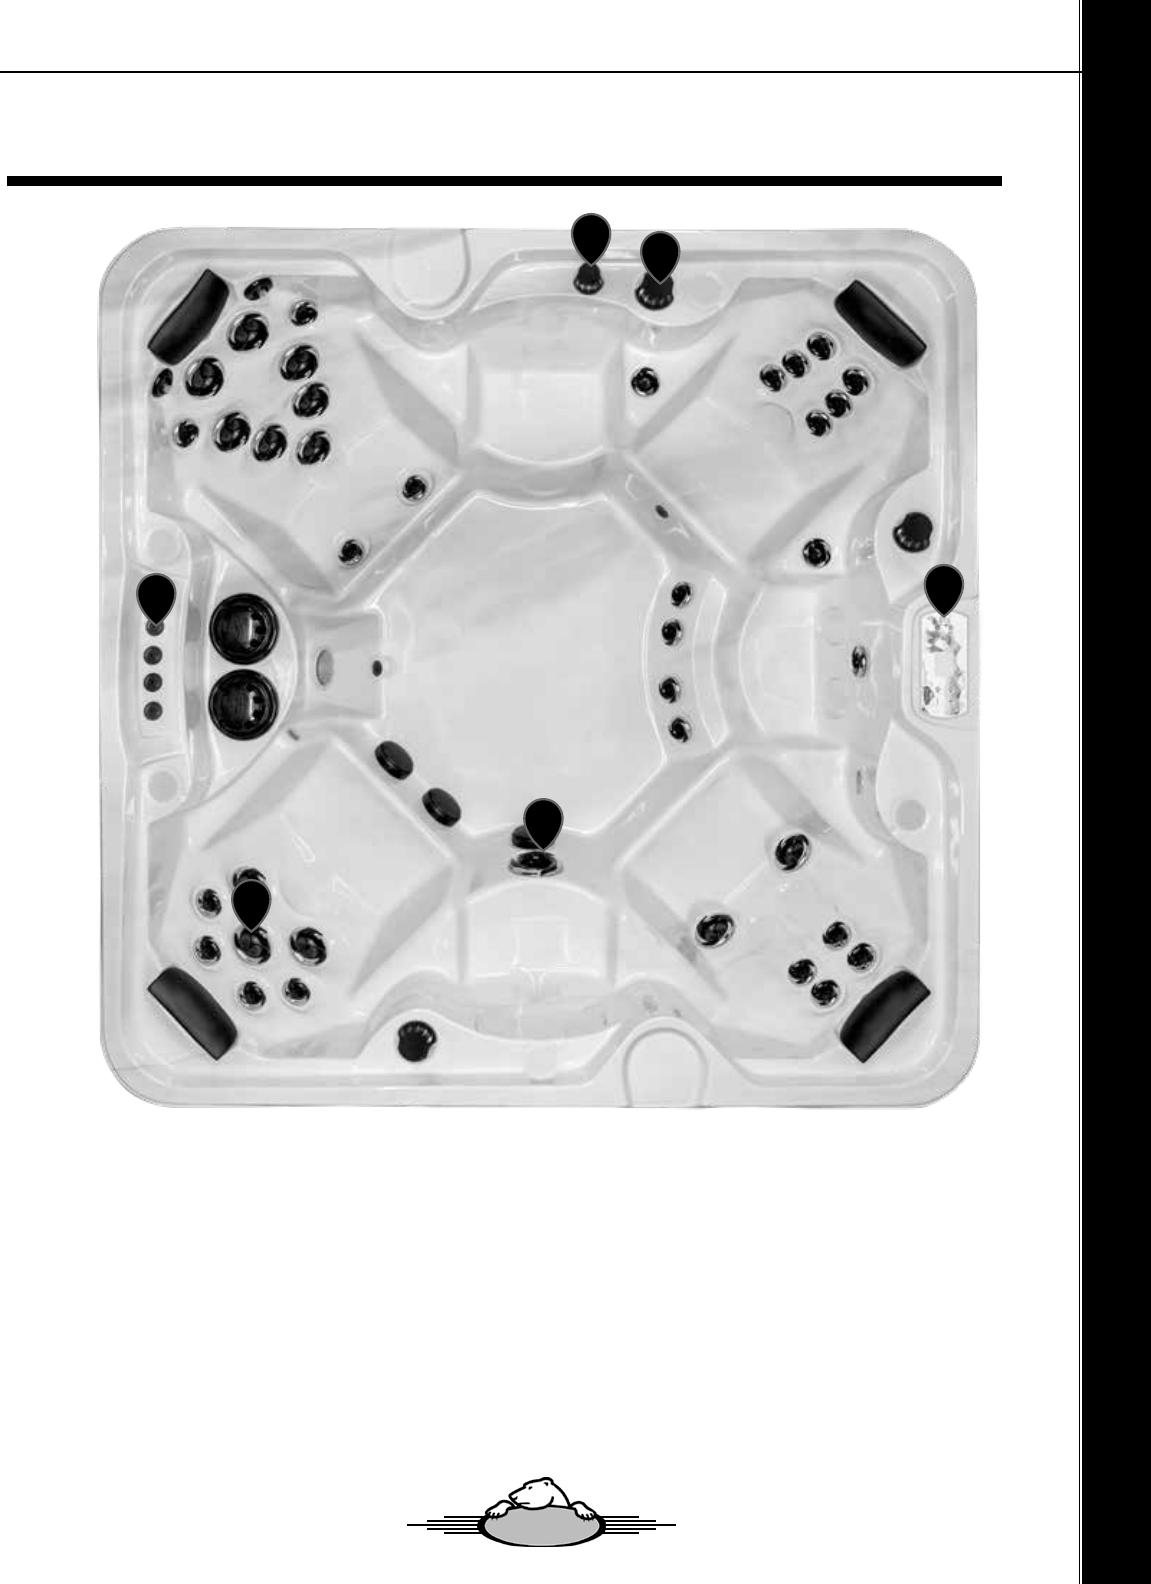
Owners Manual - Classic Series
Spa Overview
A: Topside Control | See Topside Control Overview section in this manual.
B: Waterspouts | Control by an ON/OFF valve.
C: Monsoon Jet
D: Jets | All jets are adjustable and can be turned ON/OFF and can also be locked in the fully ON position,
simply by rotating the Jet face.
E: Diverter | If your spa is equipped with a Diverter, its purpose is to distribute water pressure to varying
jets or provide water pressure to the Monsoon Jet or both.
F: Venturi | Allows air into jets to boost jet performance when Pump 1 is on. Leave in the “closed” position
when spa is not in use.
A
F
E
B
D
C
4141
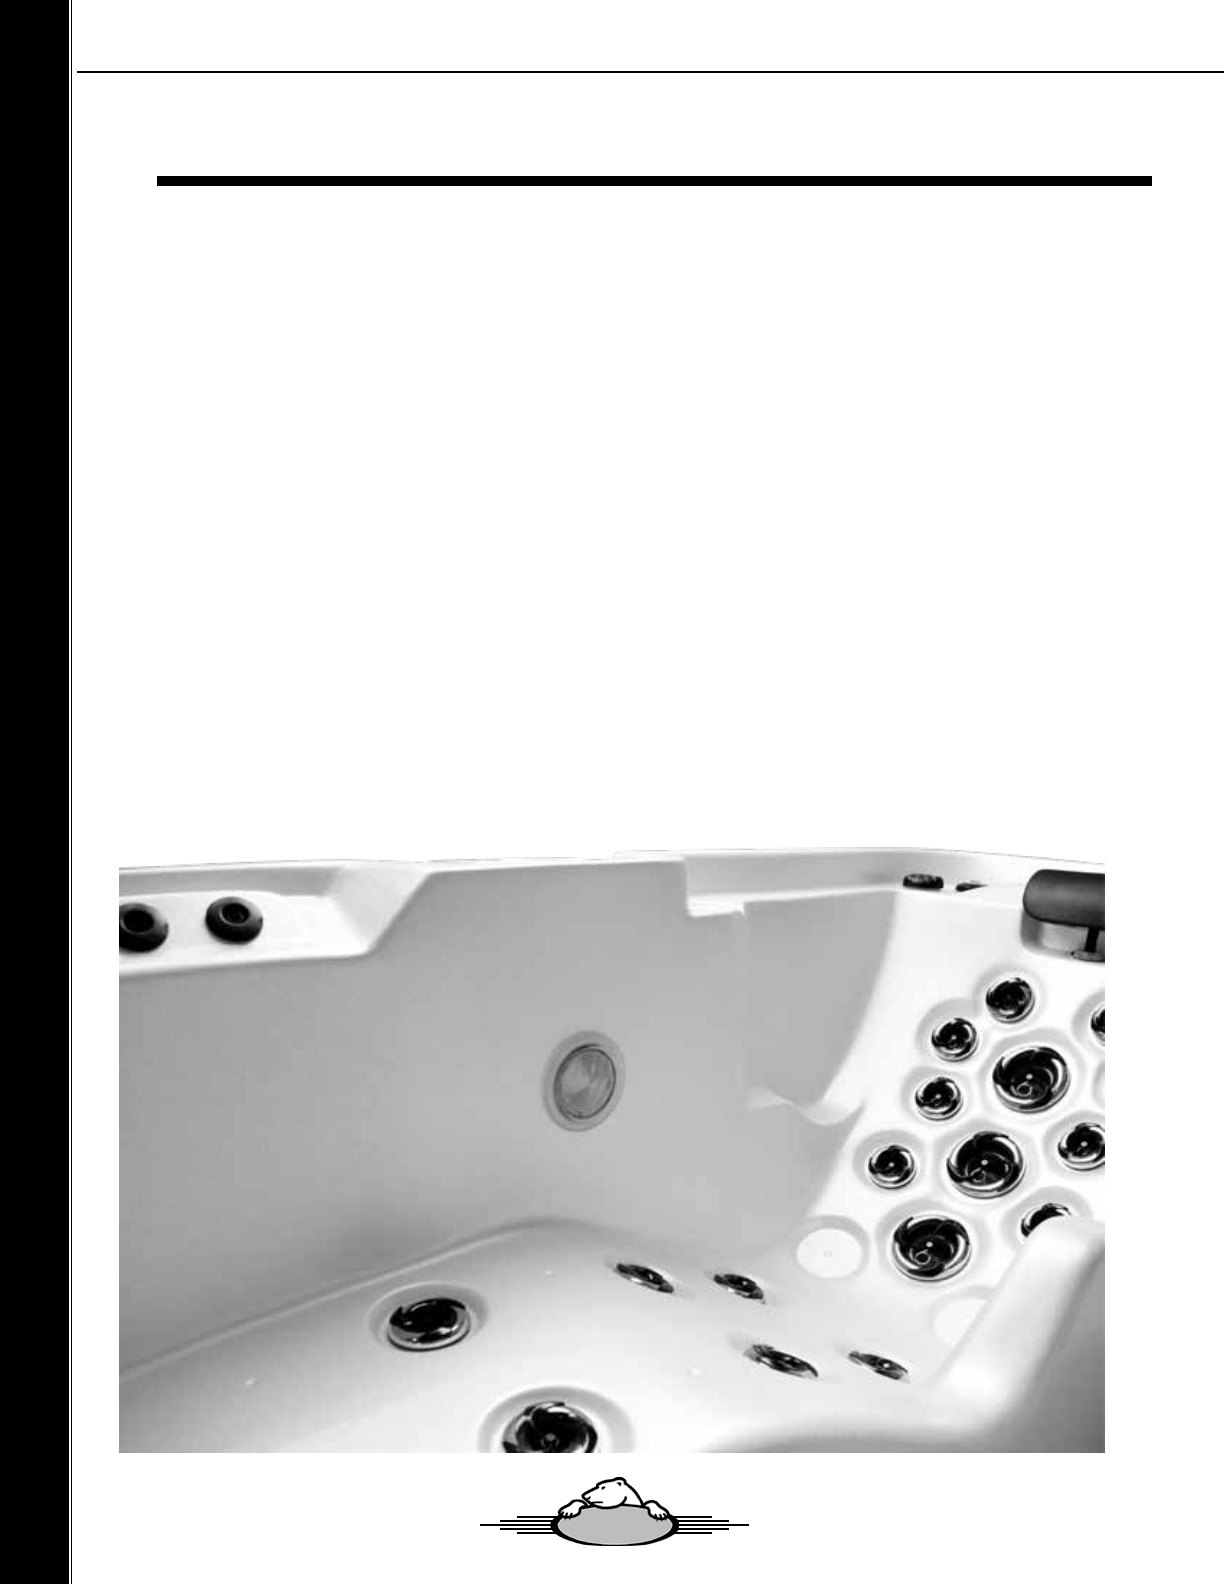
Jets
Three Inch (3”) Jets
The Turbo Single jets give a wide circular massage. The 3-inch jets are designed for a thorough massage
of the muscles in your upper back, shoulders and neck. These jets are adjustable by turning the face of
the jet clockwise for a stronger ow and counter-clockwise for a softer ow and eventually o. The Jet can
also be locked in the fully ON (open) position by turning the face of the jet clockwise until it does not go any
further. Then rotate again to allow the jet to override the lock stop.
Five Inch (5”) Jets
The ve-inch Hydro-massage jets give a wide circular massage. These jets are adjustable by turning the
face of the jet clockwise for a stronger ow and counter-clockwise for a softer ow and eventually o. The
Jet can also be locked in the fully ON (open) position by turning the face of the jet clockwise until it does not
go any further. Then rotate again to allow the jet to override the lock stop.
Monsoon Jet
The Monsoon Jet is a large hydro-massage jet designed to maximize massaging action on a specic area
of the body. It is located in the lower part of the spa to allow easy access for massaging feet, legs, hips and
lower back. The intensity of the Monsoon Jet can be altered using the Diverter (the location varies depend-
ing on spa model). Consult your local dealer regarding which diverter lever or just jump in and experiment for
yourself.
Owners Manual - Classic Series
4242
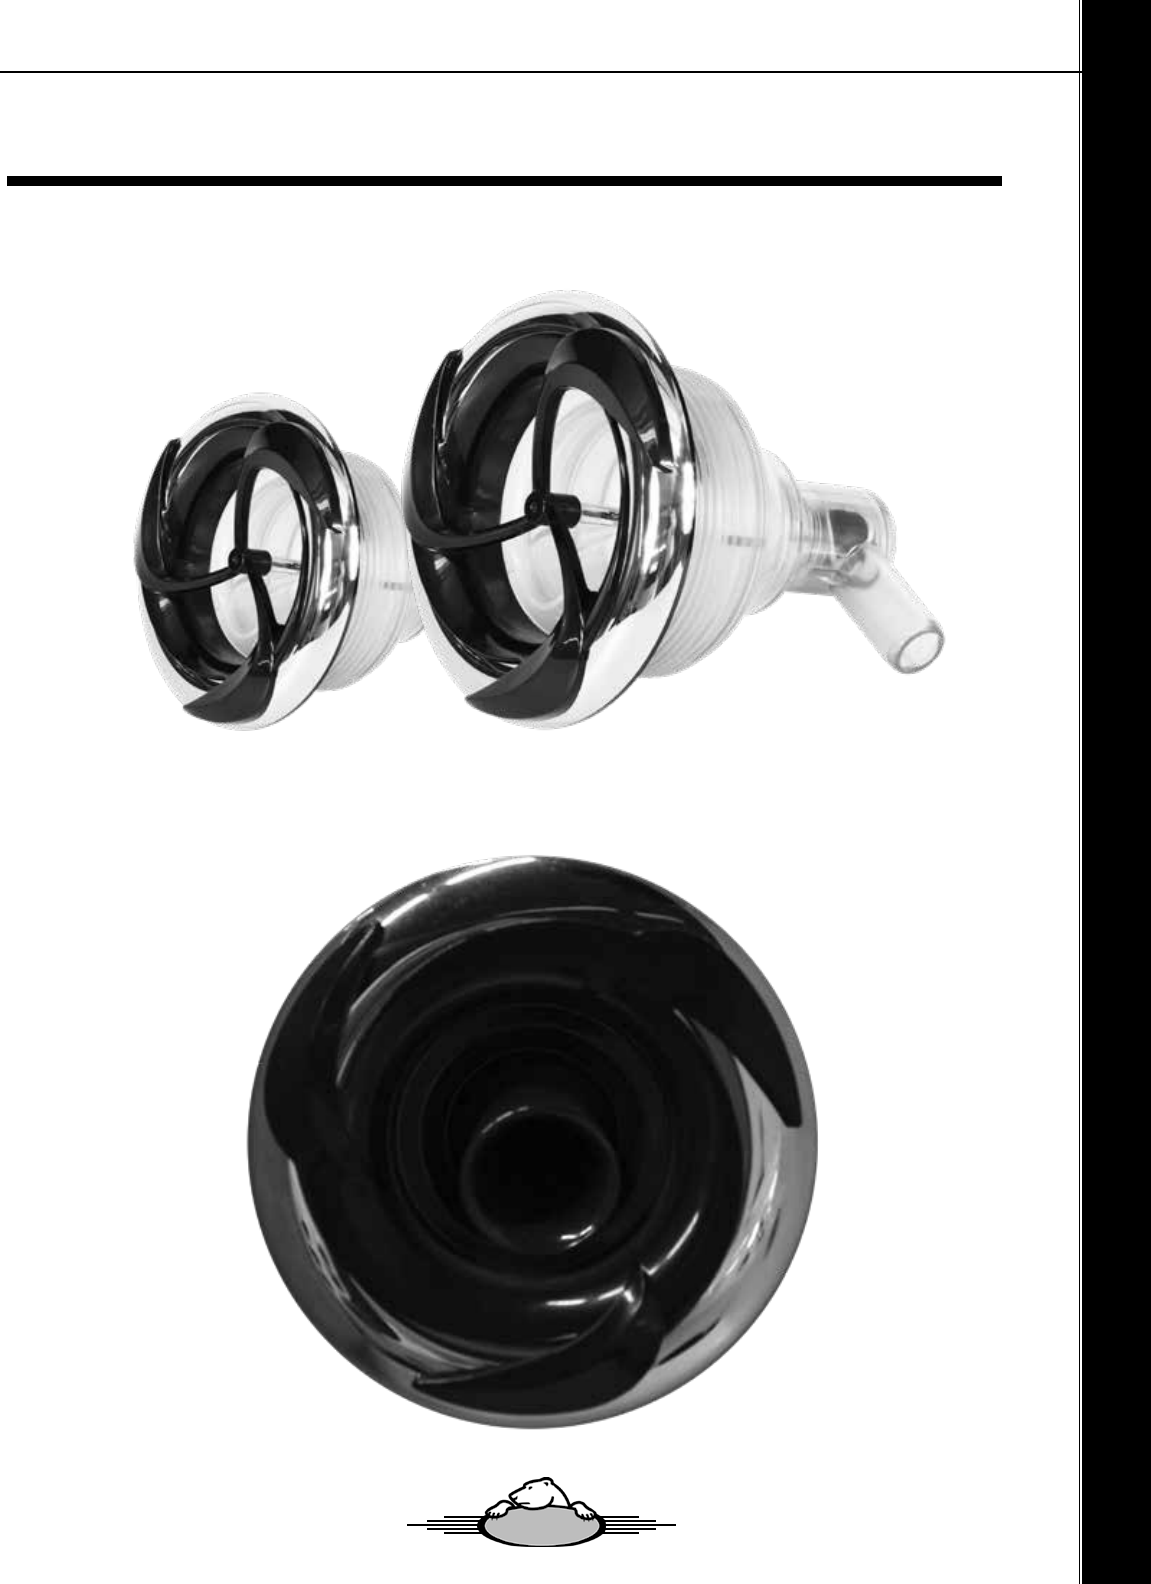
Jets
3’’
5’’
Monsoon
Owners Manual - Classic Series
4343
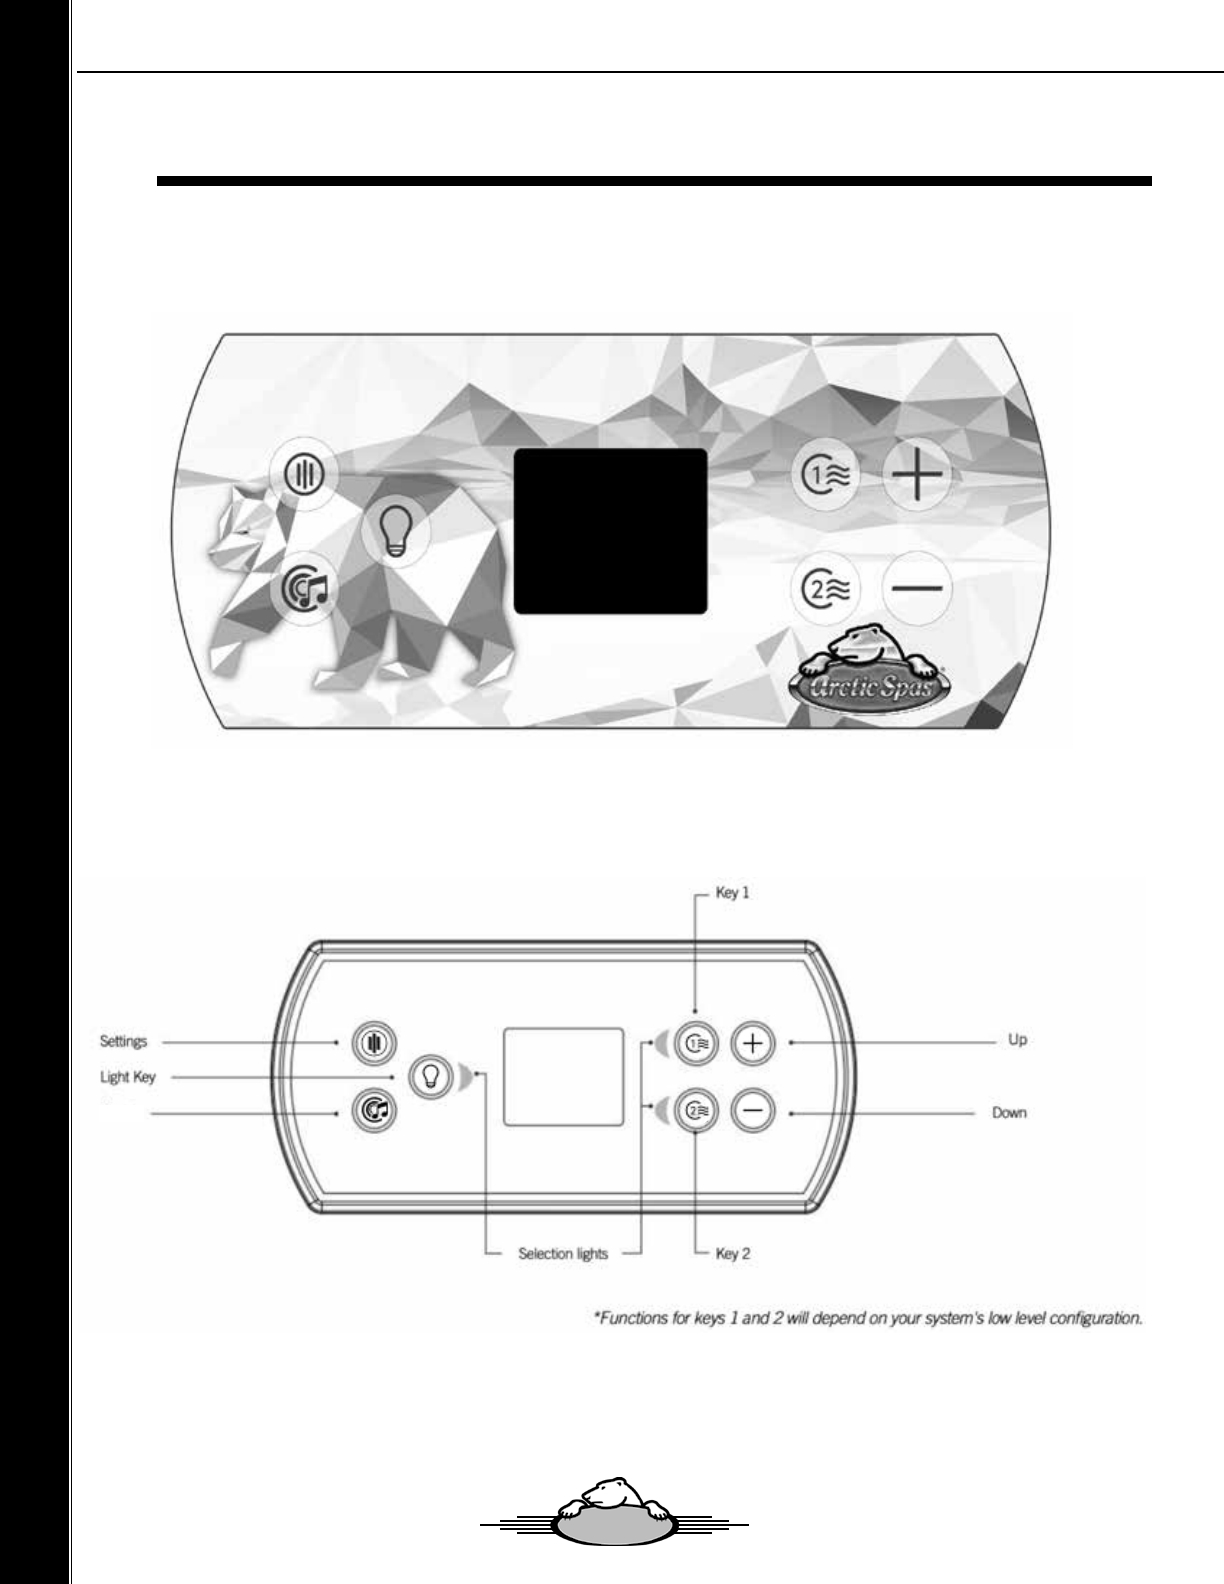
Topside Control Panel
Audio
Owners Manual - Classic Series
4444
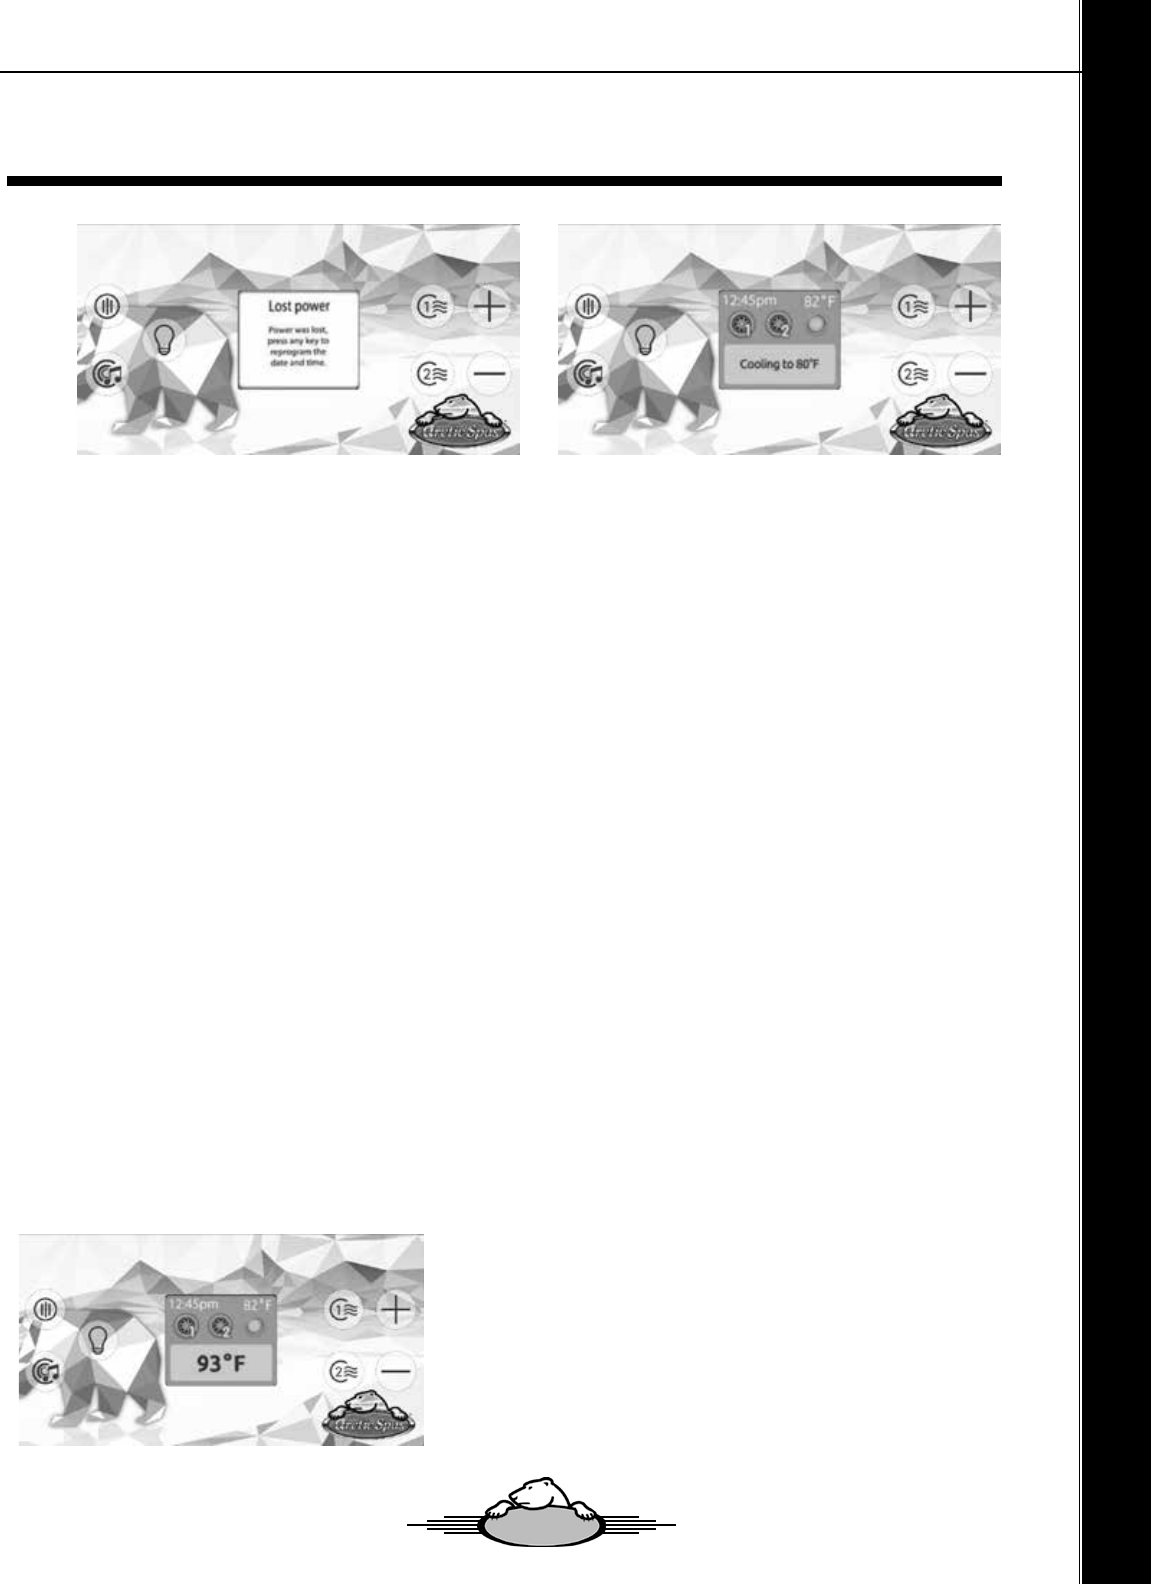
Power Up
The in.k500 topside does not store the time and date. When the in.k500 starts up after a power loss a mes-
sage will prompt the user to reprogram the date and time.
NOTE: With the in.k500 equipped with a real time clock (RTC): If the power was lost for a few hours, this mes-
sage will not appear.
Setting Key
One press gives you access to a menu to manage the setting of your spa. Refer to the setting section for
details about the settings menu.
Audio Key (controls stereo)
The in.k500 can be used with the in.tune, in.stream or in.stream 2 audio systems. The Audio section in the
Settings menu of an in.stream gives you the option to disconnect or unpair your Bluetooth enabled device
when using the in.stream. With version 7.00 and higher, it is also possible to select Source to use a device
connected by auxiliary cable or Bluetooth wireless connection. The in.stream 2 Settings menu gives you a
Source selector, a Bluetooth disconnect option, an On/O switch and an audio control on fader, balance and
subwoofer. For more information on audio functions, see the in.tune, in.stream or in.stream 2 operation sec-
tion. The Audio option will only appear in the menu for keypads that are set up for an in.stream connection.
The in.stream 2 is automatically detected at power-up.
Power
Press any button to turn on the keypad. After 30 minutes without activity it will shut o.
Main Screen
The main screen gives you access to your accessories and water temperature. At the bottom of the screen,
you will see any error or maintain messages that are present.
Start or Stop Accessories
To start or stop an accessory, press the associated button. Icons will be animated when their accessory is
turned on, and inanimate when turned o. Icons on the screen will reect the speed or state of the devices
running on your spa. When an accessory has more than two states, press the button until it reaches the de-
sired state.
Water Temperature
The temperature shown at the top of the screen is the current wa-
ter temperature. Use the UP and DOWN buttons to set the desired
temperature. The set point will appear in blue at the bottom. After
3 seconds without any change to the set temperature value, the
keypad will resume the normal display of messages. When the set
value is lower than the current temperature Cooling to xx.x will ap-
pear. When the set value is higher than the current temperature.
Heating to xx.x will be indicated. Normally there is a short delay
before the heating starts, during which Heating Suspended is in-
dicated.
Topside functions
Owners Manual - Classic Series
4545

Water Care Modes
Settings
From the home page you can access the settings where you will
nd:
Use the arrow buttons to move UP and Down in the list. To select
an option, press the light beside it. At any point, you can press the
settings button to return to the home screen.
• Water Care
• Audio (if installed)
• Maintenance
• Wi-Fi
• Restore
• Standby
• Date & Time
• Conguration
• About
Water Care
The water care section will help you set up your idea ltration and
heating settings. Choose a mode depending on your need.
Use the Light button to choose your setting. A checkmark will ap-
pear on the selected icon to conrm. In Economy Mode, the set
point will be reduced by 20F which means that the heating system
not be engaged unless the temperature falls to 20F below the spas
set temperature.
Topside functions
Owners Manual - Classic Series
Away
In this mode the Spa will always be in economy;
the set point will be reduced by 20º F.
Standard
The Spa will never be in economy mode and will be
ltering according to the pack’s low level conguration.
Energy Savings
The Spa will be in economy mode during the peak hours
of the day and resume norma; moede on the weekend.
Weekender
The Spa will be in economy mode from Monday
to Friday, and will run normally on the weekend.
4646
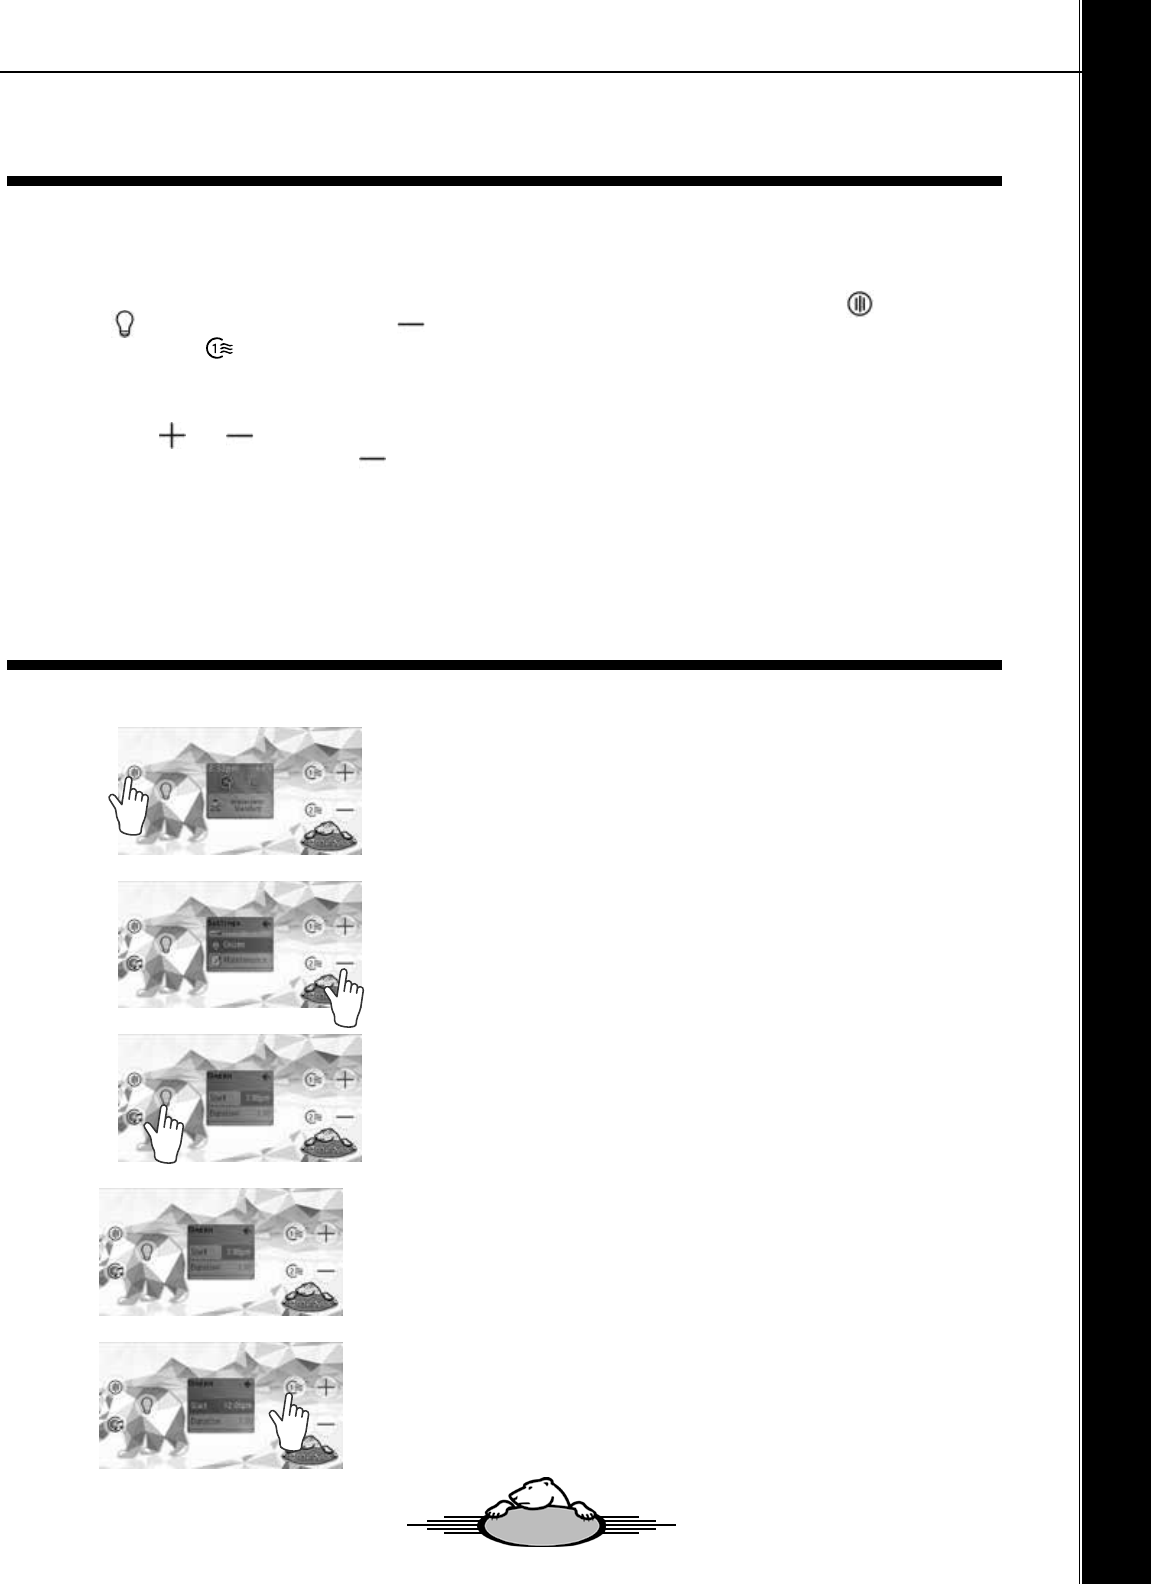
Topside functions
Onzen Settings with k500 topside
Set desired Start time, Duration, and Frequency of Onzen™ cycles.
Press the Settings button to enter the settings menu.
Use the Up / Down arrows to navigate to Onzen™ tab.
Press the light key to enter the Onzen™ menu.
Use the light key (to go forward), Pump 1 key (to go back), and the
up/Down keys to change the desired setting.
Press the Pump 1 key to exit out of the Onzen™ menu.
Owners Manual - Classic Series
Filtration Settings
To access the ltration settings from your topside control panel select the settings button . Using the light
button , select water care. Use the button to scroll down to standard, press the light button to select
then the Pump 1 button to enter you ltration settings. From here you can adjust your “Day Settings” from
everyday, weekday, weekends or specic days only. Once you have adjusted your Day Setting you can move
to the start time setting using the light key. Choose the start time for your ltration to begin. Once desired start
time is selected, use the light key to the duration category where you can choose how long your spa will lter
for. Use the and buttons to choose how long your ltration cycles will last. After all three parameters are
set, press the light button, then the button to go to the ltration 2 settings. Adjust the Day, start and duration
settings as desired and save your settings pressing the pump 1 button.
4747
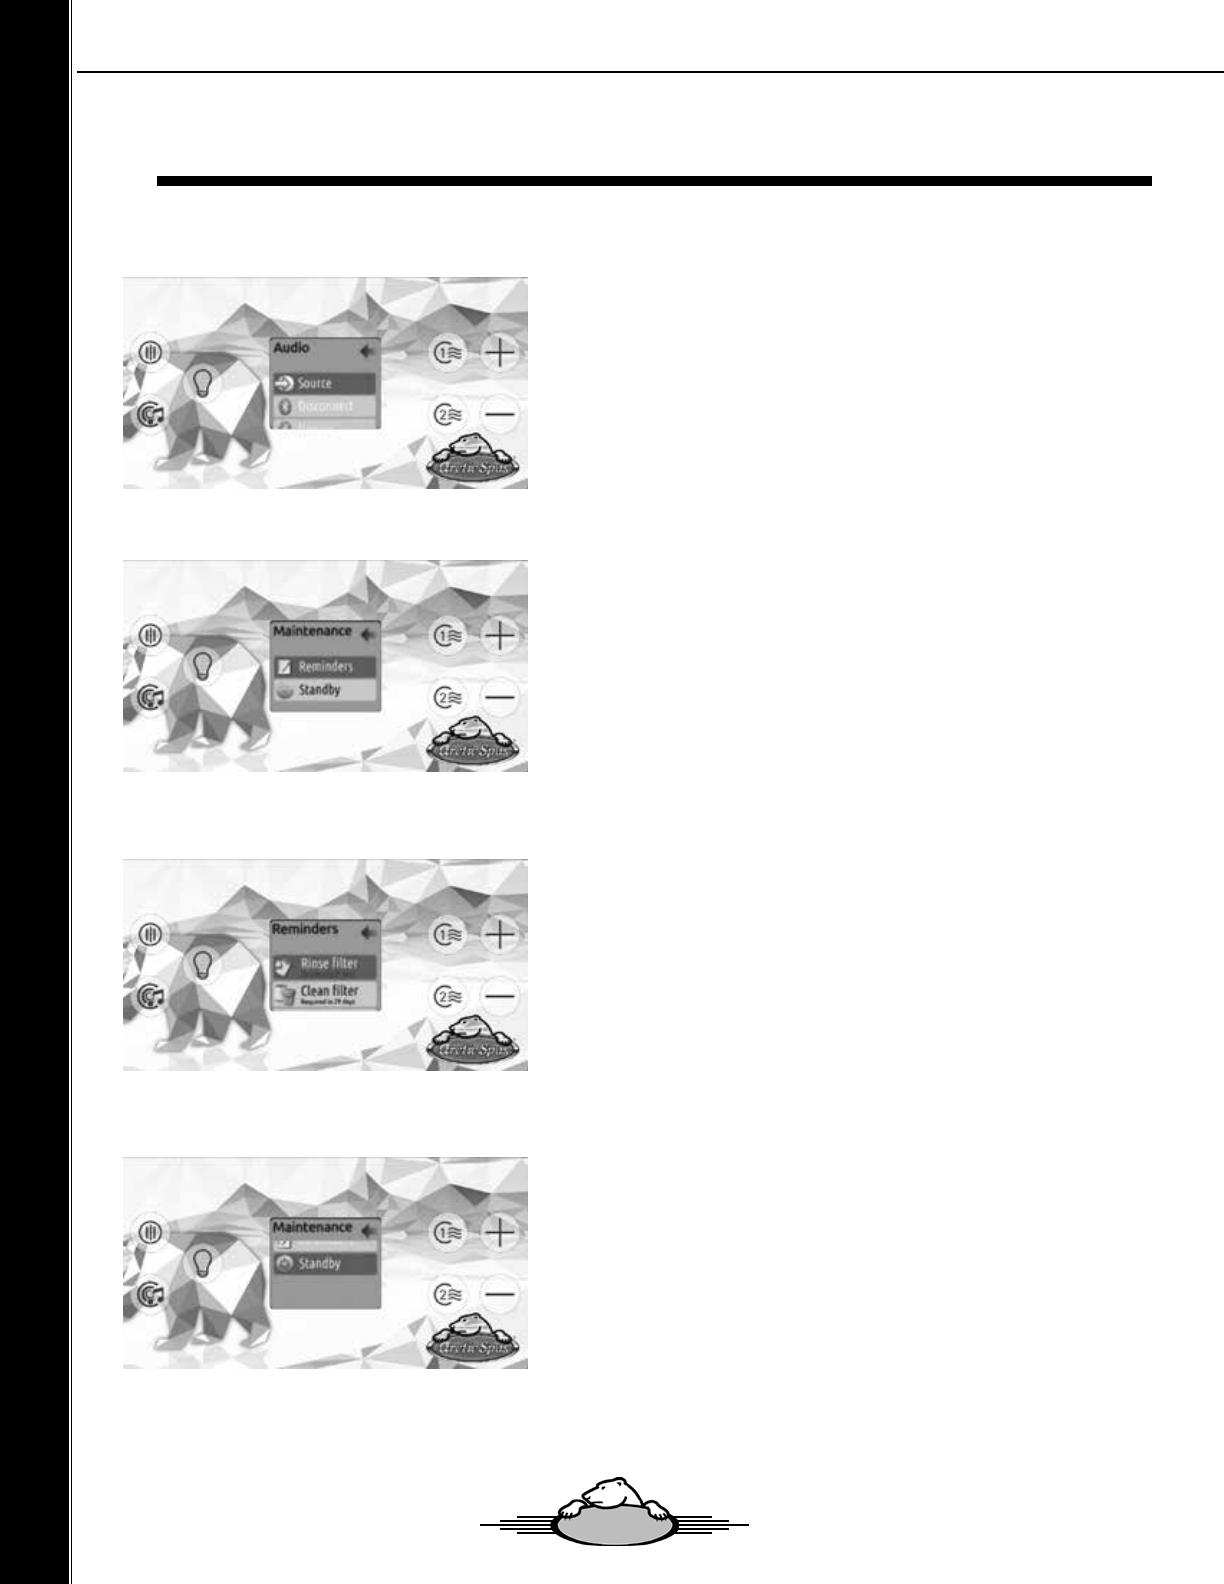
Topside functions
Audio
The Audio section in the settings menu of in.stream gives you the
option to disconnect or un-pair your Bluetooth enabled device
when using the in.stream.
The in.stream 2 settings menu gives you a source selector, a Blue-
tooth disconnect option, an On/O switch and an audio control on
fader, balance and subwoofer.
Maintenance
From the settings page you can access the Maintenance menu,
which gives you the following options:
• Maintenance Reminders
• Standby
Use the Up and Down buttons to make a selection, and the Light
button to conrm.
Maintenance Reminders
The In.k500 keypad will remind you of maintenance required on
your spa, like rinsing or cleaning the lter. Each task has its own
duration, based on normal use.
The maintenance reminders menu allows you to verify the time left
before maintenance is required, as well as to reset the time once a
task is completed. Use the Up and Down button to move through
the list. To reset a task select it by pressing the Light button, then
conrm when prompted. Once you have conrmed the task will be
reset.
Standby
The standby mode allows you to service your spa. Pumps will stop
for 30 minutes, and automatically restart after this time.
Once Standby Mode has been activated a screen will appear to
show that pumps are stopped. The normal spa page will return at
the end of Maintenance.
Press Button 1 to leave standby mode and restart the spa.
Owners Manual - Classic Series
4848
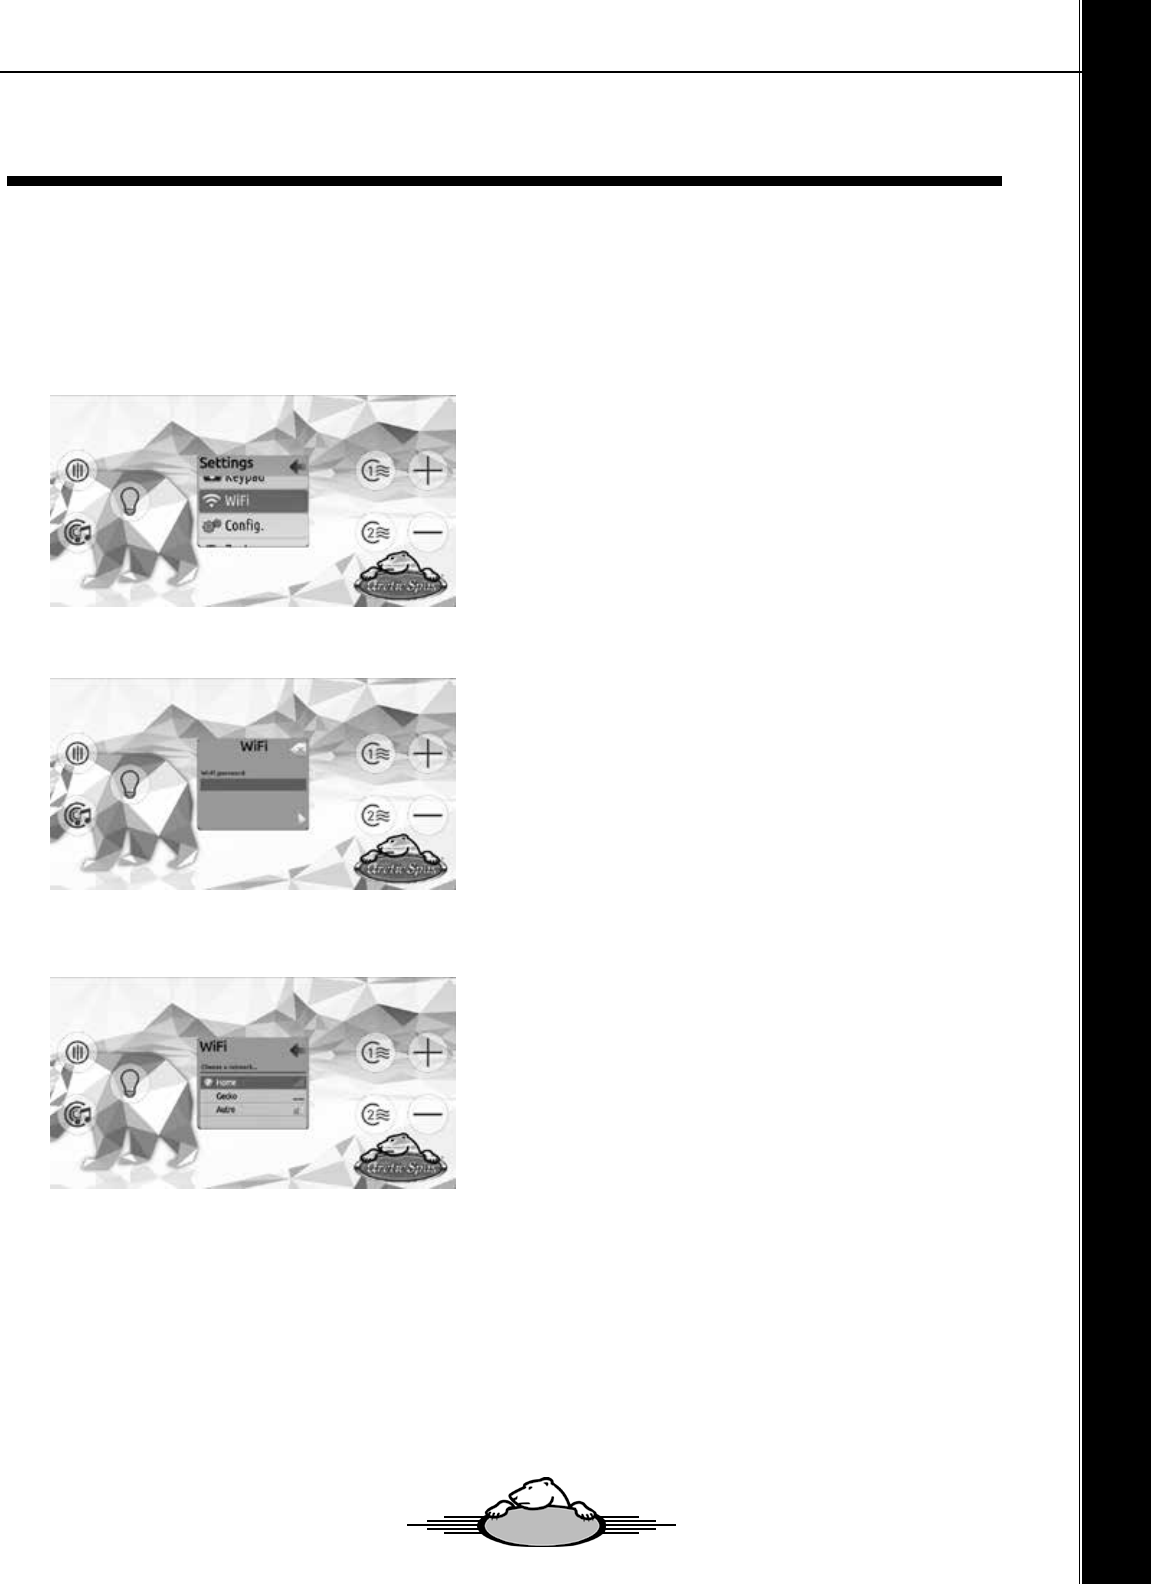
Topside functions
WiFi (in.touch only)
For the WiFi menu to appear in the Settings menu your in.touch
module must be equipped with software version 11.00 or higher.
This menu allows you to connect your in.touch module to a WiFi
network or to change ts network.
For more details about other in.touch connection methods please
see the in.touch techbook. To connect your in.touch module to a
wireless network, use the Up/Down keys to go to the WiFi option
in the Settings menu and Light key to select it.
After a few seconds the available networks will appear on the
screen, as well as their signal strength.
Use the Up/Down keys to move through the list. Select your net-
work by pressing on Light key.
If the WiFi network is password protected enter it when
prompted.
• Use the arrow keys to choose your letters and
change the type of character (uppercase, lowercase,
number, symbol).
• Use Key 2 to move the curser forward
• Use Key 1 to backspace
• Use Light key to conm
If no password is required the in.touch will connect
automatically.
Once the in.touch module is connected to a WiFi network a check
mark in a green circle will appear in the WiFi menu, and the net-
work logo will change to green in Settings menu.
Note:
WiFi logo color in Settings menu corresponds to the in.touch con-
nection state.
Yellow = not connected
Green = connected to a network
Yellow with wait icon = connection attempt to a network
Red with wait icon = in.touch no longer detected
(in.touch must be reset before next connection attempt)
Owners Manual - Classic Series
4949

Topside functions
Audio Play / Pause Last Track
Next Track Volume Up
Volume Down
Play / Pause audio
Press the Play/Pause button to start or pause the au-
dio. This button is available for Bluetooth and USB
only.
Changing tracks
Use the Last Track and Next Track keys to change
tracks or FM stations. This is not available with Aux
source.
Adjusting the volume
Press the Up or the Down key to increase or decrease
the volume.
Disconnect
This option can be found under the Audio section
in the Settings menu.
Turn power On / Off
This option can be found under the Audio section in
the Settings menu.
Fader, Balance and Subwoofer
These options can be found under the Audio section
in the Settings menu.
Press the Audio key to access your in.stream 2.
If you are using a device with Bluetooth technology, it must be connected
for functions to work.
Owners Manual - Classic Series
5050
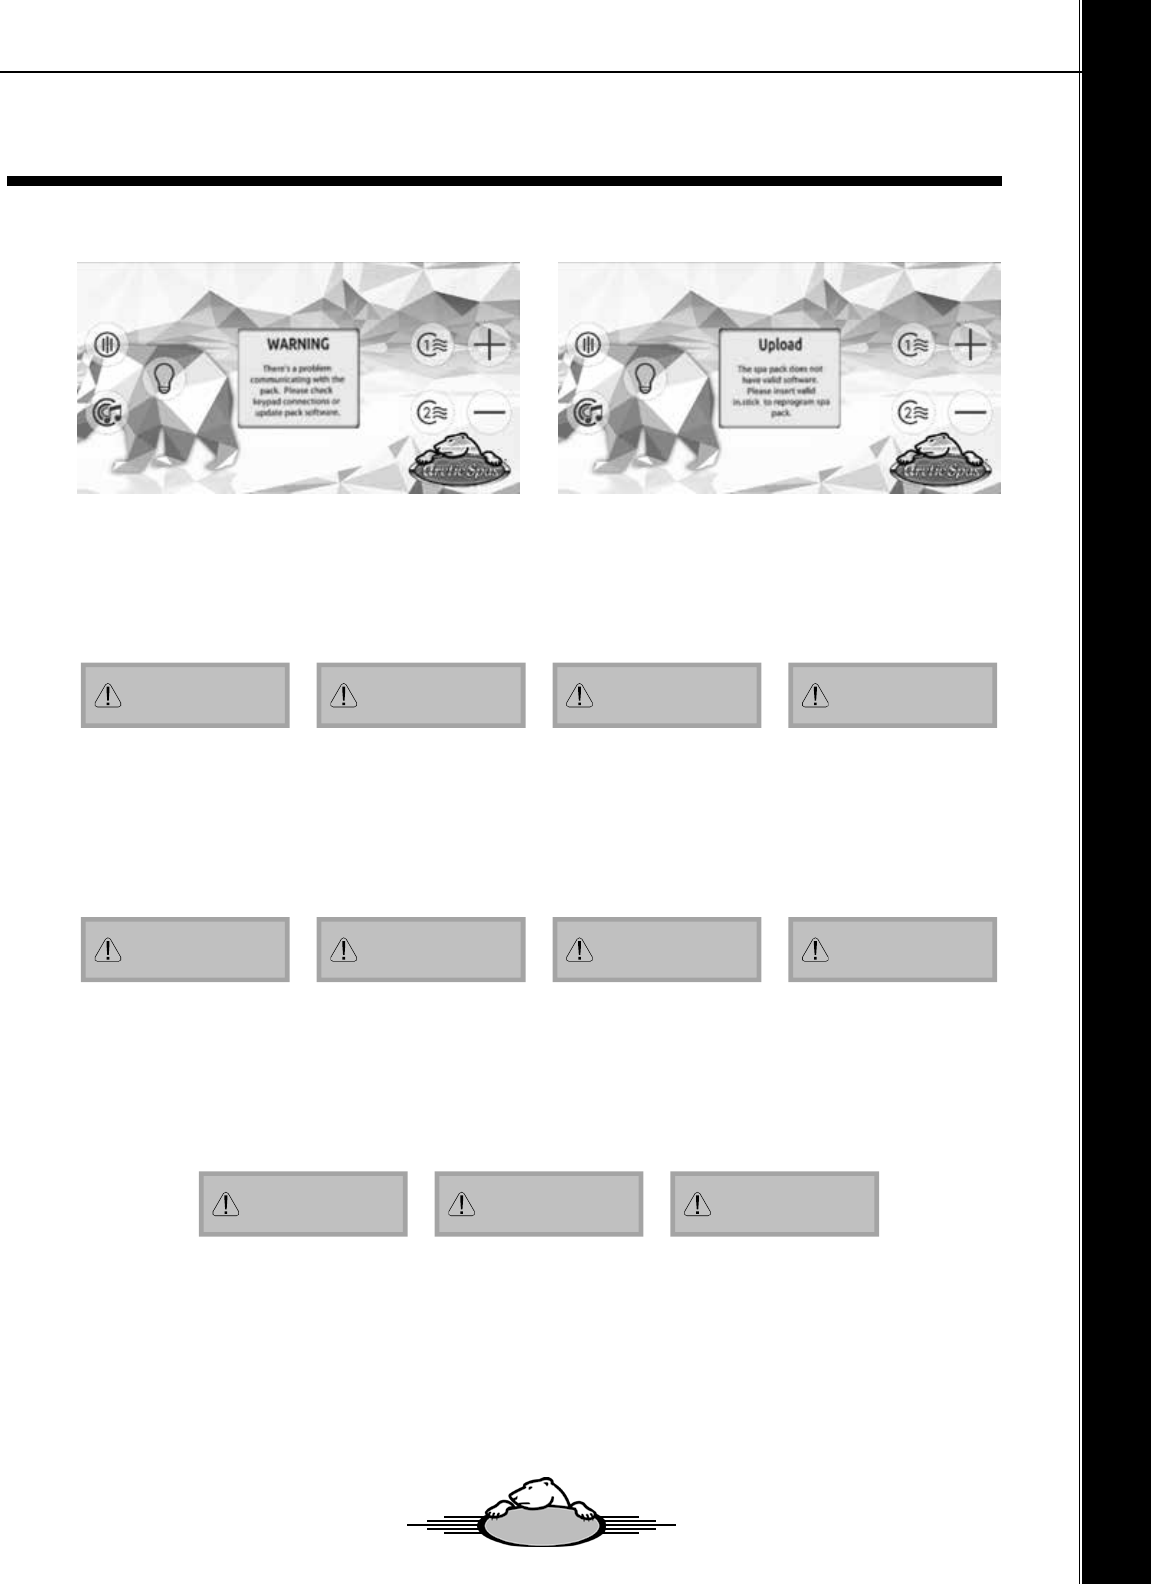
IN.K500 Error Codes
The following is a list of references at your disposal
Upon connecting the in.k500 topside to the spa pack you may see one of these messages. Please follow the
instructions in the message or contact your dealer for more information.
Owners Manual - Classic Series
HL
Warning! HL error
Warning! HL Error
FLO
No ow condition
or no ow for more
than 2 hours
No Flow Condition
HR
Danger! Relay stuck
Danger! Relay
Stuck
OH
Spa temperature is
too high
Warning!
Spa Temp. High
FLC
Flow switch is closed
Flow Switch
Closed
SP in
Input voltage issue
Input Voltage
Issue
RH NC
Comm. error
between in.xm2 and
in.therm
Comm. Error
in.xm2-in.therm
AOH
Elevated internal
temperature
Internal Pack
Temp. High
HP1-99
Heat Pump error 1-99
Heat Pump Error
RH ID
in.xm2 and in.therm
incompatible
in.xm2-in.therm
Incompatible
Pr
Warning! Temperature
probes defective
Warning! Temp.
Probes Defective
5151

Spa Shell ~ 10 years
Arctic Spas® warrants the spa shell to the customer against water loss due to structural failure for a period of 10 years.
Forever Floor ~ 3 years
Arctic Spas® warrants the Forever Floor against rotting and structure cracking for a period of 3 years to the original customer from the original
date of delivery. Includes parts and onsite labor necessary to repair.
Arctic Spas® extends this limited warranty solely to the original customer of any Arctic self-contained spa installed by an approved Arctic Spas
Dealer, for 3 years of delivery date or 4 years from manufacture ship original purchaser of the spa.
Equipment & Plumbing ~ 3 years parts and 3 year labor
Arctic Spas® warrants the spa’s electrical equipment components ~ specically the pump(s) *(please refer to detailed pump warranty below),
factory installed ozone system, heater (including the Tru-Guard™ Heater) and control system against malfunctions due to defects in materials
and workmanship for a period of 3 years to the original purchaser from the original date of delivery. Includes parts and labor necessary to repair.
Other Components ~ 3 years
Arctic Spas® warrants the fuses, lights, jet inserts, topside control overlays, cabinet material, lter baskets and weir assemblies, diverter handles
and caps, air control handles and caps, plastic cover clips, chrome trim, Intouch 2 and all other unmentioned components to be free of defects
in workmanship and materials for a period of 3 years to the original purchaser from the original date of delivery. Includes only parts necessary
to repair, not labor.
Shell Surface Acrylic ~ 4 years
Arctic Spas® warrants the shell surface to the customer against water loss due to material failure including cracks, blisters, peeling and
delaminating for a period of four years to the original customer from the original date of delivery. Includes parts and on site labour necessary to
repair.
Mylovac Cover ~ 3 years
Arctic Spas® warrants the upgraded MYLOVAC™ cover against malfunctions due to defects in materials and workmanship for three years to the
original owner from the original date of delivery. Includes parts necessary to repair. (Normal wear and tear is not included in this warranty, when
used with a cover lifter seam damage will be considered normal wear and tear.
Onzen™ ~ 2 years
Arctic Spas® warrants the factory installed Onzen system against malfunction due to defects in materials and workmanship for 2 year labor to
the original customer from original delivery date.
WetTunes™ ~ 1 years
Arctic Spas® warrants the factory installed WetTunes system against malfunction due to defects in materials and workmanship for 1 year labor
to the original customer from original delivery date.
DETAILED PUMP WARRANTY
Pump(s) are warranted against material and component failure. The pump shaft seal is covered under warranty. Damage resulting from a
neglected leaking shaft seal is not covered under warranty. This includes but is not limited to bearing seizure, end bell failure, start switch failure,
impeller failure and capacitor failure. It is the responsibility of the customer to report shaft seal failure before further damage can occur. Any pump
component failure determined to be the result of defective material will be replaced under warranty. Arctic Spas® reserves the right to replace
pump components, rather than the complete pump assembly. Vibration noise associated with normal pump operation is excluded under this
warranty.
PERFORMANCE
To obtain service in the event of a defect or malfunction covered by this Limited Warranty, notify your Arctic Spa dealer as soon as possible
and use all reasonable means to protect the spa from further damage. Upon proof of purchase, Arctic Spas®’ agent or its designated service
representative will correct the defect subject to the terms and conditions continued in this Limited Warranty. Preapproved claims must be
executed within 60 days of Pre-approval. All existing claims expire upon expiration of warranty. *Please note that union connection leaks are
considered to be user serviceable and are expressly excluded from the Limited Warranty. Damage resulting from union connection leaks are
expressly excluded from the Limited Warranty. There will be no charge for on-site labor to the customer for a period of one year from the date of
original delivery or 2 years from manufacturer’s ship date, whichever comes rst. Specically equipment, plumbing and shell surfaces against
malfunctions due to any defect in the material and workmanship within the Limited Warranty. Travel costs are the responsibility of the customer.
Your limited warranty will cover a maximum of $60 towards on-site labor per each approved warranty claim. Service and/or travel costs are
covered within the rst 30 days of ownership to a maximum distance of 100KM from dealership or designated service outlet. If Arctic Spas®
determines that repair of the covered defect is not feasible we reserve the right to instead provide a replacement spa equal in value to the original
purchase price of the defective spa. Spa replacement is done only at the discretion of Arctic Spas®.
Reasonable costs for the removal of the defective spa, and delivery and installation will be the responsibility of the spa customer. Freight will be
paid to the nearest Arctic Spas® distribution center.
CONDITIONS OF WARRANTIES
All warranties provided hereunder extend only to the original customer of the spa if purchased by an authorized Arctic spas dealer and originally
installed within the boundaries of the country where it was originally purchased. All warranties hereunder terminate upon transfer of ownership of
a spa from the original customer. This warranty only applies within the service area where the spa was originally installed. Your limited warranty
does not include repair travel mileage or for shipping cost assessed by your Factory Authorized Dealer or service agents. All events covered by
this Limited Warranty hereunder must be repaired by a Factory Authorized.
Dealer of Arctic Spas®. The warranties will not include any costs of repair incurred by a non-factory authorized agent. To obtain service, the
customer must contact the Factory Authorized Dealer in his area. In the event that a spa or component thereof must be returned to Arctic Spas®
distribution center, all freight costs are the responsibility of the spa customer. In all cases Arctic Spas® has sole responsibility for determining the
cause and nature of failure of the spa and Arctic Spas® determination with regard thereto shall be nal.
Classic Warranty
Owners Manual - Classic Series
5252

EXCLUSIONS
All warranties hereunder are void if the spa has been subject to alterations (including aftermarket accessories), misuse
or abuse or any repair of the spa has been attempted by anyone other than a Factory Authorized Dealer of Arctic
Spas®. Alterations include but not limited to, any change to the components, replacement of components or addition
of components without the written authorization from Arctic Spas®. Misuse includes careless handling of the spa,
damages caused by improper and/or non-certied electrical hook- ups, failure to operate the spa in accordance with
the instructions contained in the owner’s manual provided with the spa, including incorrect start-up procedures or
dry ring of the spa, any use of the spa or any of its components in an application for which it was not designed, and
damage caused by improper chemical balance (including any damage to spa components caused by scale build up to
due to poor water chemistry), ice in the spa, overheating the spa or spa water, damage to the spa surface by allowing
undissolved sanitizing chemicals to lie on he surface or if our spa has been used for commercial purposes. Spa covers
are not warranted against chemical burn or discoloration. Spa covers are not warranted against water absorption or
any damage resulting from water absorption. Any damage resulting from the mishandling of the spa cover in any way is
not covered under warranty. Any damage caused by moving of the spa or improper installation (including insuciently
prepared or uneven ground) is considered abuse and any damage to the material or workmanship of the spa cabinetry
and oor in shipping or handling are expressly excluded from the Limited Warranty.
Arctic Spas will not be responsible for power company issues or improper electrical installations, damage and/or lack
of performance resulting from high or low voltages outside operating parameters. Arctic Spas will not be responsible
for software and product upgrades throughout the life of the spa.
Arctic Spas® expressly excludes warranty coverage on any of the following: Acts of nature including but not limited
to damage resulting from lightning, storm, ooding, freezing, re and any other acts of nature. Any spa installed in a
commercial application. Any failure caused by improper cover use or damage to the spa surface by leaving the spa
outdoors without the hot tub cover in place. The heat created by leaving the spa in direct UV light without a cover may
cause surface issues with the acrylic and may also cause plastic parts to warp, some ttings will leak or cease working
as a result. These occurrences are not covered under warranty. The hot tub cover must be kept on the hot tub when
not being used.
Scratches or micro-crazing in the spa shell reported after the day of installation are not covered under warranty. Micro-
crazing is dened as an area of tiny shiny lines visible in areas on the surface of some thermoplastic sheets. This
phenomena, although rare, is known to occur in many types of plastic sheet materials. The surfaces of thermoformed
acrylic hot tubs are not immune to this possibility.
Damaged caused by unapproved sanitizers such as tri-chlor, acids, calcium hypochlorite, sodium hypochlorite, peroxides,
any sanitizing chemical that may remain undissolved on the spa surface. Any and all sanitation systems or chemicals used in
your spa must be factory approved by Arctic Spas or your warranty is void. You can check for a list of approved systems and
chemicals at arcticspas.com. Installation of not factory approved salt systems will void the warranty related to pump seals,
metal part, jets, etc. Damage caused by any item(s) attached to or installed onto the spa, including but not limited to gazebos,
cover lifters and cedar accessories. Any options or additional components that are not factory installed are not covered under
warranty. Any damage or failure due to improper preparation for winter storage is not covered under warranty.
Any damage resulting from the use of cover removing mechanisms is not covered under
Damage to pillows reported beyond the day of delivery will not be covered under warranty. Pillows are to be removed from the
spa when not in use.
DISCLAIMERS
Arctic Spas® will not be liable for loss of use of the spa or other incidental or consequential costs, expenses or
damages that may include but not limited to, the removal of a permanent sun deck, sunroom, gazebo, or other custom
xture, any crane costs associated with the removal of the spa for service or replacement. Arctic Spas® shall not be
liable for costs arising from water, lter cartridges and chemical loss. Under no circumstances shall Arctic Spas® or
any of its representatives be liable for any injury to any person or damage to any property, howsoever arising from the
spa. Arctic Spas® warranties are limited to a maximum amount of moneys received by Arctic Spas® with respect to
the sale of the spa.
ALL WARRANTIES
The warranties contained herein are all of the warranties provided by Arctic Spas® to the customer, and to the extent
permitted by law. Warranty registration (within 30 days of delivery) is the responsibility of the customer and is a
condition of warranty coverage. This Warranty is oered as an extra benet and does not aect your statutory rights.
All warranties herein require that any claim must be submitted to Arctic Spas® within ten days of the time the defect is
discovered, and must be accompanied by the original customer’s receipt conrming purchase of the spa, which shows
the date of purchase. All warranty claims must be submitted
within the warranty period. Failure to provide such notice and information invalidates all warranties provided hereunder.
Arctic Spas® reserves the right to repair or replace components or materials at its option. In certain cases, photographs
may be required for proper evaluation before warranty coverage is determined. In the event a customer is unable to
either obtain parts or satisfactory service from a Factory Authorized Dealer of Arctic Spas®, notice should be given
immediately to the service department of the agent where the spa was purchased and to Arctic Spas®.
Arctic Spas® expressly excludes warranty coverage on splitting, fading or warping of the cedar cabinet beyond the
date of delivery. Any damage resulting from handling of the cedar cabinet is excluded from this warranty. This warranty
will not cover any labor for Bluetooth connection assistance/issues, InTouch Internet Control initialization & connection
assistance/issues from a smartphone, or assistance with actually connecting any of these devices.
Classic Warranty
Owners Manual - Classic Series
5353
5454
Our Core Values
The foundation of our construction techniques
built into every spa to t nearly any budget
Core Series
5555
Outside
Dimensions
Height
Heater
(watts)
Water
Capacity
Dry
Weight
Electrical
Requirements
North America
A = actual / B = breaker
Electrical
Requirements
Europe
Grizzly
91’’ x 91’’
231 x 231 cm
39’’
99 cm
NA / Euro
4000 W
375 Gallons
1420 Liters
1001 Lbs
454 Kg
240 Volts / 6 Gauge Wire
2 Pumps / A40amp / B50amp
115 Volts / 14 Gauge Wire
1 Pump / A12amp / B15amp
1 phase x 32 Amp
or
3 phase x 16 Amp
Orca
91’’ x 91’’
231 x 231 cm
39’’
99 cm
NA / Euro
4000 W
400 Gallons
1514 Liters
1001 Lbs
454 Kg
240 Volts / 6 Gauge Wire
2 Pumps / A40amp / B50amp
115 Volts / 14 Gauge Wire
1 Pump / A12amp / B15amp
1 phase x 32 Amp
or
3 phase x 16 Amp
Aurora
81’’ x 80’’
206 x 204 cm
39’’
99 cm
NA / Euro
4000 W
315 Gallons
1193 Liters
702 Lbs
318 Kg
240 Volts / 6 Gauge Wire
1 Pump / A40amp / B50amp
115 Volts / 14 Gauge Wire
1 Pump / A12amp / B15amp
1 phase x 32 Amp
or
3 phase x 16 Amp
Husky
84’’ x 73’’
206 x 204 cm
39’’
99 cm
NA / Euro
4000 W
272 Gallons
1030 Liters
631 Lbs
286 Kg
240 Volts / 6 Gauge Wire
1 Pump / A40amp / B50amp
115 Volts / 14 Gauge Wire
1 Pump / A12amp / B15amp
1 phase x 32 Amp
or
3 phase x 16 Amp
Ellesmere
86’’ x 62’’
218 x 157 cm
39’’
99 cm
NA / Euro
4000 W
230 Gallons
871 Liters
560 Lbs
254 Kg
240 Volts / 6 Gauge Wire
1 Pump / A40amp / B50amp
115 Volts / 14 Gauge Wire
1 Pump / A12amp / B15amp
1 phase x 32 Amp
or
3 phase x 16 Amp
Otter
86’’ x 46’’
218 x 117 cm
30’’
75 cm
NA / Euro
4000 W
150 Gallons
568 Liters
400 Lbs
181 Kg
115 Volts / 14 Gauge Wire
1 Pump / A12amp / B15amp
1 phase x 32 Amp
or
3 phase x 16 Amp
Owners Manual - Core Series
Specications
5656
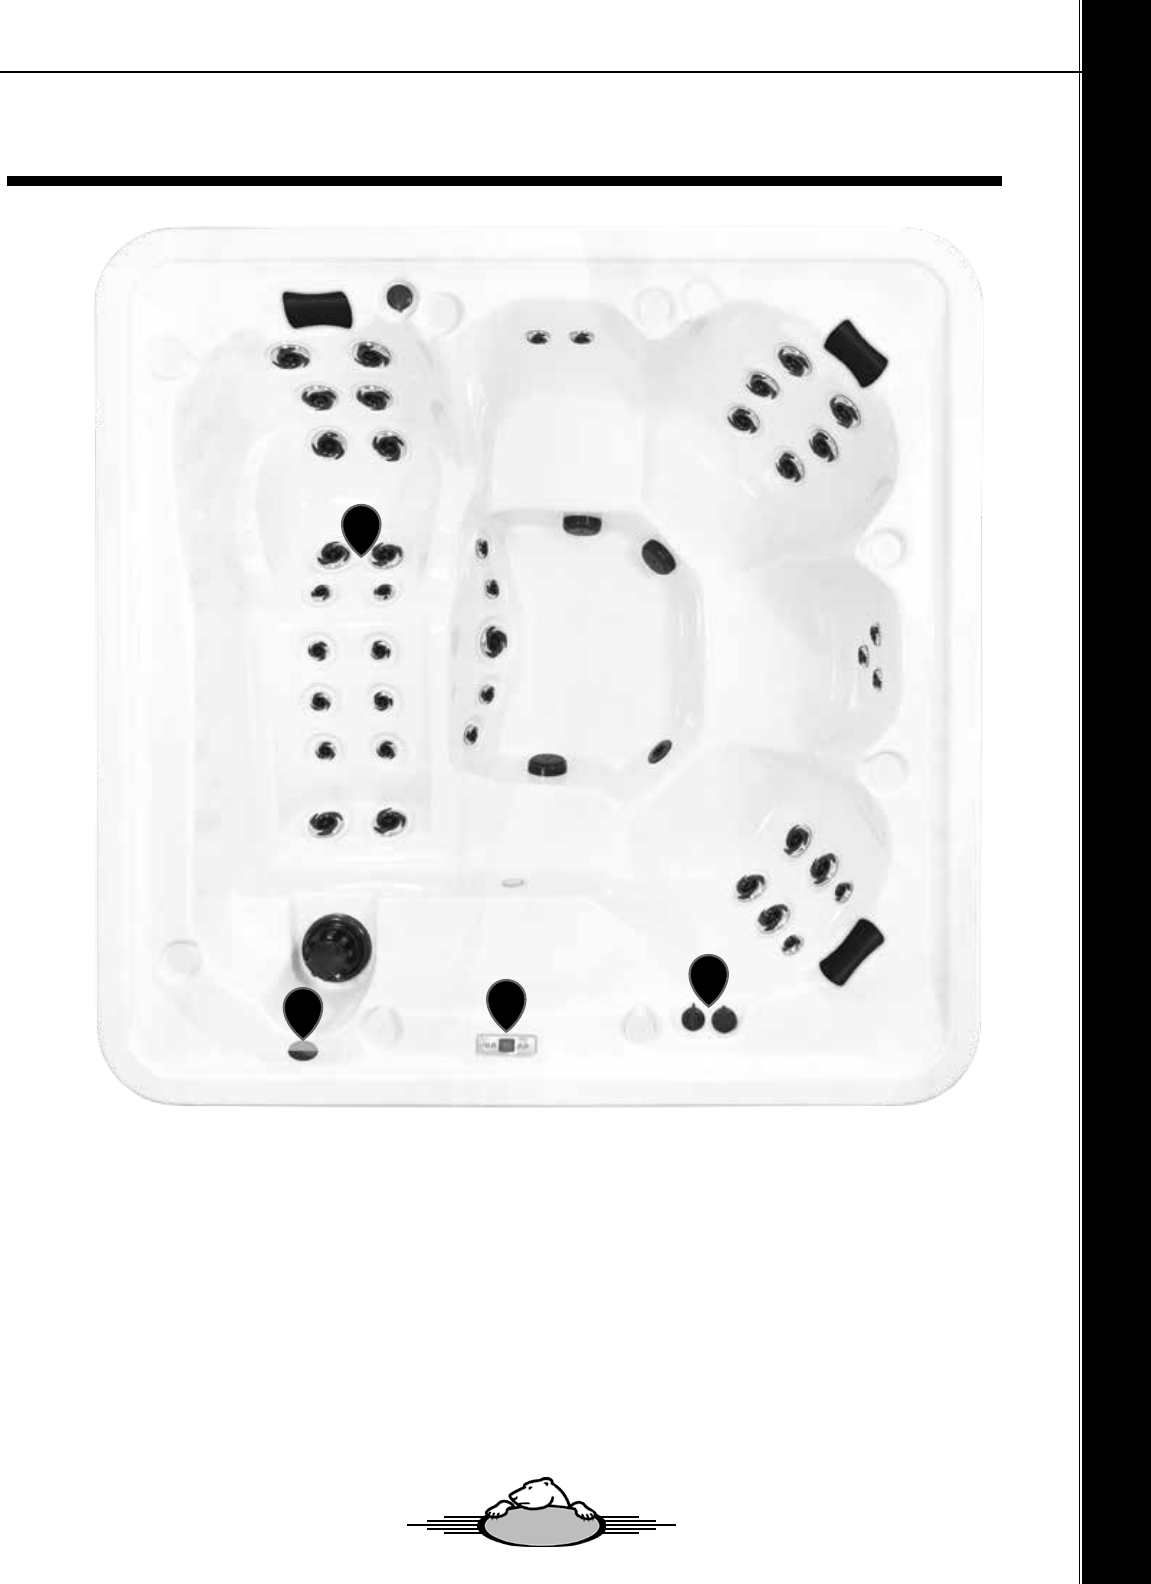
Owners Manual - Core Series
Spa Overview
A: Topside Control | See Topside Control Overview section in this manual.
B: Waterspouts | Control by an ON/OFF valve.
C: Jets | All jets are adjustable and can be turned ON/OFF and can also be locked in the fully ON position,
simply by rotating the Jet face.
D: Venturi | Allows air into jets to boost jet performance when Pump 1 is on. Leave in the “closed” position
when spa is not in use.
A
B
D
C
5757
Jets
Two and a half Inch (2.5”) Jets
The Turbo Single jets give a wide circular massage. The 2.5 inch jets are designed for a thorough mas-
sage of the muscles in your upper back, shoulders and neck. These jets are adjustable by turning the face
of the jet clockwise for a stronger ow and counter-clockwise for a softer ow and eventually o. The Jet can
also be locked in the fully ON (open) position by turning the face of the jet clockwise until it does not go any
further. Then rotate again to allow the jet to override the lock stop.
Four Inch (4”) Jets
The four-inch Hydro-massage jets give a wide circular massage. These jets are adjustable by turning the
face of the jet clockwise for a stronger ow and counter-clockwise for a softer ow and eventually o. The
Jet can also be locked in the fully ON (open) position by turning the face of the jet clockwise until it does not
go any further. Then rotate again to allow the jet to override the lock stop.
Owners Manual - Core Series
5858

Owners Manual - Core Series
5959
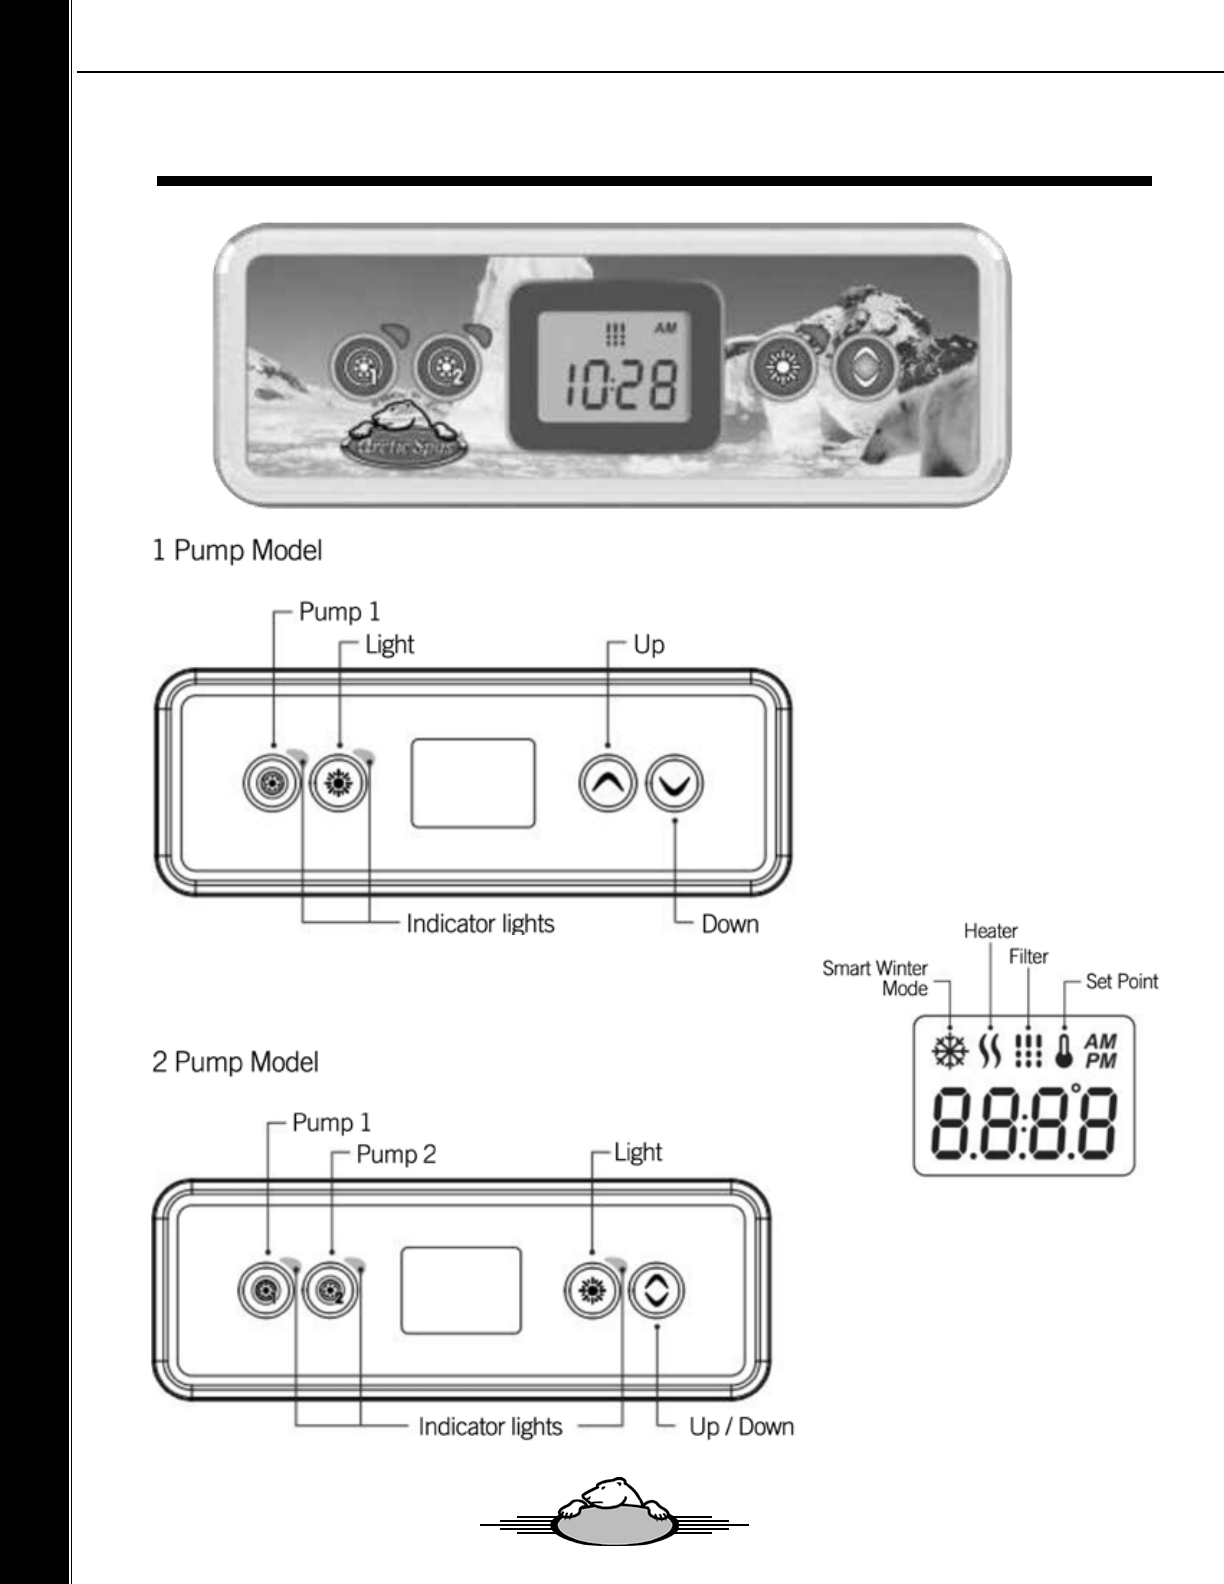
Topside Control Panel
Owners Manual - Core Series
6060

Spa Functions
Off Mode
Pressing Pump 1 for 5 seconds will enable the O Mode. This
mode allows you to stop all outouts including automatic functions
such as lter cycle, heat request and smart winter mode for 30
minutes to perform quick spa maintance. When O Mode is active,
the display will toggle between the “OFF” message, the clock and
the water temperature. The spa light will ash for a few seconds
before the end of the 30 minutes to warn you that the system is
about to resume its normal operation.
Press Pump 1 or Pump 2 (if available) to restart the system before the expiration of the 30 minutes delay. When the
system resume its normal operation, the display shows “ON” for 3 seconds.
Pump 1
Press Pump 1 key to turn Pump 1 on at low speed. Press second
time to turn pump to high speed. A third time turns pump o. A
built-in timer automatically turns pump o after 20 minutes, unless
pump has been manually deactivated rst.
The “Pump 1” indicator lights up when Pump 1 in on. The indicator
will ash when pump 1 is on at low speed.
Pump 2 (Not available on all models)
Press Pump 2 key to turn Pump 2 on at high speed. Press a sec-
ond time turns pump o. A built-in timer automatically turns pump
o after 20 minutes, unless pump has been manually deactivated
rst.
The “Pump 2” indicator lights up when Pump 2 in on.
Owners Manual - Core Series
6161
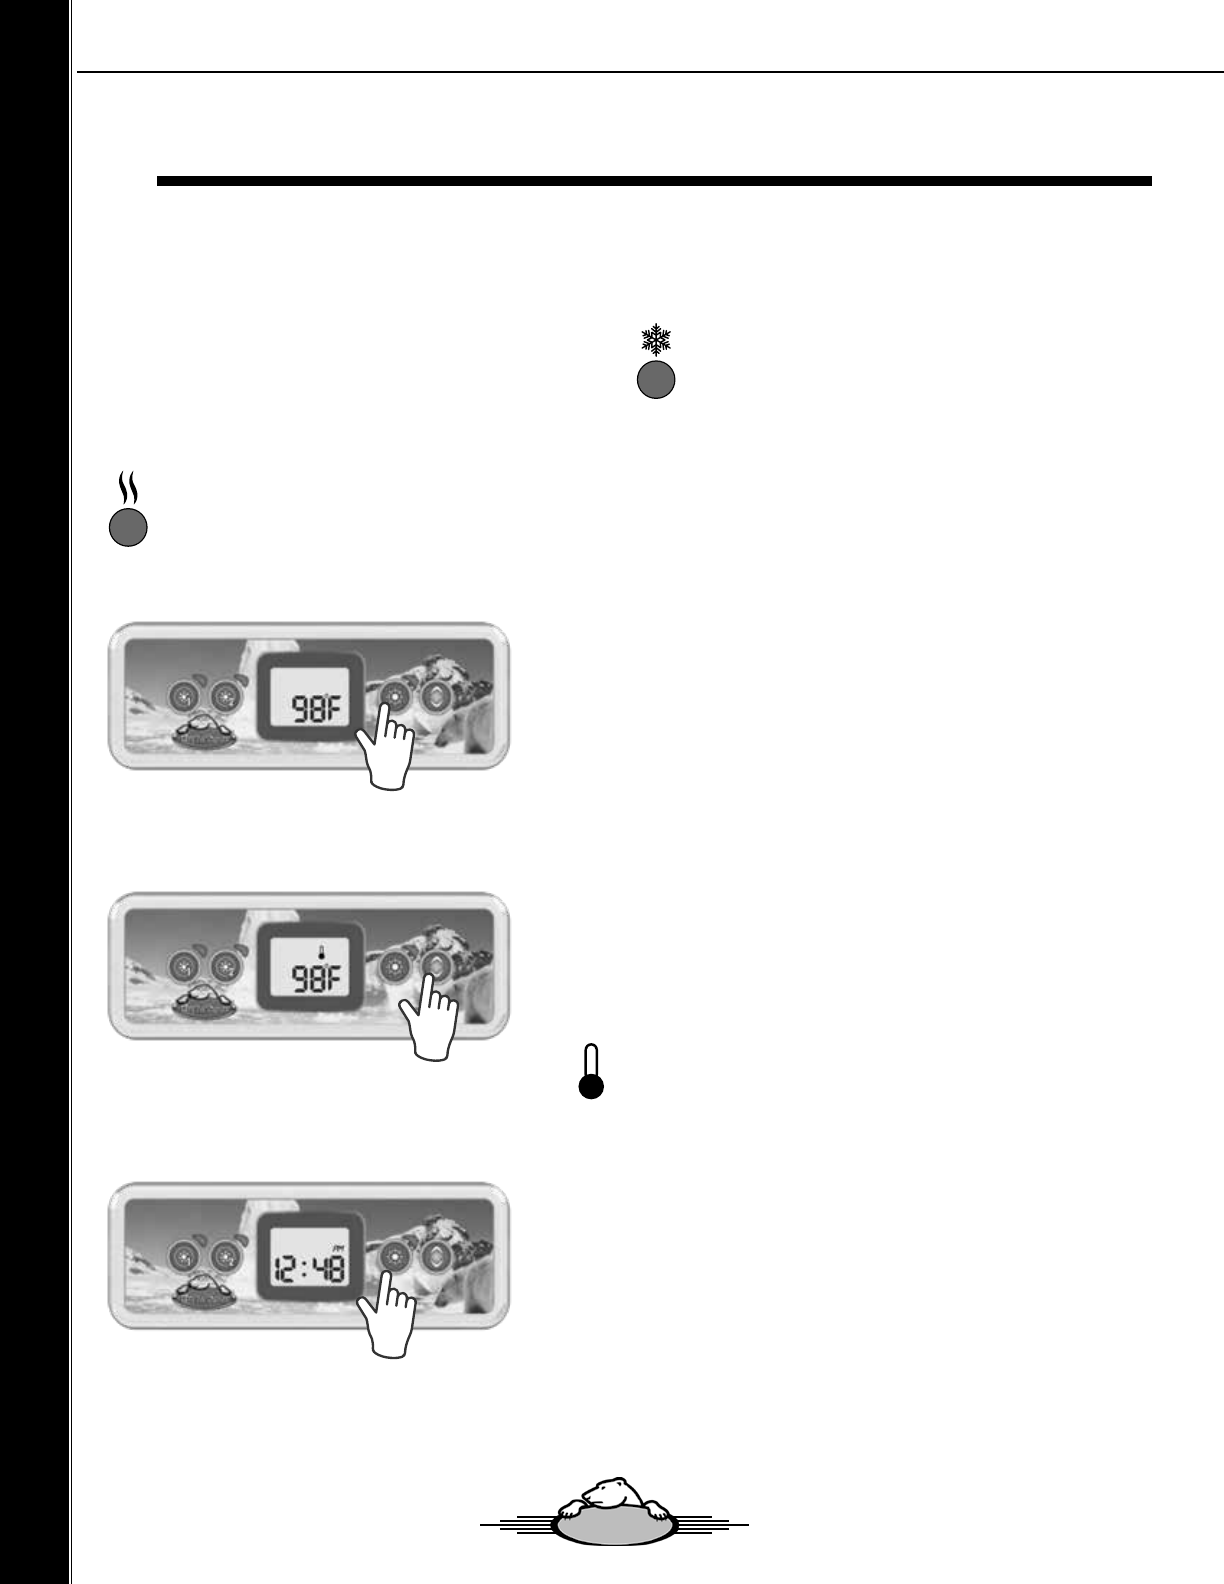
Startup Programming
Water Temperature Regulation
In a regulation cycle, the system rst generates water ow
through the heater housing and the plumbing, in order to
ensure accurate water temperature readings as well as
avoiding heater activation in dry conditions.
After verifying pump activation and taking a water temper-
ature reading if required, the system automatically turns
the heater on to reach and maintain water temperature at
Set Point.
The “Heater” indicator lights up when the heater is
on. It ashes when there is a request for more heat
but the heater has not yet started.
Cooldown
While performing this task, the heater is not allowed to
turn on and its icon ashes.
Smart Winter Mode
Our Smart Winter Mode protects your system from the
cold by turning pumps on several times a day to prevent
water from freezing in pipes.
The “Smart Winter Mode” indicator lights up when
the Smart Winter Mode is on.
Light Key
Press Light Key to turn lights on. A second press turns lights o. A
built-in timer automatically turns light o after 2 hours, unless it has
been manually deactivated rst.
The “Light” indicator lights up when light is on
Up / Down Keys
Use Up or Down key to set desired water temperature. The tem-
perature setting will be displayed for 2 seconds to conrm your
new selection.
2 pump spas have a combined Up/Down Key. Hold the button to
increase the parameter and release the button to stop. Hold the
button again to decrease the parameter.
The “Set Point” icon indicates that the display shows the
desired temperature, NOT the current water temperature!
Program Menu
Press Light Key to turn lights on. A second press turns lights o.
The program menu is accessible by holding down the Light key for
5 seconds. In the program menu the following parameters can be
set: clock, lter or purge cycles, economy mode and temperature
units. While in the program menu, use the Up or Down key to
adjust the parameters and use the Light key to jump to the next
parameter. The changes will be saved after the conrmation of the
last parameter only. If there is no action taken for 10 seconds, the
system will exit the program menu without saving any changes.
Owners Manual - Core Series
6262
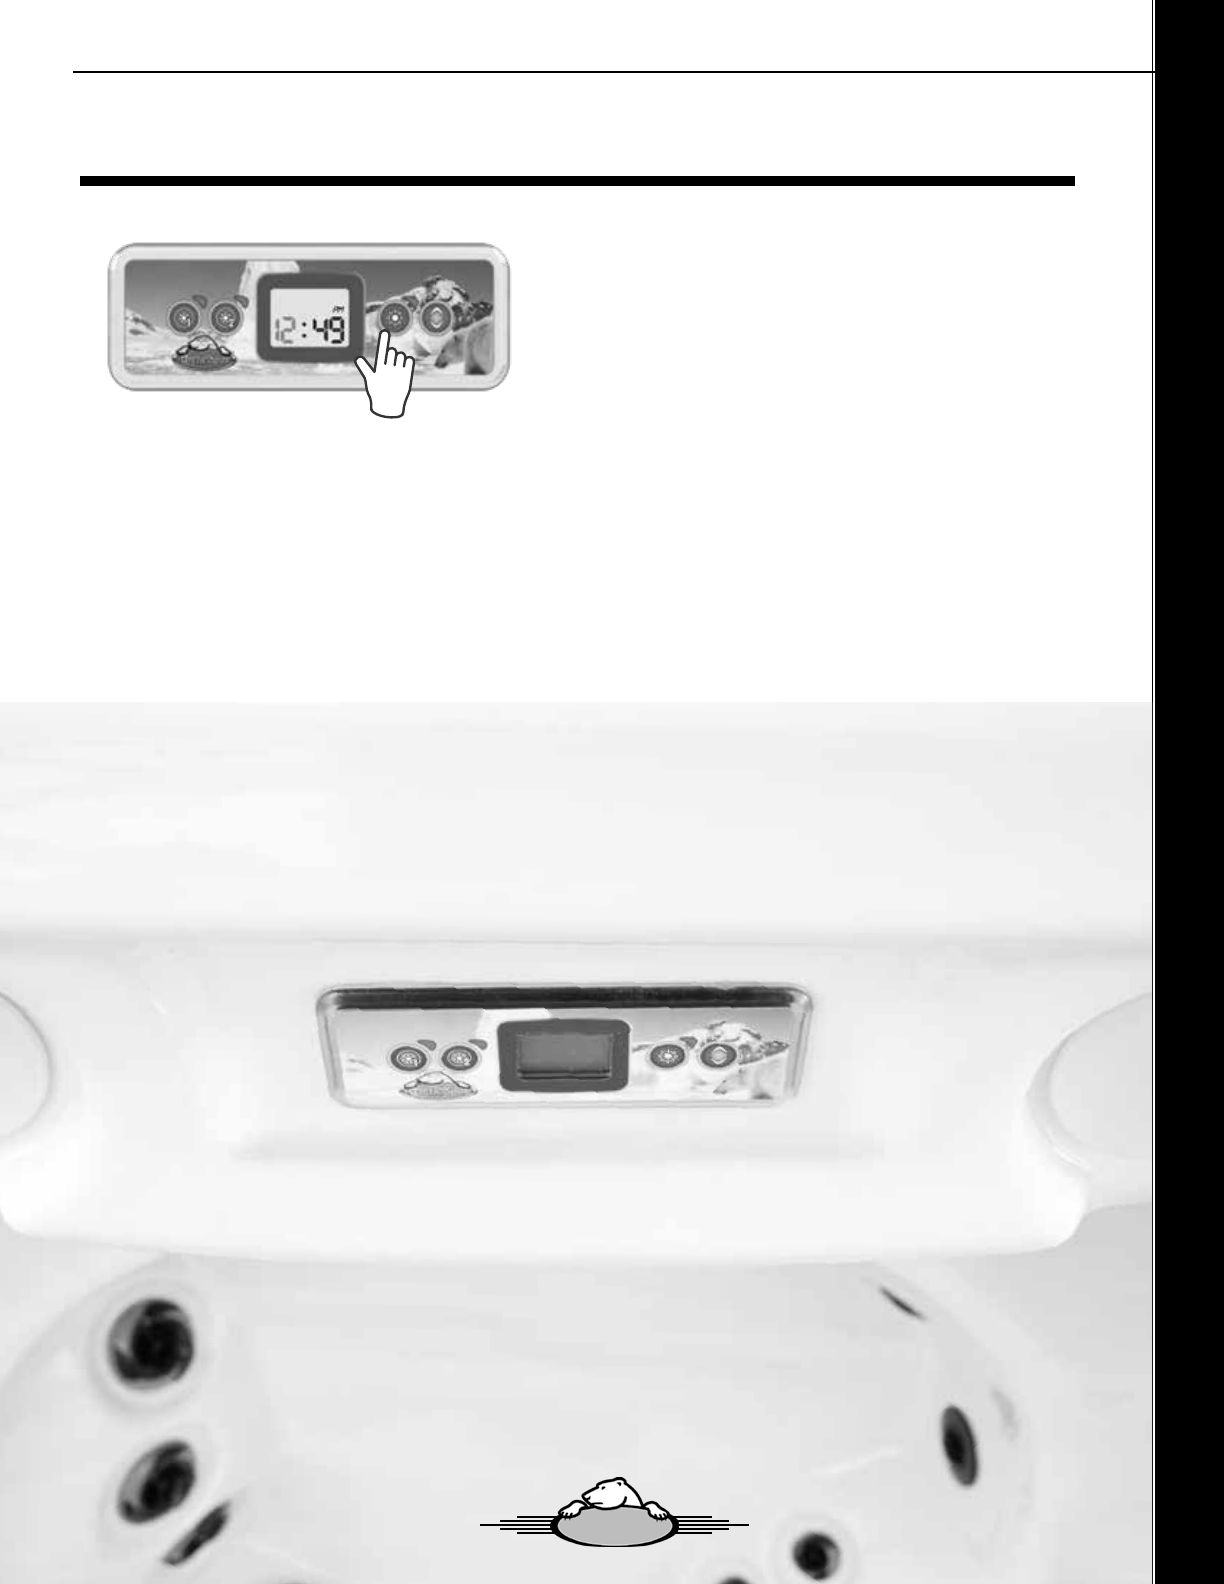
Startup Programming
Setting the Clock
Enter the program menu by holding down the Light key for 5
seconds. The display will show the current clock setting with
the hour ashing.
Depending on factory settings your system may be set
to 24-hour time or 12-hour time.
Setting the hour: Use the arrow keys to adjust the hour. Press the Light key to jump to the next parameter, the
minutes. Setting the minutes: Use the arrow keys to adjust the minutes. Press the Light key to jump to the next
parameter, the lter or purge start time (FS).
Programming the lter
The lter cycle menu consists of the following parameters: the start time (FS), the duration (Fd) and the frequency
(FF). A lter cycle consists of starting all the pumps in high speed for 1 minute (purge step) then, the pump associ-
ated with the lter will run in low speed for the remaining duration of the lter cycle (clean step).
Owners Manual - Core Series
6363
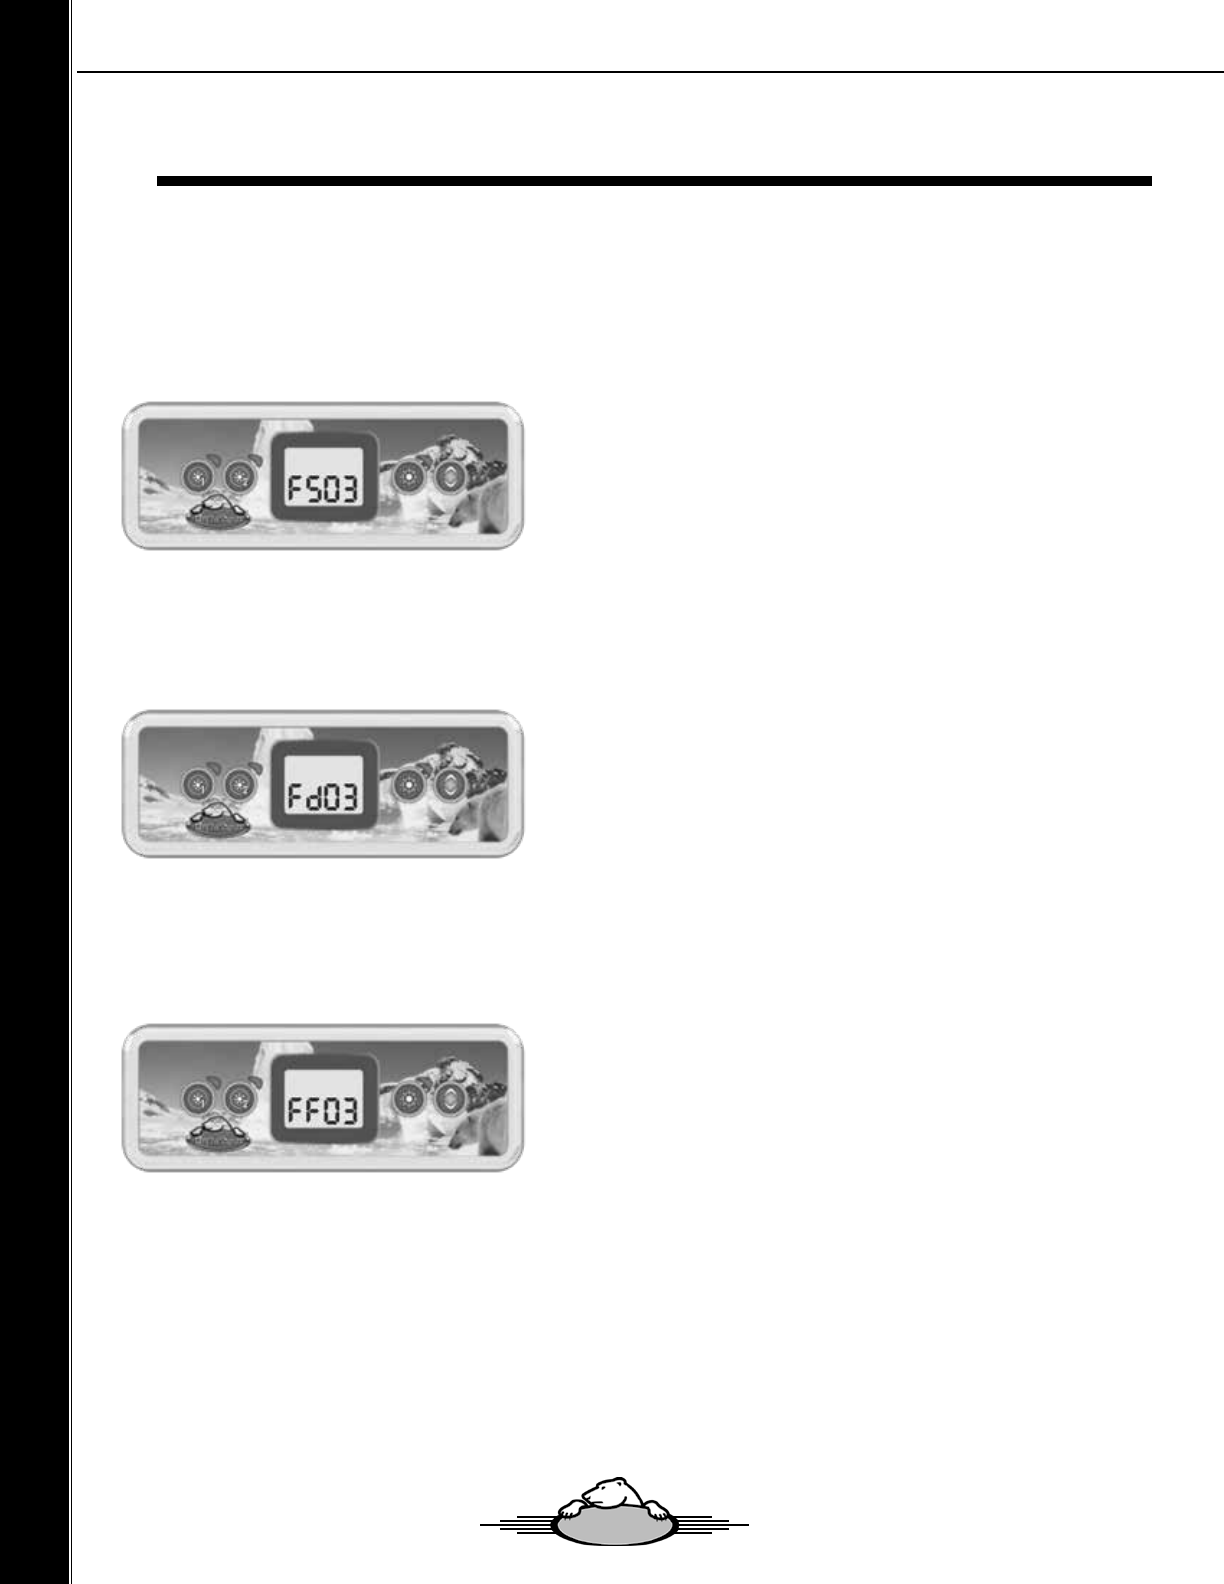
Filtration Settings
Setting Filter Cycle Start Time
The display will show FSxx, “xx” representing the starting hour
of the cycle. Use the arrow keys to adjust the hours. Use the
Light key to jump to the next parameter, lter duration (Fd).
Setting Filter Cycle Duration
The display will show Fdxx, “xx” representing the duration in
hours of the lter cycle. Use the arrow keys to adjust the dura-
tion. Use the Light key to jump to the next parameter, lter or
purge frequency (FF).
• 0 = no ltration (It is not recommended to set this to “0”)
• 24 = continuous ltration
Setting Filter Cycle Frequency
The display will show FFxx, “xx” representing the number of
cycles per day. Use the arrow keys to adjust the frequency.
Use the Light key to jump to the next parameter, Onzen Cycles
(OC).
• The “Filter” indicator lights up when lter is on and ashes
when suspended.
Owners Manual - Core Series
6464
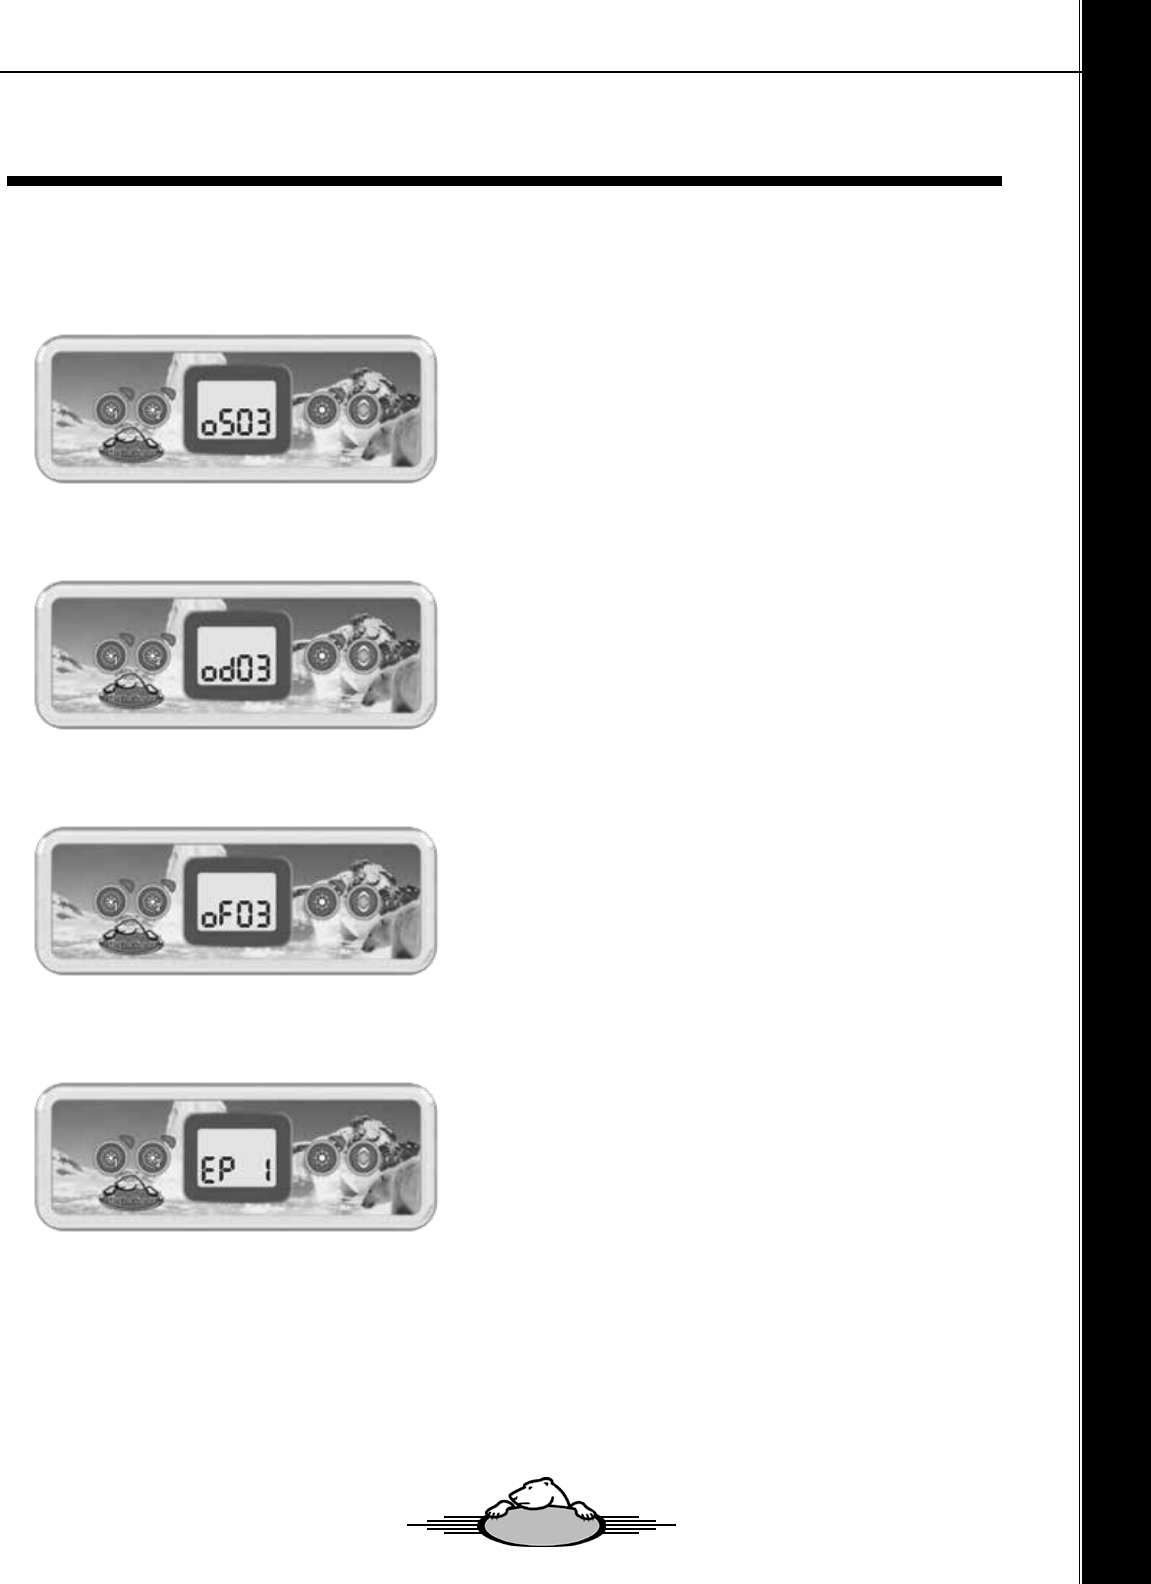
Setting Onzen Cycle Start Time
The display will show oSxx, “xx” representing the starting hour of
the cycle. Use the arrow keys to adjust the hours. Use the Light
key to jump to the next parameter, lter duration (Fd).
Setting Onzen Cycle Duration
The display will show odxx, “xx” representing the duration in hours
of the lter cycle. Use the arrow keys to adjust the duration. Use
the Light key to jump to the next parameter, lter or purge fre-
quency (FF).
• 0 = no ltration (It is not recommended to set this to “0”)
• 24 = continuous ltration
Setting Onzen Cycle Frequency
The display will show oFxx, “xx” representing the number of cycles
per day. Use the arrow keys to adjust the frequency. Use the Light
key to jump to the next parameter, economy mode (EP).
Setting Economy Mode*
This mode allows you to lower the temperature set point of the spa
by 20 °F (11 °C) during a certain period of the day. The display will
show EPx, “x” representing the state of the programmed economy
(0 = disabled, 1 = enabled). Use the arrow keys to enable or dis-
able economy mode. Use the Light key to jump to the next param-
eter, economy start time (ES). When the Economy mode is ON,
the display will toggle between the “Eco” message, the time, and
the water temperature.
Filtration Settings
Owners Manual - Core Series
6565
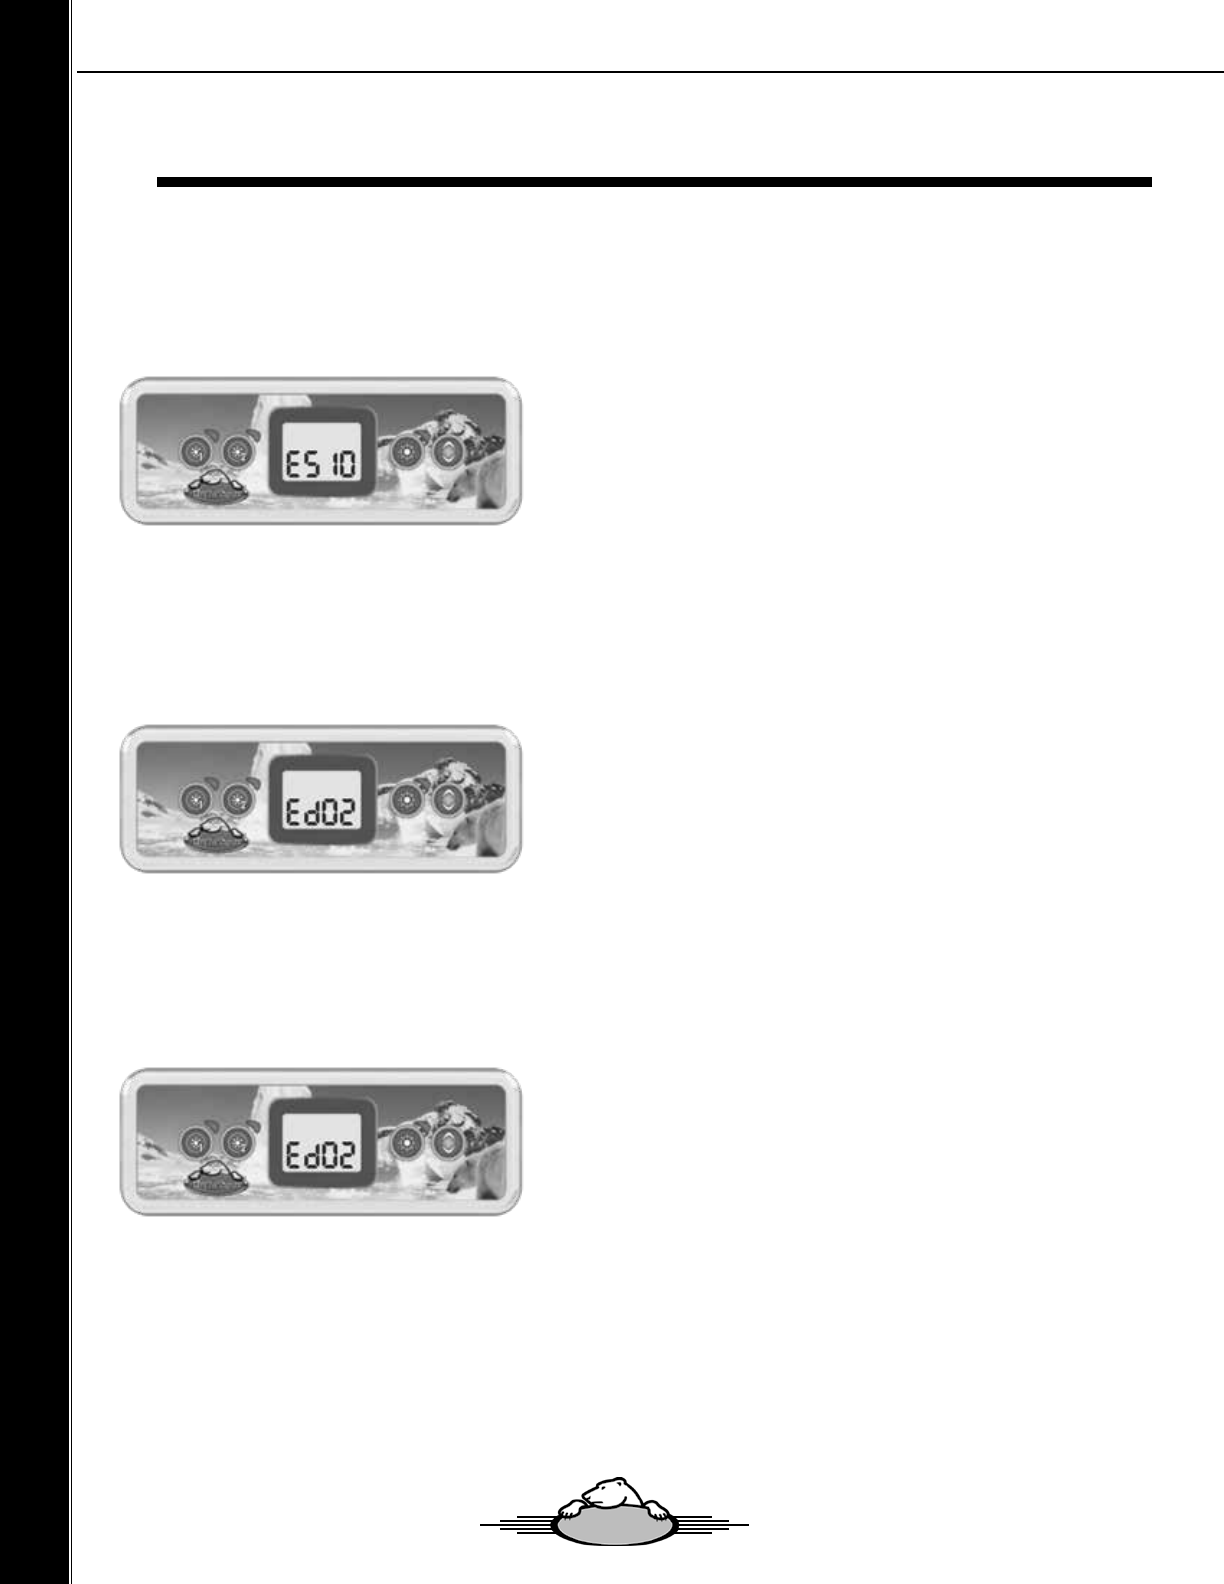
Setting Economy Mode
Setting Economy Start Time*
The display will show ESxx, “xx” representing the hour at which
the economy mode will become active. Use the arrow keys to ad-
just the hour. Use the Light key to jump to the next parameter,
economy duration (Ed).
* Note that the parameters for the economy mode settings are as-
sociated to specic low level conguration of the system that are
not present in all software revisions.
Setting Economy Duration*
TThe display will show Edxx, “xx” representing the duration in
hours of the economy mode. Use the arrow keys to adjust the
hour. Use the Light key to jump to the next parameter, temperature
unit.
• 24 = continuous economy
Setting Temperature Unit
Water temperature can be displayed in either Fahrenheit (°F) or
Celsius (°C). The display will show °F or °C. Use the arrow keys
to change the setting. Use the Program or Light key to save all the
parameters.
Owners Manual - Core Series
6666
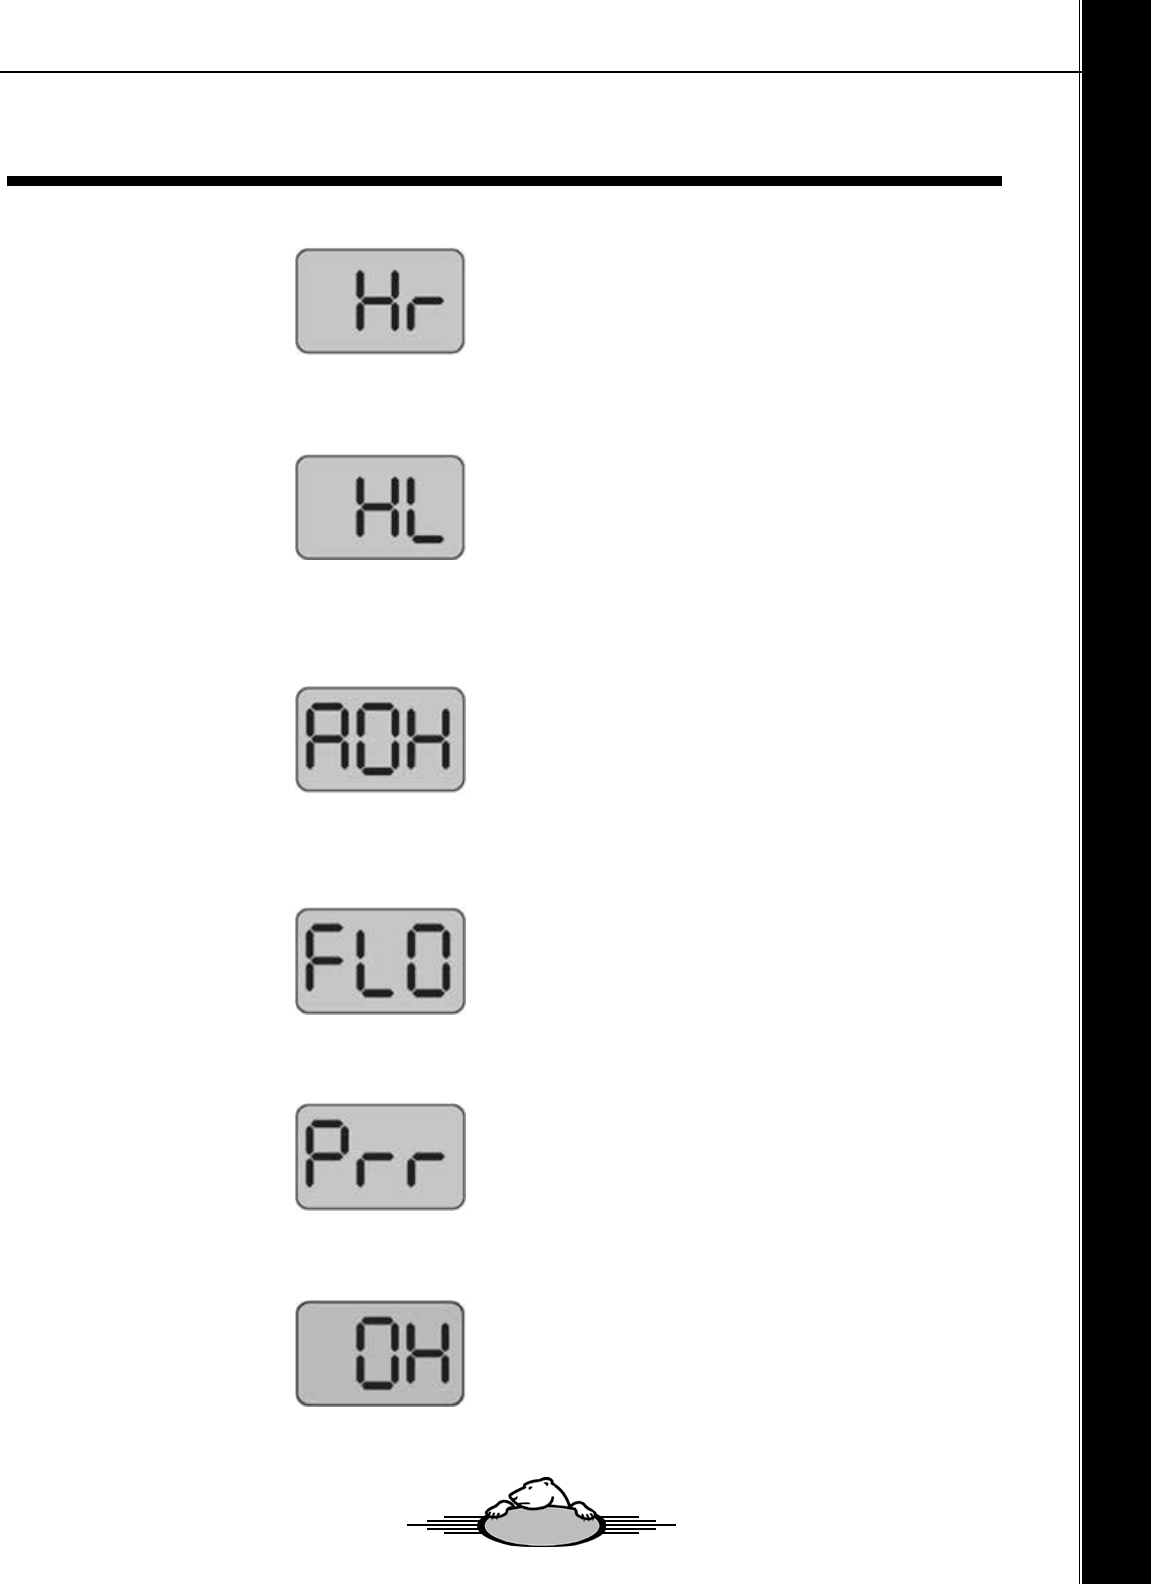
Hr
An international error has been
detected in in.xe. Contact dealer
or service supplier.
HL
The system has shut the heater
down because the temperature
at the heater has reached 119ºF
(48ºC). Do not enter the water!
Remove the spa cover and allow
the water to cool down, then the
shut power o and power your
spa up again to reset the system.
AOH
The temperature inside the spa
skirt is too high, causing the in-
ternal temperature in the in.xe to
increase above the normal lim-
its. Open skirt and wait until error
clears.
FLO
The system does not detect any
water ow while the primary
pump is running. Check and
open water valves. Check for
water level. Clean lter. If the
problem persists, call your deal-
er or service supplier.
Prr
A problem is detected with the
temperature probe. Call your
dealer or service supplier.
OH
The water temperature in the spa
has reached 108ºF (42ºC). Do
not enter the water! Remove the
spa cover and allow the water to
cool down to alower tempera-
ture. Call your dealer or service
supplier if the problem persists.
Error Codes
Owners Manual - Core Series
6767

Core Warranty
Spa Shell ~ 7 years
Arctic Spas® warrants the Core Series shell to the customer against water loss due to structural failure for a period of 7
years.
Arctic Spas® extends this limited warranty solely to the original customer of any Arctic self-contained spa installed by an
approved Arctic Spas Dealer, for 3 years of delivery date or 4 years from manufacture ship date witch ever comes rst
to the original purchaser of the spa.
Equipment & Plumbing ~ 3 years parts and 1 year labor
Arctic Spas® warrants the Core Series electrical equipment components ~ specically the pump(s) *(please refer to
detailed pump warranty below), factory installed aquanova ozone system, heater (including the Tru-Guard™ Heater) and
control system against malfunctions due to defects in materials and workmanship for a period of 3 years to the original
purchaser from the original date of delivery. Includes parts necessary to repair. Labor is included for a period of 1 year.
Other Components ~ 3 years
Arctic Spas® warrants the Core Series fuses, lights, jet inserts, topside control overlays, lter baskets and weir assemblies,
diverter handles, in.touch 2 internet control and caps, air control handles and caps, plastic cover clips, chrome trim and all
other unmentioned components to be free of defects in workmanship and materials for a period of 3 years to the original
purchaser from the original date of delivery. Includes only parts necessary to repair, not labor.
Aqua Nova ~ 1 year
AquaNova limited warranty one (1) year on sanitizer, check valve assembly & UV-C.
Shell Surface ~ 3 years
Arctic Spas® warrants the Core Series interior surface to the customer against water loss due to material failure including
cracks, blisters, peeling and delaminating for a period of 3 years to the original purchaser from the original date of
delivery. Includes parts and labor necessary to repair.
Cover (4” - 2”) ~ 1 years
Arctic spas® warrants the standard Core Series cover against malfunctions due to defects in materials and workmanship
for one year to the original owner from the original date of delivery. Includes parts necessary to repair.
Upgraded Cover (5”-4”) ~ 3 years
Arctic Spas® warrants the upgraded VACSEAL™ cover against malfunctions due to defects in materials and workmanship
for three years to the original owner from the original date of delivery. Includes parts necessary to repair. (Normal wear
and tear is not included in this warranty, when used with a cover lifter seam damage will be considered normal wear and
tear.
Core Sound ~ 1 year
Arctic Spas® warrants the factory installed Core sound stereo system against malfunction due to defects in materials
and workmanship for one year to the original customer from original delivery date. Includes parts and onsite labor and
parts necessary to repair.
Everlast Floor ~ 3 years
Arctic Spas® warrants the Everlast Floor against structure cracking for a period of 3 years to the original customer from
the original date of delivery. Includes parts necessary to repair.
DETAILED PUMP WARRANTY
Pump(s) are warranted against material and component failure. The pump shaft seal is covered under warranty. Dam-
age resulting from a neglected leaking shaft seal is not covered under warranty. This includes but is not limited to bearing
seizure, end bell failure, start switch failure, impeller failure and capacitor failure. It is the responsibility of the customer
to report shaft seal failure before further damage can occur. Any pump component failure determined to be the result of
defective material will be replaced under warranty. Arctic Spas® reserves the right to replace pump components, rather
than the complete pump assembly. Vibration noise associated with normal pump operation is excluded under this war-
ranty.
PERFORMANCE
To obtain service in the event of a defect or malfunction covered by this Limited Warranty, notify your Arctic Spa dealer as
soon as possible and use all reasonable means to protect the spa from further damage. Upon proof of purchase, Arctic
Spas®’ agent or its designated service representative will correct the defect subject to the terms and conditions continued
in this Limited Warranty. Preapproved claims must be executed within 60 days of Pre-approval, All existing claims expire
upon expiration of warranty. *Please note that union connection leaks are considered to be user serviceable and are
expressly excluded from the Limited Warranty. Damage resulting from union connection leaks are expressly excluded
from the Limited.
Owners Manual - Core Series
6868

Core Warranty
Warranty. There will be no charge for onsite labor to the customer for a period of one year from the date of original deliv-
ery or 2 years from manufacturer’s ship date, whichever comes rst. Specically equipment, plumbing and shell surfaces
against malfunctions due to any defect in the material and workmanship within the Limited Warranty. Travel costs are the
responsibility of the customer. Your limited warranty will cover a maximum of $60 towards onsite labor per each approved
warranty claim. Service and/or travel costs are covered within the rst 30 days of ownership to a maximum distance of
100KM from dealership or designated service outlet. If Arctic Spas® determines that repair of the covered defect is not
feasible we reserve the right to instead provide a replacement spa equal in value to the original purchase price of the
defective spa. Spa replacement is done only at the discretion of Arctic Spas®.
Reasonable costs for the removal of the defective spa, and delivery and installation will be the responsibility of the spa
customer. Freight will be paid to the nearest Arctic Spas® distribution center.
CONDITIONS OF WARRANTIES
All warranties provided hereunder extend only to the original customer of the spa if purchased by an authorized Arctic
Spas dealer and originally installed within the boundaries of the country where it was originally purchased. All warranties
hereunder terminate upon transfer of ownership of a spa from the original customer. This warranty only applies within
the service area where the spa was originally installed. Your limited warranty does not include repair travel mileage or for
shipping cost assessed by your Factory Authorized Dealer or service agents. All events covered by this Limited Warranty
hereunder must be repaired by a Factory Authorized Dealer of Arctic Spas®. The warranties will not include any costs of
repair incurred by a non-factory authorized agent. To obtain service, the customer must contact the Factory Authorized
Dealer in his area. In the event that a spa or component thereof must be returned to Arctic Spas® distribution center, all
freight costs are the responsibility of the spa customer. After 30 days from delivery, a deductible or “excess“ fee will be
applied to all warranty costs. This fee will be a maximum of $75 CAD or equivalent local currency, and may be applied
to the parts or labor component costs associated with each separate job covered by the warranty. Charges not covered
by the warranty or after the warranty period expires are not aected by this condition. To obtain this Limited Warranty
hereunder the spa must be purchased from a Factory Authorized Dealer of Arctic Spas®.
EXCLUSIONS
All warranties hereunder are void if the spa has been subject to alterations (including after-market accessories), mis-
use or abuse or any repair of the spa has been attempted by anyone other than a Factory Authorized Dealer of Arctic
Spas®. Alterations include but not limited to, any change to the components, replacement of components or addition of
components without the written authorization from Arctic Spas®. Misuse includes careless handling of the spa, damages
caused by improper and/or non-certied electrical hook- ups, failure to operate the spa in accordance with the instruc-
tions contained in the owner’s manual provided with the spa, including incorrect start-up procedures or dry ring of the
spa, any use of the spa or any of its components in an application for which it was not designed, and damage caused
by improper chemical balance (including any damage to spa components caused by scale build up to due to poor water
chemistry), ice in the spa, overheating the spa or spa water, damage to the spa surface by allowing undissolved sanitiz-
ing chemicals to lie on the surface or if our spa has been used for commercial purposes. Spa covers are not warranted
against chemical burn or discoloration. Spa covers are not warranted against water absorption or any damage resulting
from water absorption. Any damage resulting from the mishandling of the spa cover in any way is not covered under
warranty. Any damage caused by moving of the spa or improper installation (including insuciently prepared or uneven
ground) is considered abuse and any damage to the material or workmanship of the spa cabinetry and oor in shipping
or handling are expressly excluded from the Limited Warranty. Arctic Spas will not be responsible for power company
issues or improper electrical installations, damage and/or lack of performance resulting from high or low voltages outside
operating parameters. Arctic Spas will not be responsible for software and product upgrades throughout the life of the
spa. Arctic Spas® expressly excludes warranty coverage on any of the following: Acts of nature including but not limited
to damage resulting from lightning, storm, ooding, freezing, re and any other acts of nature. Any spa installed in a com-
mercial application. Any failure caused by improper cover use or damage to the spa surface by leaving the spa outdoors
without the hot tub cover in place. The heat created by leaving the spa in direct UV light without a cover may cause
surface issues with the acrylic and may also cause plastic parts to warp, some ttings will leak or cease working as a
result. These occurrences are not covered under warranty. The hot tub cover must be kept on the hot tub when not being
used. Scratches or micro-crazing in the spa shell reported after the day of installation are not covered under warranty.
Micro-crazing is dened as an area of tiny shiny lines visible in areas on the surface of some thermoplastic sheets. This
phenomena, although rare, is known to occur in many types of plastic sheet materials. The surfaces of thermoformed
acrylic hot tubs are not immune to this possibility.
Damaged caused by unapproved sanitizers such as tri-chlor, acids, calcium hypochlorite, sodium hypochlorite, perox-
ides, any sanitizing chemical that may remain undissolved on the spa surface. Any and all sanitation systems or chemi-
cals used in your spa must be factory approved by Arctic Spas or your warranty is void.
Core Spas expressly excludes warranty coverage on splitting, fading or warping of the cabinet beyond the date of deliv-
ery. Any damage resulting from handling of the cabinet is excluded from this warranty.
Owners Manual - Core Series
6969
7070
Our automated water care system, Spa Boy® represents the most important advancement to hot tubs in many
years. Rather than solely relying on inconvenient and imprecise manual testing and addition of sanitizer to
your spa, Spa Boy® monitors, and helps maintain ideal spa water conditions. Spa Boy® simply, accurately
and eortlessly helps to maintain perfect clear and safe spa water for you. This incredible technology uses
medical-grade sensors to constantly analyze key water cleanliness parameters and from this data, the Spa
Boy® system precisely controls the output of our integrated salt water system, ensuring that sanitizer levels
are kept in the absolute optimum range. Should your spa’s pH value come slightly out of balance, Spa Boy®
alerts the spa owner (via the topside control panel, the app and the myarcticspa.com portal) to correct this
condition.
Spa Boy®, has also completely changed the bathing experience. Relax in a soft and silky high sodium low
saline bath that feels absolutely amazing on your skin with no chemical smell. Enjoy your Arctic Spa to its
fullest potential, and leave water maintenance to your own, personal Spa Boy®!
Spa Boy
®

NATURAL SALT WATER CARE
1.1 Obtaining Technical Data For Your Spa
To ensure you have the current appropriate technical data for your spa it is recommended that you obtain such data from
your authorised retailer or from the Arctic Spas Web Site http://arcticspas.com.
1.2 What is Spa Boy?
Spa Boy is an advanced salt water maintenance system designed to data log pH and ORP readings and self
manage the ORP level within the specied range.
1.3 What Does Spa Boy Do?
• Data log spa water pH and ORP readings.
• Maintains ORP within the specied range by automatically producing sanitizer (Chlorine) agents.
• Displays current ORP and pH levels of your spa water.
• Softens water.
• Claries water.
1.4 What Are The Benets of Spa Boy?
• Automatically maintains sanitizer (Chlorine) within the specied ORP range.
• Displays current ORP and pH levels of your spa water.
• Takes the guess work out of calculating how much Arctic Pure, Salt Water Balance is required to add to
your spa water to lower the pH level within the required range.
• Makes skin feel soft and smooth.
• Makes water look sparkling clean.
• Reduces contact with harsh chemicals.
• Dramatically reduces time and money needed to maintain spa water.
• Reduces impact to the environment:
1. Fewer trips to the spa store for supplies and having your water tested.
2. Less packaging wasted on chemical containers.
3. Less industrial waste produced making spa chemicals.
Owners Manual - Spa Boy®
Understanding Spa Boy®
7171
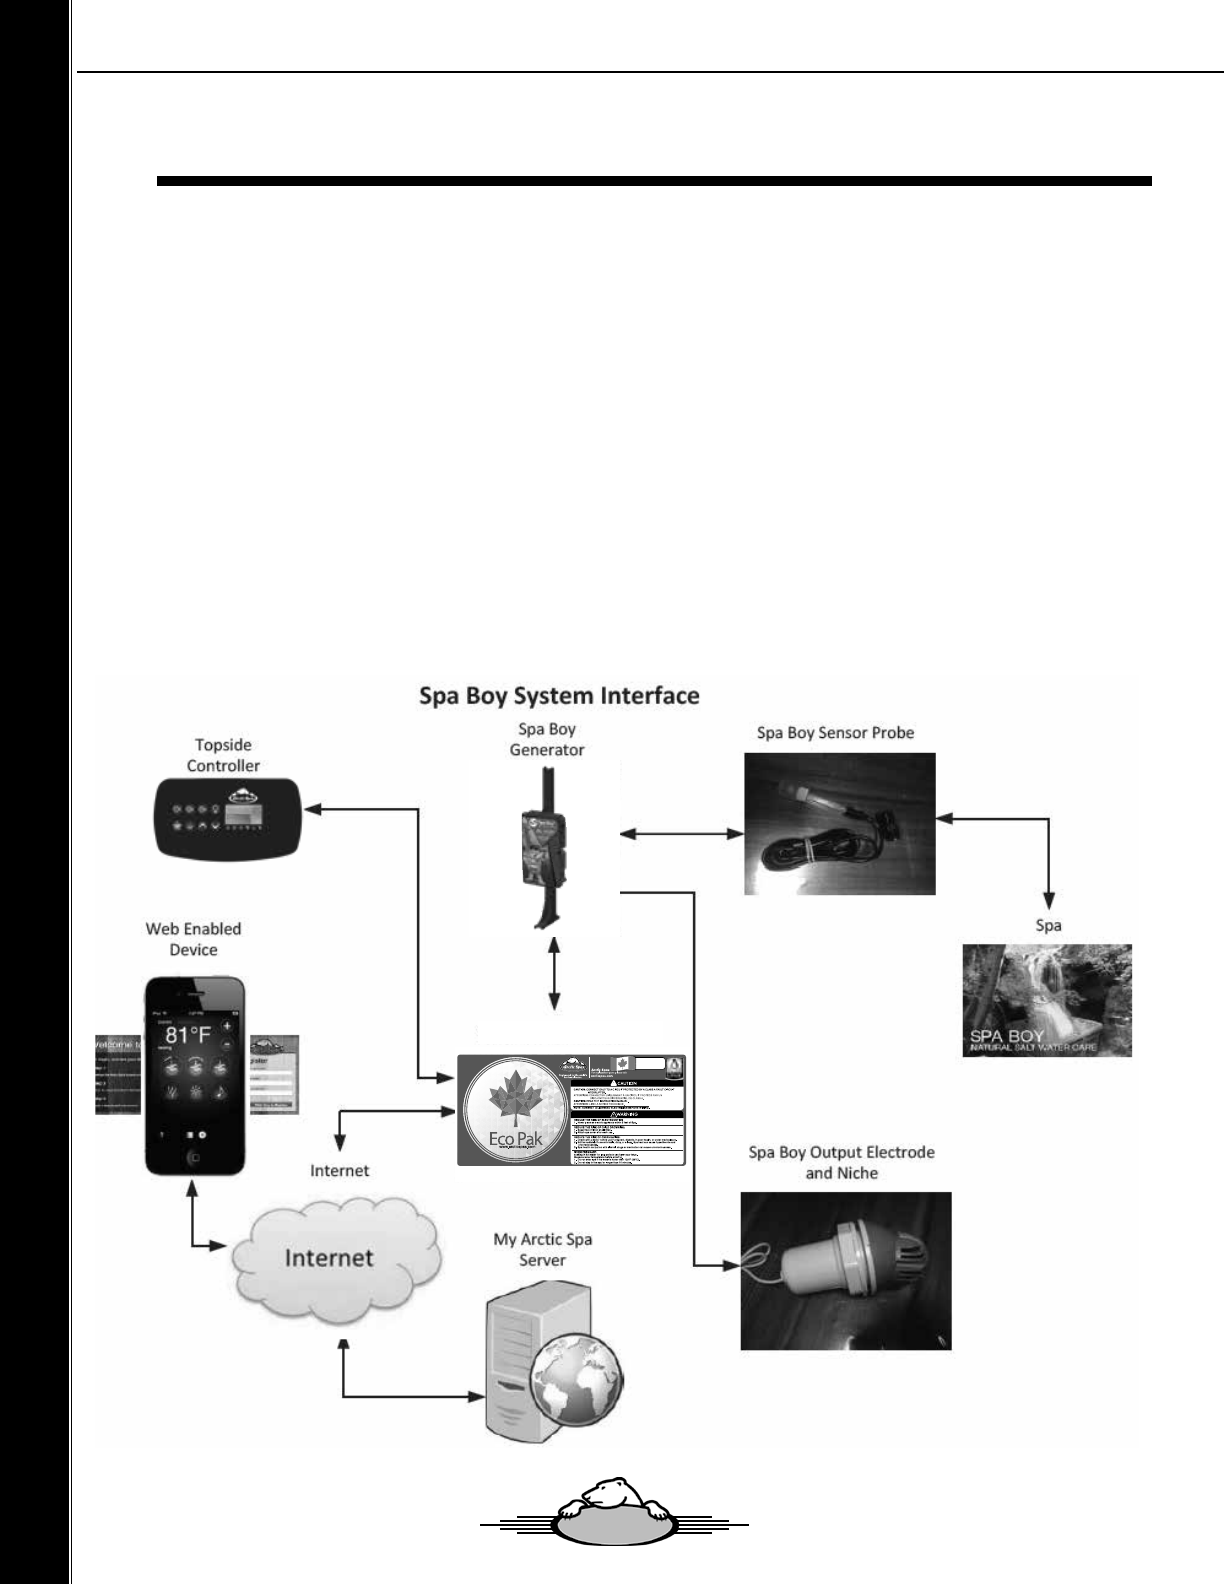
1.5 How Does Spa Boy Work?
• Consumer registers their spa on the My Arctic Spa web based after sales support system.
• Arctic Pure Natural Mineral Sea Salt Blend is added to the spas water when the spa has been lled with
water and water balanced.
• An ORP/pH probe is xed into the foot well area of your spa, which sends a signal to the Spa Boy Generator
and through the Spa Boy Communication Cable connects to the Global Eco PAK. The Global Eco PAK can
then establish a two-way communication channel between the Global Eco PAK and myarcticspa.com.
• Spa Boy data logs the spa water pH and ORP levels for the Technician to view.
• Spa Boy automatically produces and maintains sanitizer (Chlorine) within the specied ORP range (545-
550mV).
• Spa Boy displays current ORP and pH levels of your spa water within My Arctic Spa.
• As required the consumer adds the required amount of Arctic Pure Salt Water Balance to keep the pH
within the required range.
1.5.1 Spa Boy System Interface
The following diagram reects the Spa Boy System interface:
2020 Global EcoPak
Owners Manual - Spa Boy®
Understanding Spa Boy®
7272

1.5.2 Spa Boy Main Components
The following table depicts the Spa Boy components referenced in this manual.
Term
2020 Global Eco PAK
Spa Boy Generator with datacommunication cable
Spa Boy Output Electrode
Spa Boy Sensor
Spa Boy Niche
(Two piece the front section unscrews from the body section)
Spa Boy Sensor Housing
(Also known as Lippert Walltting Threaded)
Spa Boy Housing Grate
(Also known as Lippert Grate Threaded)
Spa Boy Housing Plug
Spa Boy Communication Cable
Picture
Spa Boy Owners Manual
Spa Boy Owners Manual Version 1 Revision 1 (R1)
Page 6 of 35 Issued 20 Nov 2014
1.6.2 SSaapp BBooyy MMaaiinn CCoommppoonneennttss
The following table depicts the Spa Boy components referenced in this manual.
TERM
Picture
2011 Global Eco PAK
Spa Boy Generator
Spa Boy Output Electrode
Spa Boy Sensor
Spa Boy Niche
(Two piece the front section unscrews
from the body section)
Spa Boy Electrode Housing
(Also known as Lippert Wallfitting
Threaded)
Spa Boy Housing Grate
(Also known as Lippert Grate Threaded)
Spa Boy Housing Plug
Spa Boy Communication Cable
Owners Manual - Spa Boy®
Understanding Spa Boy®
7373
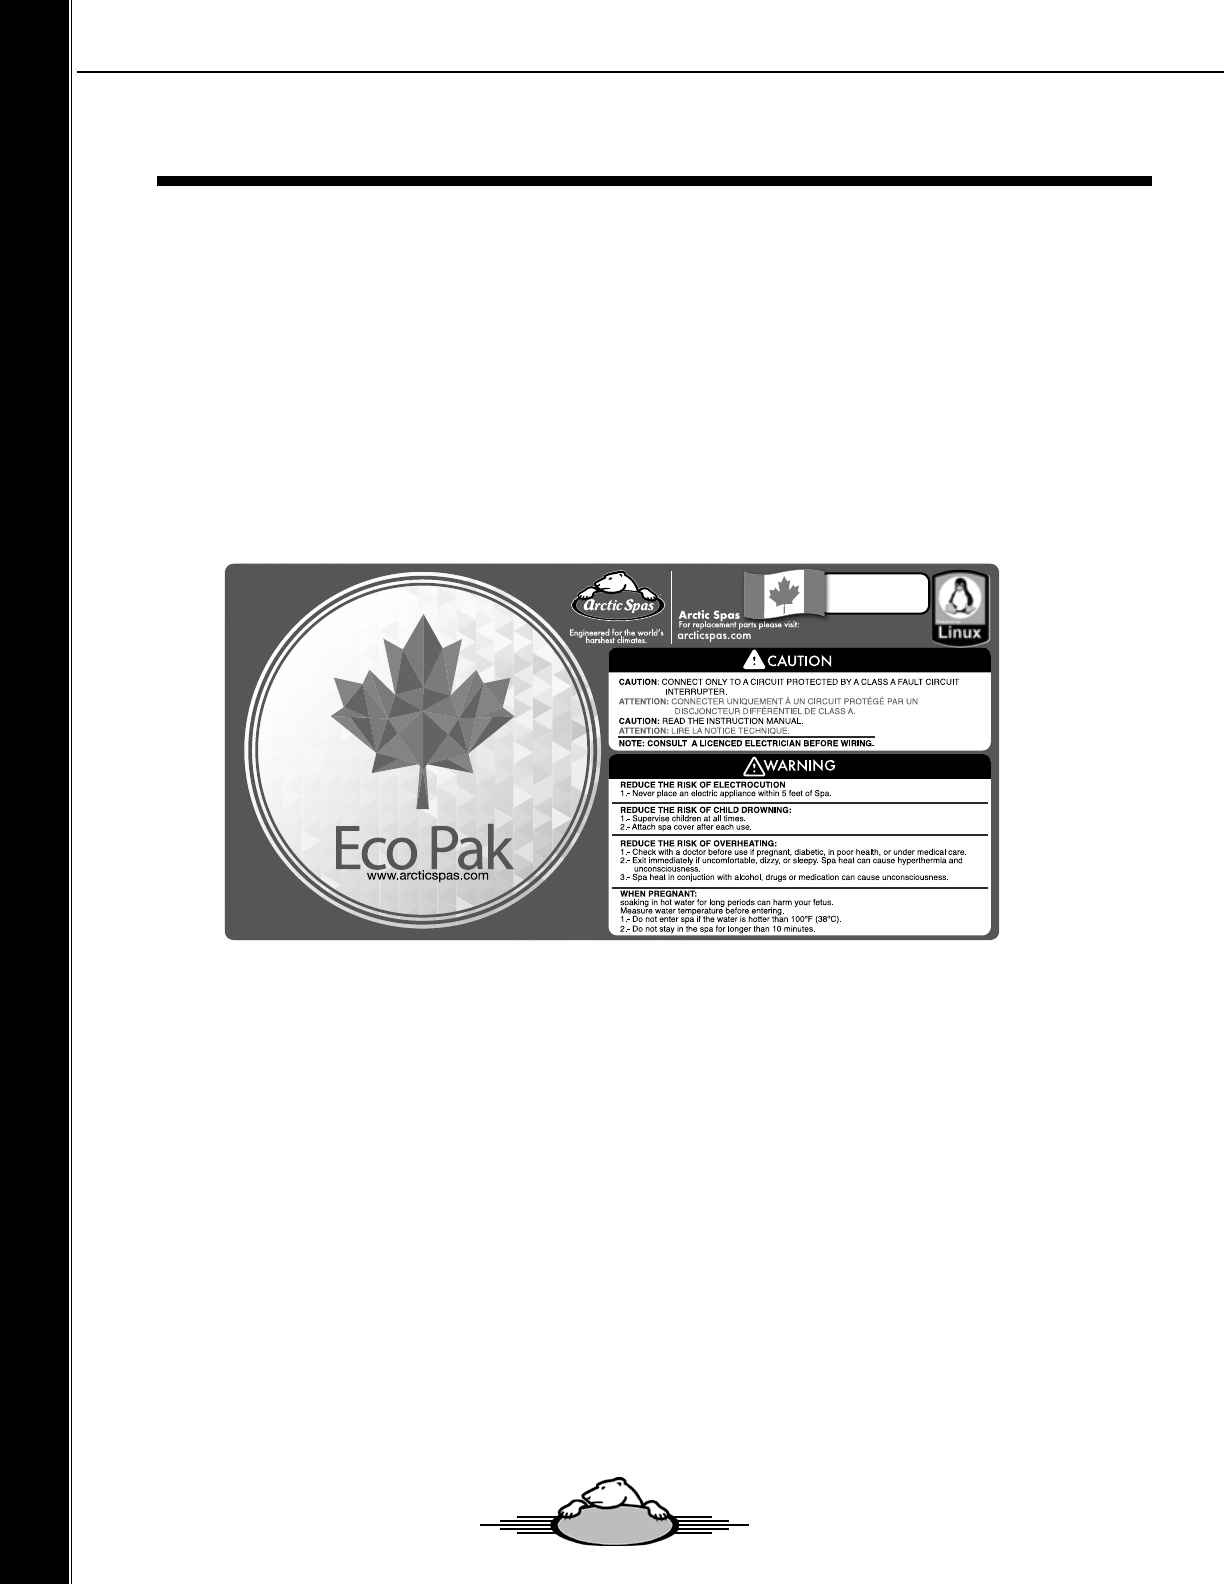
1.6 Spa Boy Version Summary
Spa Boy Version 1 Revision 1 (R1)
When Arctic Spas rst released their Onzen system back in 2009 the Arctic Spas vision was to provide the
consumer with a spa that can self-manage water balance and sanitizer levels.
With the release of Spa Boy Version 1 R1, Arctic Spas have achieved their next milestone in realizing their
vision. Spa Boy Version 1 R1 can be easily upgraded (retrotted) into a spa that currently does not have Spa
Boy installed, providing the spa is equipped with a Global Eco PAK. The Global Eco PAK was released in 2011.
Spas built prior to 2011 that are not equipped with the Global Eco PAK can also be upgraded with Spa Boy
by replacing your Spa PAK with the 2011 Global Eco PAK. For upgrade details, consult with your Arctic Spas
Dealer.
1.7 How to Determine Spa Production Date
The Spa production date can be determined from the Spa Serial Number recorded on the Spa Identication
Plate mounted on the cabinet usually under the topside controller.
Example : Spa Serial No. A10H131112
• The two digits following the rst letter represent the year that the Spa was built 10 = 2010.
• The letter following the rst two digits represent the month that the Spa was built H = August.
*The 6 digit number represents the Spas Serial Number. 131112 = Serial Number.
Understanding Spa Boy®
Owners Manual - Spa Boy®
7474
1.8 Denitions of Terms
TERM DEFINITION
Spa Boy Spa Boy is an advanced salt water maintenance system designed to data log pH
and ORP readings and self manage the ORP level within the specied range (545-
550mV).
Spa Boy Output Elec-
trode
Five plate platinum-iridium Titanium electrode - equipped salt cell converts the salt-
water solution to sanitizer, and as this solution reverts back to its natural form (salt)
after sanitizing. Unless large volumes of water are added to the spa you never
have to add more salt. The ve plate electrode plastic outer casing is grey in color.
Note: When the Spa Boy System has activated the Output Electrode to generate
sanitizer, the electrode gives o smoke eect.
Spa Boy Output Elec-
trode Version
Modication status of the electrode tted to the spa.
Spa Boy Sensor pH and ORP sensor (probe) used to measure pH and chlorine (ORP) readings
along with many other reading and transfer the readings to the My Arctic Spa web
site.
The Sensor is connected to the Spa Boy Generator and the Spa Boy Communica-
tion Cable from the generator is connected to the Global Eco PAK.
Spa Boy Communication
Cable
Cable that connects the Spa Boy Generator to the Global Eco PAK. The commu-
nication cable is used to establish continous two-way communication between the
Spa Boy System and myarcticspa.com.
Arctic Pure Arctic Spas range of products developed especially for maintaining your spas
water.
My Arctic Spa My Arctic Spa is a Web based after sales support system designed and built by
Arctic Spas especially for Arctic Spas owners that have Spa Boy installed in their
spa.
My Arctic Spa has been designed to receive data from your spa over the internet
through the spas Wi-Fi system. The data is logged and saved by My Arctic Spa on
a continual basis.
Calcium Hardness (CH) Calcium Hardness is a measure of the total amount of dissolved calcium salts in
the water.
CH helps determine how scaling or corrosive the water is. It is believed that cal-
cium helps control the corrosive nature of water.
Calcium has two major problems in Hot Water Chemistry:
1. CH has a tendency to precipitate (fall out of suspension in high temperatures,
,
where pH is above 7.8ppm)
2. High pH will cause calcium to precipitate. The problem with calcium falling out
of suspension is that it collects on the heater and pump, and shortens their life.
High pH also reduces the life of the Spa Boy Output Electrode.
Any natural corrosiveness in the water can be combated by maintaining a slightly
higher Total Alkalinity Level.
Understanding Spa Boy®
Owners Manual - Spa Boy®
7575
1.8 Denitions of Terms
TERM DEFINITION
Alkalinity
Total Alkalinity (TA)
A measure of how stable the pH is (a measure of the total levels of carbon-
ates, bicarbonates, hydroxides, and other alkaline substances in the water).
TA is referred to as the water’s “”pH buer””. In other words, it’s a measure of
the ability of the water to resist changes in pH level.
If the TA is too low, the pH level will uctuate widely from high to low. Fluc-
tuations in pH can cause corrosion or scaling of the spa components.
Low TA can be corrected by adding Arctic Pure, Perfect Balance to the spa
water.
If the Total Alkalinity is too high, the water will be more susceptible to scale
and high pH. High pH may be dicult to bring down.
Note: Salt systems naturally drive pH levels to increase.
High TA can be lowered by adding Arctic Pure, Adjust Down to the spa water.
Once the TA is Balanced, it normally remains stable, although some sanitiz-
ers, and the addition of more water with a high or low alkalinity will raise or
lower the TA reading of the water.
Potential Hydrogen
(pH)
The pH level is the measure of alkalinity.
pH is measured between 0 and 14 denoting various degrees of acidity or
alkalinity.
Neutral water has a pH of 7.0 Water below 7.0 is acidic and becomes more
acidic as it approaches zero.
Water above 7.0 is alkaline and alkalinity increases as it approaches 14.
When the pH of water is 7.0 or below, chlorine will act primarily as a sani-
tizer. At this level, it is very eective at killing bacteria.
At 7.4, chlorine will act equally as a sanitizer and oxidizer.
Above 7.8, chlorine will act principally as an oxidizer.
The pH of chlorine is 11.7.
Spa water is considered balanced if the pH level is within the target range,
between 7.2pH to 7.6pH.
Adding chlorine either automatically through a salt system or manually, into
spa water with high pH, above 7.6pH, will further increase the pH level and
dramatically reduce the eectiveness of the chlorine as a sanitizer. This must
be avoided by rst reducing the pH level into the target range 7.2pH - 7.6pH.
The chart below reects the loss of sanitizer eectiveness/sanitizer eective-
ness based on the spas water pH level:
pH Level Sanitizer (Chlorine)
Loss of Eectiveness
based on pH Level
Sanitizer (Chlorine)
Eectiveness
based on pH Level
6.0 pH 4% 96%
6.5 pH 10% 90%
Understanding Spa Boy®
Owners Manual - Spa Boy®
7676
1.8 Denitions of Terms
TERM DEFINITION
Potential Hydrogen
(pH)
(continued)
pH Level Sanitizer (Chlorine)
Loss of Eectiveness
based on pH Level
Sanitizer (Chlorine)
Eectiveness
based on pH Level
7.0 pH 27% 73%
7.2 pH 38% 62%
7.5 pH 50% 50%
8.0 pH 78% 21%
8.5 pH 90% 10%
Maintaining a Balanced pH level between 7.2pH and 7.6pH is extremely
important for:
• Optimizing the eectiveness of the sanitizer.
• Maintaining water that is comfortable for the user.
• Preventing equipment deterioration.
• Note: Salt systems naturally drive pH levels to increase, strive to achieve a
balanced pH level.
If the spa water’s pH level is too low, the following may result:
• The sanitizer will dissipate rapidly.
• The water may become irritation to spa users.
• The spa’s equipment may corrode reducing life expectancy.
Low pH can be raised by adding Arctic Pure, Adjust Up to the spa water.
If the pH level is too high, the following may result:
• The sanitizer is less eective.
• Scale will form on the spa shell surface and the equipment.
• High pH will cause calcium to precipitate (fall out of suspension).
• The water may become cloudy.
High pH can be lowered by adding Arctic Pure, Salt Water Balance to the spa
water.
It is important to check the pH on a regular basis. The pH will be aected by
the bather load, the addition of new water, the addition of various chemicals,
and the type of
sanitizer used.
ORP Oxidation–Reduction Potential.
This is simply a measurement of the water’s ability to cleanse itself. ORP is
measured in millivolts (mV). Also refer FCL
Free Chlorine (FCL) FCL is the active form of chlorine that actually kills bacteria and algae (It is
a Sanitizer).
Sanitizer is extremely important for killing algae, bacteria and viruses, and
preventing unwanted organisms for growing in the spa. At the same time,
you don’t want too high a sanitizer level, or it can irritate your skin, lungs
and eyes.
Always maintain the sanitizer level in your spa within the recommended
range.
Also refer ORP
Chlorine Residual The actual level of chlorine in the water after the chlorine demand has
been satised.
Understanding Spa Boy®
Owners Manual - Spa Boy®
7777
1.8 Denitions of Terms
TERM DEFINITION
Sanitizer Chemical used to kill bacteria.
Generic names: Chlorine, Bromine and Biguanide.
Arctic Pure, Boost
Adding Arctic Pure BOOST should be avoided unless the ORP level is very
low.
Also Refer Section 1.15 Caring for your Spa Boy System, Question 3 If
the Spa Boy System is not working, what should I do if I need to add Arctic
Pure BOOST or other sanitizer to the spas water?
Note; resetting the spas breaker could speed up sensor recovery.
Refresh Oxidiser that is pH Neautral
An oxidizer that “burns o” the organic wastes which cause cloudiness and
algae. It is a generic term for a chemical used to oxidize organic wastes.
If your spa is equiped with an Arctic Spas OZONE System such as Peak
1 or Peak 2 in most cases there should be a reduced need to add Arctic
Pure, Refresh to your spas water. This is dependent on bather load and
OZONE run time. But weekly maintenance is required.
Parts Per Million (ppm) ppm: parts per million, a standard measure of chemical or mineral concen-
tration.
Organic waste Debris such as microorganisms, perspiration, urine, etc. which needs to be
burned up or “oxidized” regularly to prevent haze, algae, chloramines, etc.
Shock An oxidizer that “burns o” the organic wastes which cause cloudiness and
algae. It is a generic term for a chemical used to oxidize organic wastes.
Arctic Pure, Boost.
Warning Adding a Chlorine agent such as Boost to the spas water should
be avioded as this will aect the Spa Boy Sensor Probe which will cause
inacurate ORP and pH readings to be sent to My Arctic Spa and registered
with My Arctic Spa. If chlorine is added to the spas water it will take at least
three days for the Spa Boy Sensor Probe to clense itself and start sending
accurate readings to My Arctic Spa.
Also Refer Section 1.15 Caring for your Spa Boy System, Question 3 If the
Spa Boy System is not working, what should I do if I need to add Arctic Pure
BOOST or other sanitizer to the spas water?
Note; resetting the spas breaker could speed up sensor recovery.
Salt Water Balance Arctic pure product specially formulated by Arctic Spas to lower pH without
causing any damage to the Spa Boy Output Electrode.
Drop Test Kit Test kit for testing spa water sample using additives instead of test
stips. This type of test method is more eective at measuring the
0.5ppm residual amount of chlorine generated through Spa Boy.
0.5ppm Chlorine reading = approximately 550mV
Understanding Spa Boy®
Owners Manual - Spa Boy®
7878
1.8 Water Chemistry Abbreviations / Acronyms & Ranges
ABBREVIATION/ACRO-
NYMS
DEFINITION CORRECT CHEMICAL LEVELS
CH Calcium Hardness 50 - 150 ppm
TA Total Alkalinity 80-100 ppm
pH Potential Hydrogen 7.2 – 7.6 ppm
ORP Oxidation–Reduction Po-
tential
545 – 550 mV Spa Boy Optimum Range.
(Optimum Range is the default factory
setting, the user may adjust higher if
preferred by contacting their dealer to
have it adjusted. )
Depending on the water chemistry which
will be eected by bather load and spa
usage, at times the ORP value will
overshoot or undershoot the Optimum
Range.
Note: Using a Drop Test Kit, a 0.5ppm
Chlorine reading = approximately 550mV
1.9 Spa Boy Warranty
Refer to your Arctic Spas Owners Manual for the Spa Boy warranty details.
Understanding Spa Boy®
Owners Manual - Spa Boy®
7979

1.10 Spa Boy® SP Guide
1.10.1 Spa Boy® SP Overview Flowchart
NOTE:
This owchart provides an
overview of the Spa Boy start-up
process.
The detailed support procedures
are contained in this document.
All checks and test should be
carried out in accordance with
the Arctic Spas Spa Boy Owners
Manual.
Spa has been positioned in accor-
dance with the Arctic Spas Owners
Manual.
Program Filtration Cycles/Filtration
Duration.
Relax and Enjoy Your Spa
Arctic Spas Spa Boy Version 1 R1 Maintenance Schedule.
Refer: Arctic Spas Spa Boy Version 1 R1 Maintenance Schedule QRC
Stabilize Spa Water.
Establishing Correct Water
Chemistry.
Connect Your Spa to the
Home Network.
Sanitizer and pH Settings
Maintain Correct Water
Chemistry
Register Spa With My
Arctic Spa.
myarcticspa.com
Fill Spa With Water, Power Up Spa
and Set Water Temperature
Note: Spa Boy Sensor Probe Should
have been installed.
Have electrical power to
Spa connected in accor-
dance with
Arctic Spas Owners Manual
Arctic Spas Spa Boy
Salt Dose
Guidance Table.
Caring For Your Spa
Boy System.
Understanding Spa Boy®
Owners Manual - Spa Boy®
8080
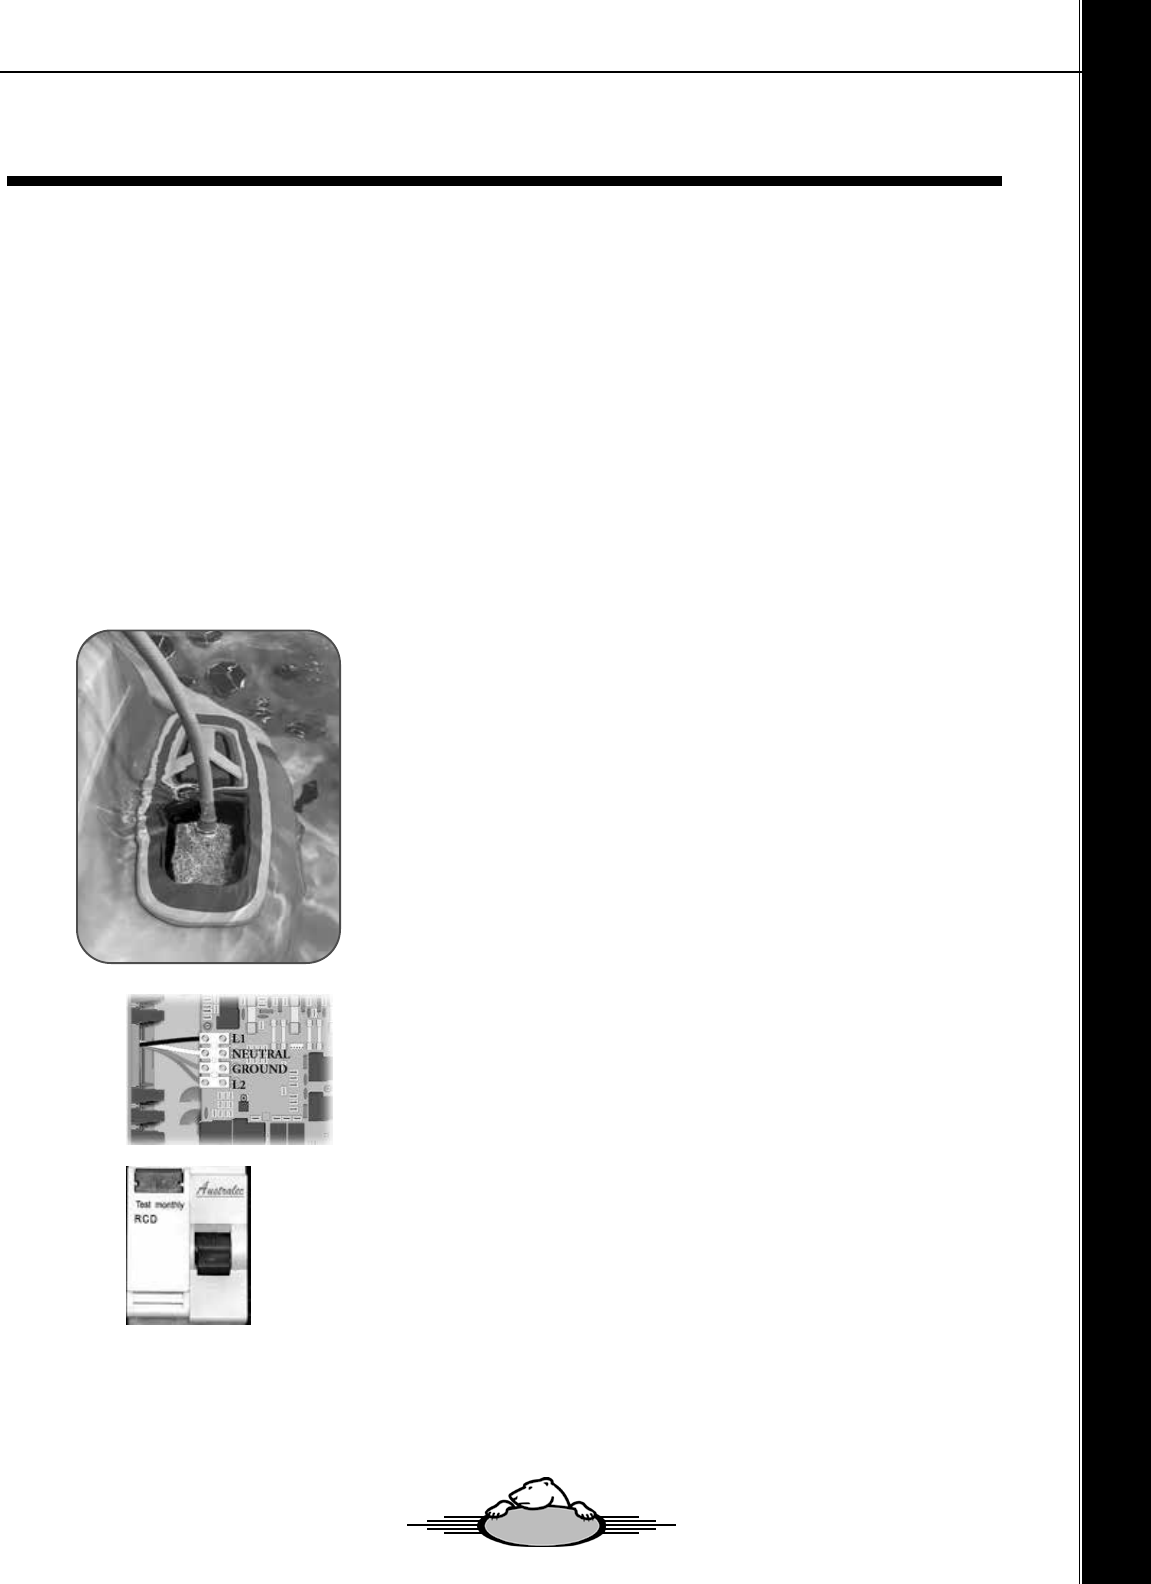
1.10.2 Fill Spa With Water Power Up Spa and Set Water Temperature
The following steps provide guidance to help establish correct chemically balanced water. To help ensure
chemicals dissolve appropriately it is good practice to rst mix/dissolve the chemical in an uncontaminated
container of hot water before carefully adding to the spa water.
Note: The following steps take into account that the Spa Technician has lled your spa with water to above the
Spa Boy Sensor Housing, removed the Spa Boy Sensor Plug, installed the Spa Boy Sensor Housing Grate and
installed the Spa Boy Sensor.
Warning: Do not proceed until the Spa Technician has lled your spa with water to above the Spa Boy Sensor
Housing, removed the Spa Boy Housing Plug, installed the Spa Boy Sensor Housing Grate and installed the
Spa Boy Sensor or you have obtained further direction from your Dealer.
Spa Boy Owners Manual
Spa Boy Owners Manual Version 1 Revision 1 (R1)
Page 14 of 35 Issued 20 Nov 2014
1.14.2 FFiillll SSppaa WWiitthh WWaatteerr PPoowweerr UUpp SSppaa aanndd SSeett WWaatteerr
TTeemmppeerraattuurree
The following steps provide guidance to help establish correct chemically balanced water.
To help ensure chemicals dissolve appropriately it is good practice to first mix/dissolve the
chemical in an uncontaminated container of hot water before carefully adding to the spa
water.
Note: The following steps take into account that the Spa Technician has filled your spa
with water to above the Spa Boy Sensor Housing, removed the Spa Boy Sensor Plug,
installed the Spa Boy Sensor Housing Grate and installed the Spa Boy Sensor.
Warning: Do not proceed until the Spa Technician has filled your spa with water
to above the Spa Boy Sensor Housing, removed the Spa Boy Housing
Plug, installed the Spa Boy Sensor Housing Grate and installed the Spa
Boy Sensor. or you have obtained further direction from your Dealer.
Steps to Fill Spa With Water Power Up Spa and Set Water Temperature
Step 1. Fill Spa
Fill your spa through the filter intake as shown to the
appropriate level (just under the head rests). If you have
sediment or high mineral content a “carbon filled pre-filter”,
as pictured, can help. (This is optional and will prolong
the fill time).
Step 2. Connect/Turn on Electrical Power to the Spa
Once the spa is filled to the proper level, connect power to
the spa in accordance with the Arctic Spas Owners Manual,
and turn the power on to the spa on.
Understanding Spa Boy®
Steps to Fill Spa With Water Power Up Spa and Set Water Temperature
Step 2. Connect/Turn On Electrical Power To
The Spa
Once the spa is lled to the proper level, connect power to the spa
in accordance with the Arctic Spas Owners Manual, and turn the
power on to the spa on.
Step 3. Set Water Temperature
Set the water temperature control on the Topside Controller to
the desired temperature (between 100ºF and 104ºF or 38°C and
40°C).
Step 1. Fill Spa
Fill your spa through the lter intake as shown to the appropriate
level (just under the head rests). If you have sediment or high min-
eral content a “carbon lled pre-lter”, as pictured, can help. (This
is optional and will prolong the ll time).
Owners Manual - Spa Boy®
8181

1.10.3 Program Filtration Cycles/Filtration Duration
The factory default ltration settings will automatically perform 4 x two-hour ltration cycles per day, 6 hours
apart. Depending of bather load and spa usage it is suggested ltration settings can be changed to automati-
cally perform 4 one- hour ltration cycles per day, 6 hours apart.
The system factory ltration settings can be adjusted by the consumer through:
• OnSpa® power management using your device such as smart phone or tablet that has been connected to
your spa through WiFi. Refer OnSpa® user Guide. (Pg.117)
1.10.4 Stabilize Spa Water
Before balancing the spa water, it is recommended that the water temperature reach a minimum of 85 ºF (29 ºC).
Note: Do not be tempted to use your spa at this time.
Understanding Spa Boy®
Step to Stabilize Spa Water
Once the spa has been lled with water, powered up and ltration requirements set, place the insulated cover on
the spa and allow the water temperature to stabilize (approximately 16 hours). Make sure you secure the cover
in place using the cover locks. Periodically check the spa water temperature. When the water temperature climbs
above 85°F, (29°C) proceed to the next step.
Note: As heat impacts both Calcium and Total Alkalinity a little, it is highly recommended to heat the water above
29°C (85°F) before advancing to Establishing Correct Water Chemistry.
1.10.5 Establishing Correct Water Chemistry
The following steps provide guidance to help establish correct chemically balanced water. To help ensure chemi-
cals dissolve appropriately it is good practice to rst mix/dissolve the chemical in an uncontaminated container of
hot water before adding to the spa water.
Steps to Establish Chemically Balanced Water With Spa Boy
Step 1. Test and Adjust Total Alkalinity (Use drop Test Kit)
Test Total Alkalinity. It should be 80 – 100 ppm (100 max). If high, lower Total Alkalinity with
Arctic Pure, Salt Water Balance. Do not raise Total Alkalinity!
WARNING: Skipping this step on Start-up can cause scaling problems and cloudy water that may not be covered
under warranty.
NOTE: Use all products according to directions on the bottle.
Owners Manual - Spa Boy®
8282
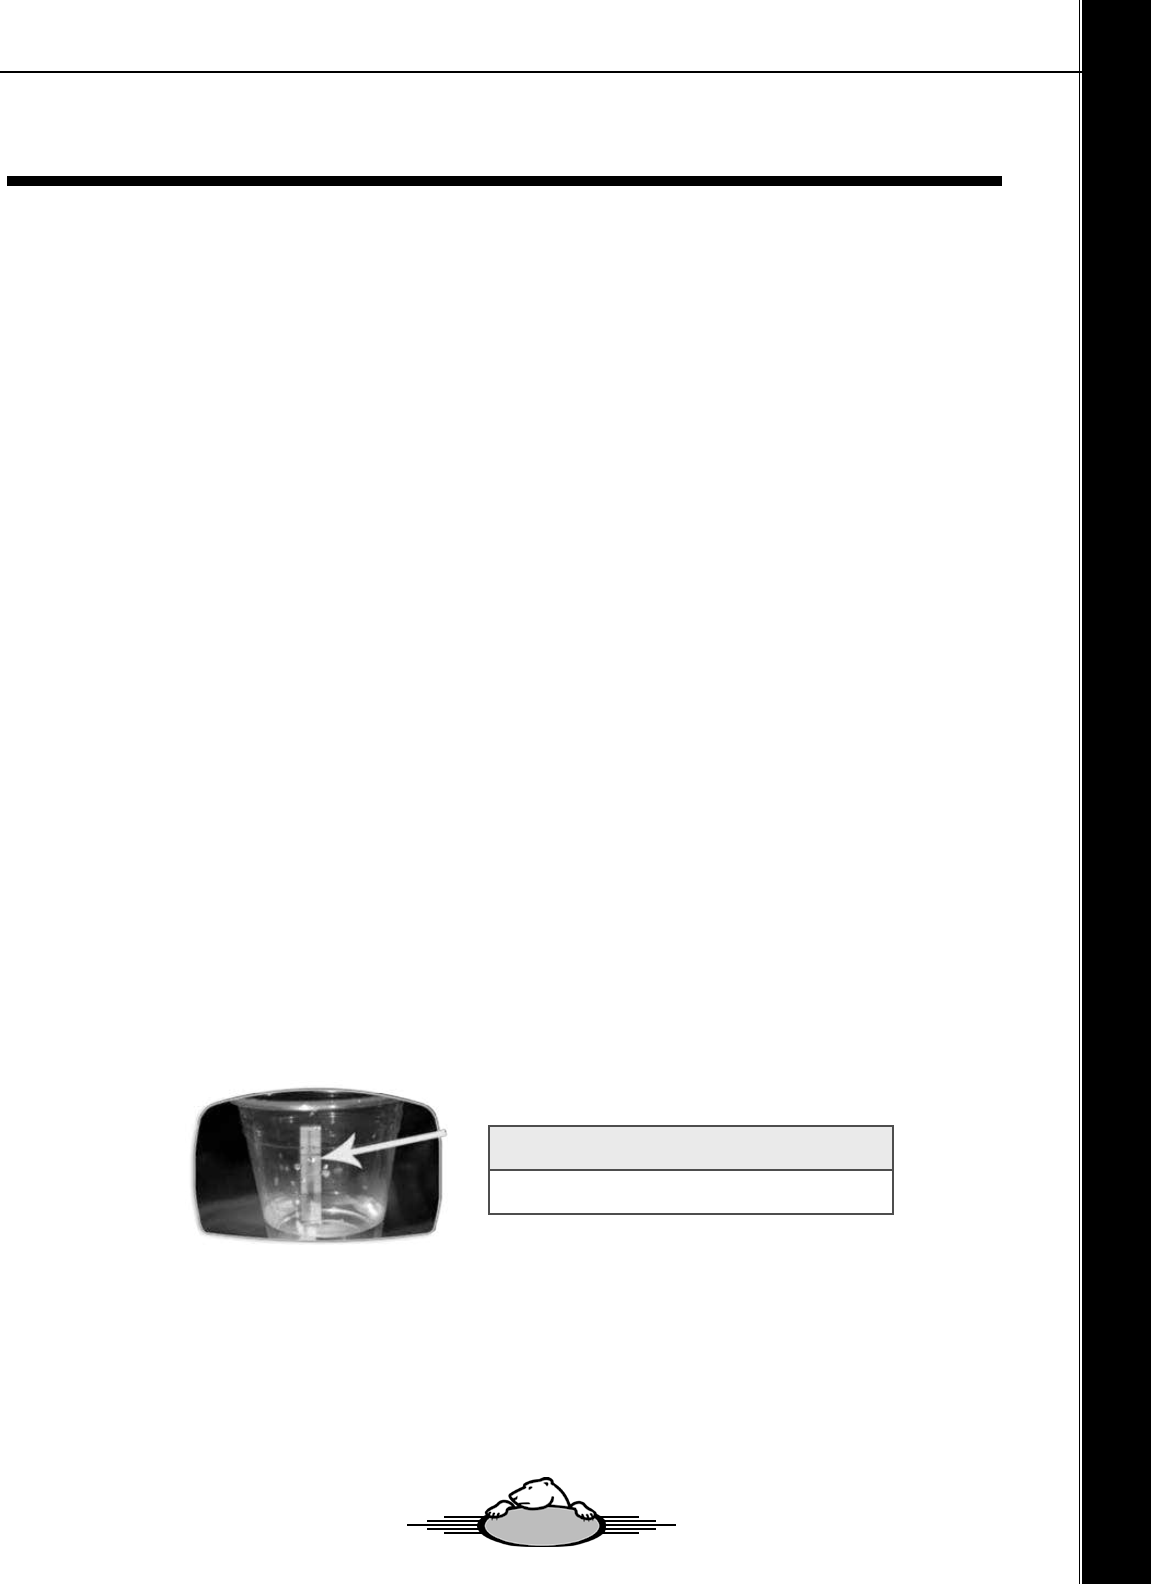
Step 2. Test and Adjust pH (Use drop Test Kit)
Test pH. Levels should be between 7.2 – 7.6. If pH is high, (over 7.6) add Arctic Pure, Salt Water Balance.
NOTE: Salt systems naturally drive pH levels to increase, strive to achieve a balanced pH level.
NOTE: High pH will cause calcium to precipitate (fall out of suspension). The problem with calcium falling out of
suspension is that it collects on the heater and pump, and shortens their life.
Step 3. Mix Salt Crystals
Dissolve 1/3 of the required recommended salt dosage in a 5 Gallon (20 litre) pail of hot water.
Refer Arctic Spas – Spa Boy Salt Dosage Chart contained in this guide.
WARNING: Salt causes pH to rise, to help ensure pH can be managed within the target range, it is most impor-
tant not to add the entire salt dose in one step. If all the salt is added in one dose it may increase the pH level to
an unmanageable level that requires the spas water to be drained.
Step 4. Add Salt to Spa Water & Re-Test TA / pH
(a) Slowly pour the dissolved salt from the pail into the spa water.
(b) Run pumps for 5 minutes to help mix salt blend through.
(c) Wait 1 hour.
(d) Then re-test and adjust pH level accordingly.
Refer: Steps 2 for correct pH levels.
Step 5. Repeat Steps 3 & 4
Repeat steps 3 and 4, ensuring all sub steps are carried out accordingly.
Step 6. Repeat Steps 3 & 4
Repeat steps 3 and 4, ensuring all sub steps are carried out accordingly.
Step 7. Test Sodium Chloride Level
(Aquacheck Salt Test Strips are suggested) Also refer Sub Steps to Help Ensure Sodium Chloride Test Strips
are Used Correctly. You will now need to test sodium chloride levels. This can be carried out using a salt tests
strip. If sodium chloride levels are low, dissolve 1/2 lb (225 Grams) of salt (using cup provided) into hot water.
Pour the dissolved salt into the spa water. Test sodium chloride level. Repeat until required sodium chloride
level is reached:
Understanding Spa Boy®
NOTE: For start up it is recommended to strive for the minimum salt dosage. Once a Sodium Chloride reading
has been taken and the minimum salt dosage achieved, it can be increased slightly to accommodate spa usage
and bather load.
NOTE: The Arctic Spa Boy Salt Chart in this guide provides the estimated impact of adding ½ lb (225Grams) of
salt to your spa.
Spa Boy Owners Manual
Spa Boy Owners Manual Version 1 Revision 1 (R1)
Page 18 of 35 Issued 20 Nov 2014
Steps to Establish Chemically Balanced Water With Spa Boy
Step 5. Add Salt to Spa Water & Re-Test TA / pH
(a) Slowly pour the dissolved salt from the pail into the spa water.
(b) Run pumps for 5 minutes to help mix salt blend through.
(c) Wait 1 hour.
(d) Then re-test and adjust Total Alkalinity level accordingly.
(e) Then re-test and adjust pH level accordingly.
Refer: Steps 2 and 3 for correct TA/pH levels
Step 6. Repeat Steps 4 & 5
Repeat steps 4 and 5, ensuring all sub steps are carried out accordingly.
Step 7. Repeat Step 4 & 5
Repeat steps 5 and 6, ensuring all sub steps are carried out
accordingly.
Step 8. Test Sodium Chloride Level
You will now need to test sodium chloride levels. This can be carried
out using a salt tests strip.
If sodium chloride levels are low, dissolve 1/2 lb (225 Grams) of salt
(using cup provided) into hot water. Pour the dissolved salt into the
spa water. Test sodium chloride level.
Repeat until required sodium chloride level is reached:
Spa Boy Version
Minimum
Maximum
Version 1 R1
2000ppm
2500ppm
Note: The Arctic Spas Spa Boy Salt Chart in this guide provides
the estimated impact of adding ½ lb (225Grams) of salt to
your spa.
Note: Having the correct dosage of salt concentration, will reduce
potential corrosion and increase the life of the Spa Boy
Output Electrode.
Spa Boy Version Minimum Maximum
Version 1 R1 2000ppm 2500ppm
Owners Manual - Spa Boy®
8383
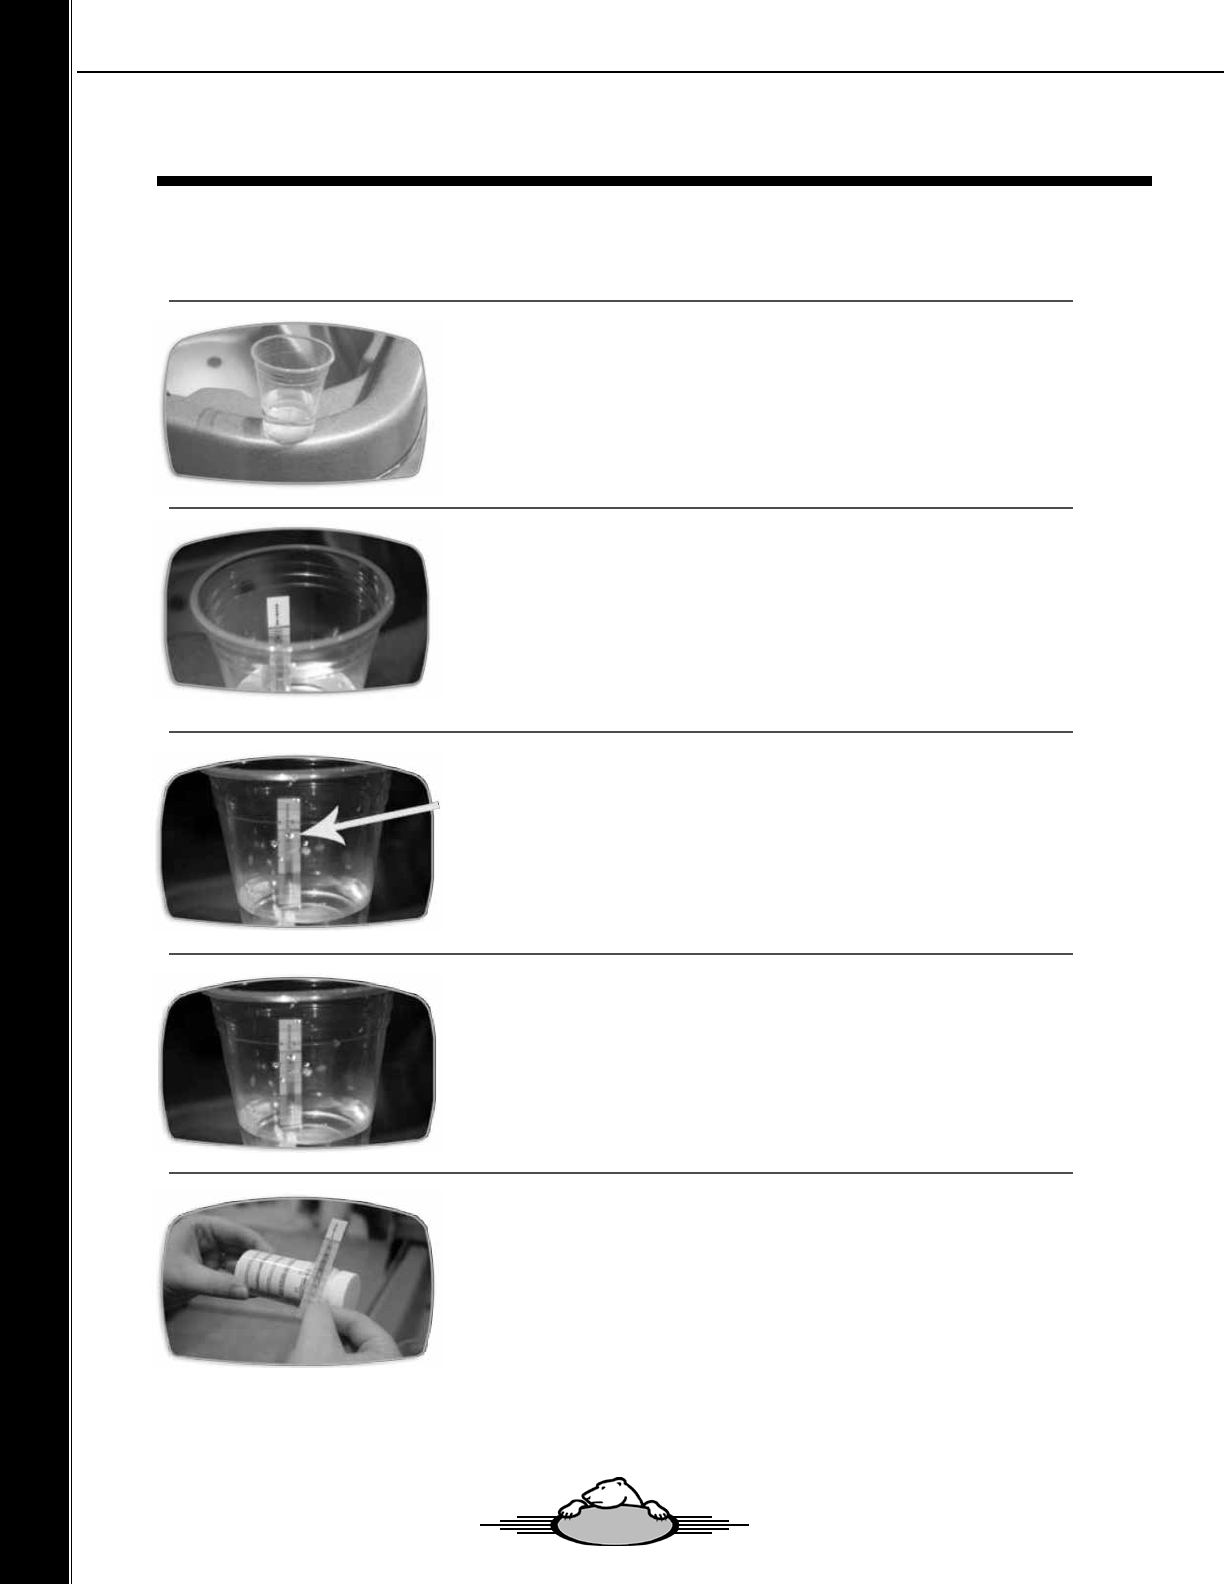
Sub Steps to Help Ensure Sodium Chloride Test Strips are Used Correctly
Step 1. Take Water Sample
Take a sample of water from the spa in a small cup (about 25mm / 1”
full).
NOTE: Always take water samples 25-30cm (12”-18”) below the water
surface.
Step 2. Place Test Strip in Water Sample
Place the lower end of the strip into the water.
IMPORTANT Keep top half of strip COMPLETELY dry to get an ac-
curate reading.
Step 3. Test Duration Period
Leave strip in water for 3 – 5 minutes until yellow band at top of strip
turns dark.
Step 4. Obtain Readings
Obtain your reading: where top of white peak falls on the number
scale.
Read top of peak to the nearest 0.2 division.
Step 5. Correspond Test Result Reading
Correspond the test result reading number with the numbers on the
bottle.
Understanding Spa Boy®
Owners Manual - Spa Boy®
8484
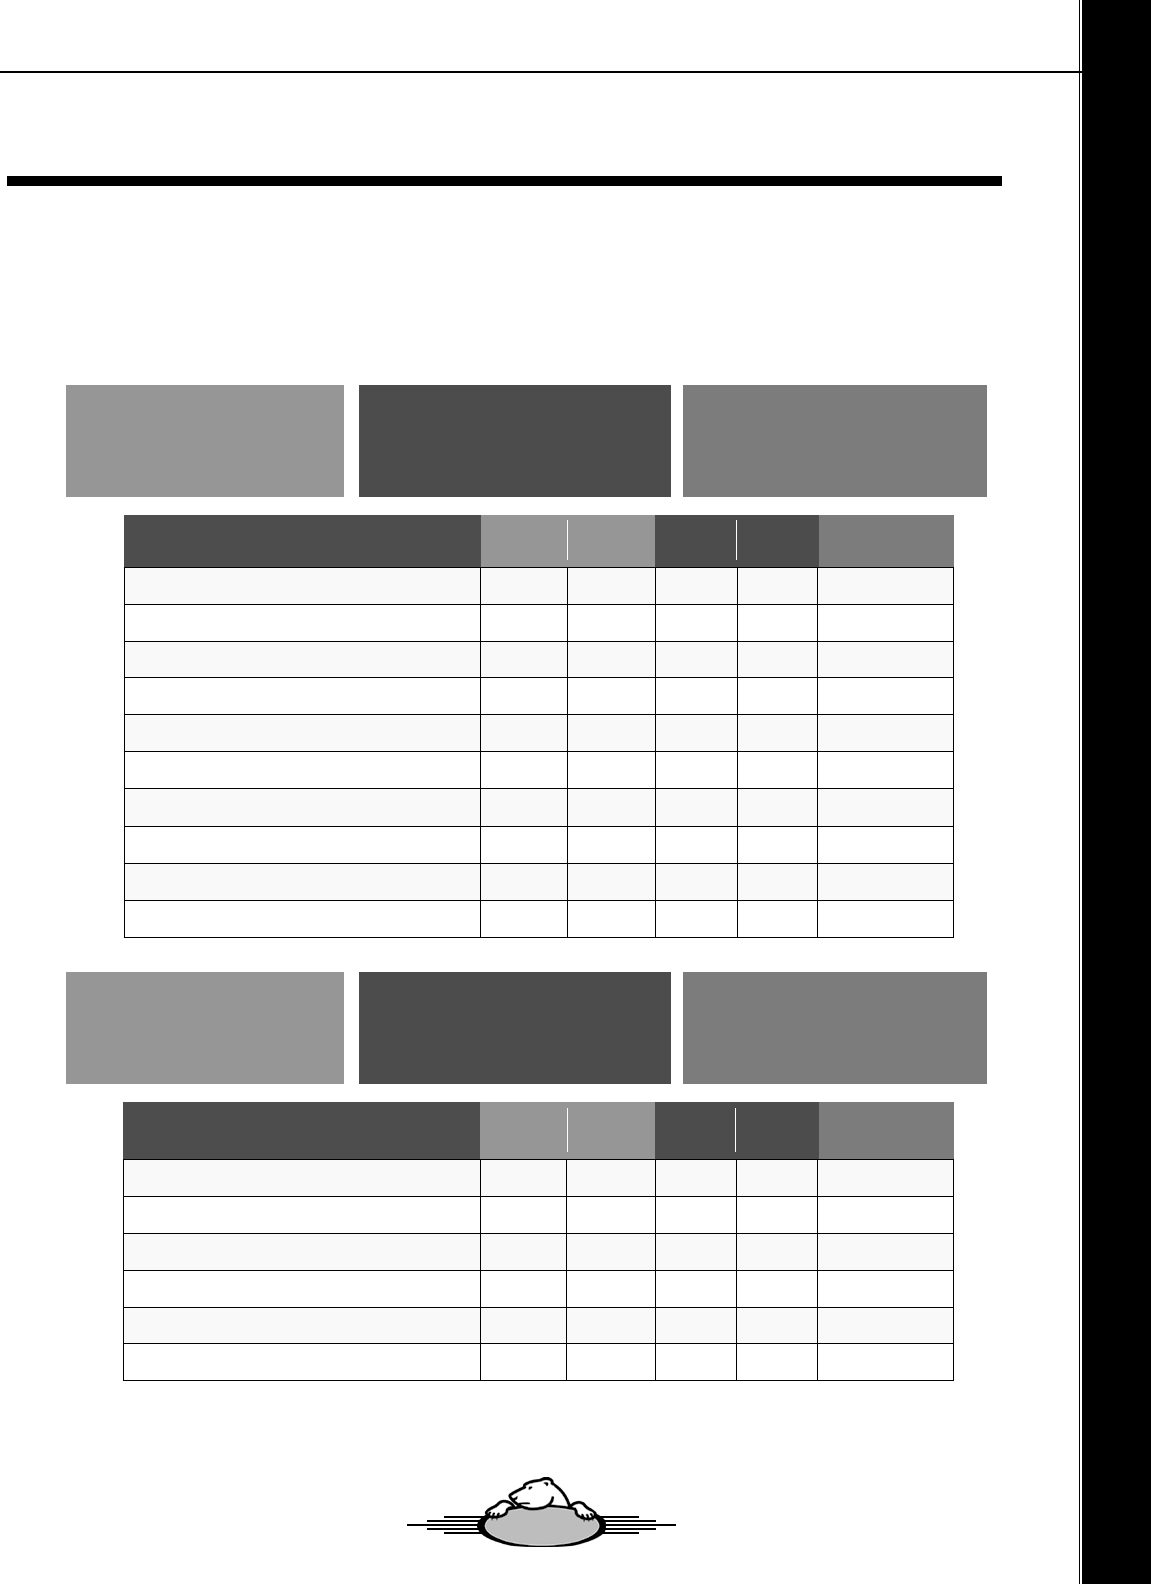
1.10.6 Arctic Spas Spa Boy Salt Dose Guidance Table
The following table identies the dosage of Arctic Pure Sea Salt Blend that is required for each Arctic Spa mod-
el and estimated impact of adding 225g of salt. Use this table for Spa Boy Version 1 R1.
Operating at the desired salt concentration will reduce potential corrosion and increase the life of the Spa Boy
Output Electrode.
Arctic Spas - Spa Boy Version 1 R1 Custom Salt Dosage Chart (1). Custom Salt Dosage Chart (2).
NOTE: The above table provides a guideline to achieve a salinity level of 2200 ppm. Due to diering levels of
compounds and chemicals in water in dierent suburbs and countries, please ensure you conrm salinity level
is in the desired salinity range using Aquacheck Salt Test Strips
Custom Spa Model Litres US Gal Kg Lb PPM
Summit XL 2033 537 4.5 9.9 111
Summit 1363 360 3.0 6.6 165
Tundra 1556 411 3.4 7.6 145
Kodiak 1295 342 2.8 6.3 174
Klondiker 1412 373 3.1 6.9 159
Frontier 1268 335 2.8 6.2 177
Yukon 1264 334 2.8 6.1 178
Cub 1041 275 2.3 5.1 216
Arctic Fox 787 208 1.7 3.8 286
All Weather Pools 5100 1347 11.2 24.8 44
Water Volume Metered Fill Point
(Approximately Bottom of Head Rest)
Required Salt Dosage to Achieve 2200ppm
(Salinity Range for Spa Boy Version 1 R1 must
be between 2000 ppm - 2500 ppm)
Added Salt 225 Grams (1/2 Lb)
Classic Spa Model Litres US Gal Kg Lb PPM
Mustang 1400 370 3.1 6.8 161
McKinley 1700 449 3.7 8.3 132
Totem 1360 360 3.0 6.6 165
Eagle 1185 313 2.6 5.8 190
Timberwolf 916 242 2.0 4.4 246
All Weather Pools 5100 1347 11.2 24.8 44
Water Volume Metered Fill Point
(Approximately Bottom of Head Rest)
Required Salt Dosage to Achieve 2200ppm
(Salinity Range for Spa Boy Version 1 R1 must
be between 2000 ppm - 2500 ppm)
Added Salt 225 Grams (1/2 Lb)
Understanding Spa Boy®
Owners Manual - Spa Boy®
8585

1.10.7 Sanitizer and pH Readings
The following provides guidance on the establishment and maintenance of sanitizer and pH readings.
Sanitizer Readings: You should have ORP sanitizer (Chlorine) readings within 24 hours. 24 hours post adding
the salt to the spas water, My Arctic Spa will be able to provide accurate readings regarding the ORP sanitizer
(chlorine) reading, and pH reading.
Important: Always check the pH and ORP (sanitizer) levels before each spa use. If the pH reading is out of
range (to high), adjust accordingly with Arctic Pure, Salt Water Balance to correct it. High pH will cause prema-
ture failure of the Spa Boy Output Electrode, cloudy water, and decreased eectiveness of the sanitizer.
* Expect the pH to increase slowly over each week and when the pH gets too high use Arctic Pure, Salt Water
Balance to correct it. High pH will cause premature failure of the Spa Boy Output Electrode, cloudy water, and
decreased eectiveness of the sanitizer.
1.11 Caring for your Spa Boy System
Spa Boy Maintenance
Question 1 How do I Replace the Spa Boy Output Electrode? The Spa Boy Output Electrode should be
replaced every 12 - 18 months. Doing this ensures Sanitizer will be produced and sanitizer remains in the
required range. The App also shows a “ BATTERY” displaying the amount of life left in the Spa Boy Salt Cell.
Accuracy of the display is dependent on the salt dosage being within the required range 2000ppm – 2500ppm.
The Spa Boy Output Electrode can be replaced without draining the spas water providing these steps are fol-
lowed.
Steps:
• Turn the breaker o to isolate power to your Spa.
• Unscrew the Spa Boy Niche out of its housing.
• Raise the Niche completely out of the spas water and dry o any water on the Niche and Electrode.
• To help prevent galvanic corrosion, it is critical to ensure that spa water does not come into contact with the
Spa Boy Electrode Electrical Pin or female matting connection located on the Spa Boy Niche when disconnect-
ing the Niche from the Spa Boy Electrode.
* Keep them high and keep them dry, when replacing the Spa Boy Output Electrode!
• With a small Phillips screwdriver unscrew the set screw that secures the Spa Boy Output Electrode to the
Niche.
• Remove the Spa Boy Output Electrode from the Niche by Unscrewing the Electrode anticlockwise and ensure
the small O-ring has not dislodged from the Electrode and remained behind inside the Niche.
Understanding Spa Boy®
Owners Manual - Spa Boy®
8686

• Ensure the new Electrode has the small O-ring correctly seated into the groove that is positioned around the
electrical pin.
• Inspect the male electrical connection plug in the Niche to ensure it is not corroded. If corroded the dealer will
need to be contacted as the Spa Boy Niche Assembly will require replacement.
• Apply Dielectric Grease to the electrical pin on the new Spa Boy Electrode.
• Insert the Spa Boy Electrode back into the Niche and turning clockwise screw the Electrode into the Niche
until tight and the locating hole has aligned (approximately 4 revolutions).
• Insert the set screw into the Electrode and using a Phillips screwdriver tighten the set screw.
• Tuck the wiring loom back into the Housing.
• Screw the Niche back into its Housing ensuring the Electrode points upwards when tight. This ensures maxi-
mum output from the Electrode.
• Turn the breaker back on to repower your spa.
Question 2 How do I Care for the Spa Boy Sensor? The Spa Boy Sensor must never be permitted to freeze
and must always remain in contact with water. If the Sensor freezes or is not left in contact with water at all
times the sensor will fail and will require replacement!
Question 3 How do I Care for the Spa Boy Sensor when Draining the Spas Water? As the Spa Boy Sensor
must always remain in contact with water, when the spas water is being drained the Spa Boy Sensor Housing
must be sealed before the water is drained. The Spa Boy Sensor Housing is usually located in the foot well or
other area of the spa that is not in the way of bathers or impacted by water turbulence from jets. The Spa Boy
Housing has a Grate screwed into the front of the Housing. Steps for caring for your Spa Boy Sensor when
draining the spas water:
• Find your 2” (50mm) Spa Boy Housing Plug that was installed in the Spa Boy Sensor Housing when your spa
was rst delivered.
• Check to ensure the Spa Boy Housing Plug has an O-ring in place, which is used to generate a seal between
the plug and housing when the plug is screwed into the housing.
• Turn the breaker o to isolate power to your Spa.
• Turning counter clockwise, unscrew the Grate located on the front of the Spa Boy Sensor Housing.
Understanding Spa Boy®
Owners Manual - Spa Boy®
8787

• Screw the Spa Boy Housing Plug provided with your spa into the front of the Spa Boy Sensor Housing. This
will seal the water that is in the Housing and prevent the water in the Housing from draining when you drain
your spas water.
Warning: The Spa Boy Sensor must never be permitted to freeze and must always remain in contact with
water. If the Sensor freezes or is not left in contact with water at all times the sensor will fail and will require
replacement! Such failures are not covered by warranty.
What do we do when winterizing a Spa?
• You can now drain your spas water.
• Clean the Spa shell with a mixture of water and white vinegar. Rinse the shell down with fresh water and then
polish the shell with Arctic Pure, Reection.
• When relling your spa with water, leave the Spa Boy Sensor Plug secured in place until the water line is
higher than the Spa Boy Housing.
• The Spa Boy Housing Plug can now be unscrewed from the Housing and the Housing Grate can be screwed
back into the Housing.
• Once the water level has been reached the bottom of the pillow line you can turn the breaker back on to re-
power your spa.
Question 4 Does adding salt to the spas water impact pH? Yes adding salt to the spas water will increase
the pH level. The chlorine that is produced by a salt chlorinator plays a role in the water chemistry of a salt spa.
Salt is sodium chloride. When an electric charge is passed through salt water, the sodium chloride is turned
into sodium hypochlorite. This is the same kind of chlorine that is sold by the gallon as liquid chlorine. The most
important feature of sodium hypochlorite is a high pH. When the salt chlorinator produces chlorine, it raises the
pH of the spas water. Strive to achieve a Low pH level 7.2. pH must not exceed 7.6.
Question 5 What do I do if my ORP Reading is below the Optimum Range? If Spa Boy reects that the
ORP is below the Optimum Range of 545 – 550 mV you must rst consider that water chemistry may have
been aected by recent bather load and spa usage, at times the ORP value will overshoot or undershoot the
Optimum Range. If the Spa Boy Dashboard on My Arctic Spa reects that the ORP is below 545 mV do the fol-
lowing:
• Check Spa Boy Dashboard through My Arctic Spa to see if the Dashboard reects sanitizing YES, if yes Spa
Boy is currently producing sanitizer. Re-check ORP in a few hours to conrm ORP is increasing.
• If Dashboard reects Sanitizing NO: Trip the spas breaker to isolate the power to the spa and then turn the
breaker back on to repower the spa. Check Spa Boy Dashboard through My Arctic Spa to see if the Dashboard
reects sanitizing YES, if yes Spa Boy is currently producing sanitizer. Re-check ORP in a few hours to conrm
ORP is increasing.
• If Dashboard reects Sanitizing NO: First, try pressing the Spa Boy BOOST button on the Arctic Spas App or
myarcticspa.com dashboard under “Settings/Spa Boy Status” to manually activate the Spa Boy system for 30
minutes.
Understanding Spa Boy®
Owners Manual - Spa Boy®
8888

If the dashboard still reects Sanitizing contact your Arctic Spas Dealer who will request a Master Tech-
nician to log onto your spa to determine the possible cause, such as depleted Spa Boy Output Elec-
trode, Spa Boy Sensor issue or corroded Spa Boy Output Electrode electrical connections.
Question 6 If the Spa Boy System is not working, can I add Arctic Pure BOOST or other sanitizer to the
spas water? Yes you can add Arctic Pure BOOST if needed. Arctic Pure BOOST or other chlorine sanitizer
shouldn’t need to be added regularly to keep up with regular bather load. Adding Arctic Pure BOOST or other
chlorine sanitizers will raise sanitizer levels above the Spa Boy Systems maintained chlorine/ORP optimum
range (545mV-550mV) causing the Spa Boy System to shut down until the chlorine/ORP reading is below the
optimum range, 545mV/ORP.
• Adding BOOST can temporarily “poison” the SpaBoy sensor for 24-48 hours. Do not trust the ORP reading
until water has stabilized.
Question 7 Is it permitted to add Arctic Pure Refresh directly to the spas water? If your spa is not
equipped with Arctic Spa Ozone such as Peak 1 or Peak 2 it is a good idea to add 1 cap full per week.
Question 8 How do I help prevent impedance increase at the Spa Boy Electrode? Maintain the pH level
within the target range 7.2 pH – 7.6 pH. As salt systems naturally drive pH levels upwards, it is most critical to
the performance/life of the salt system to maintain the pH within the target range. High pH reduces the eec-
tiveness of chlorine.
• pH level of 7 makes chlorine 70% eective (30% loss of eectiveness).
• pH level of 8 makes chlorine 21% eective (79% loss of eectiveness).
Therefore, high pH causes your Spa Boy system to produce more chlorine unnecessarily thus increasing pH
even higher and reducing the eectiveness of chlorine even further. Strive to achieve a Low pH level 7.2. pH
must not exceed 7.6.
Question 9 Why is my water bright yellow, or bright green, or a rusty color suddenly? This can happen
if the pH gets too high. Maintain the pH level within the target range 7.2 pH – 7.8 ph. Lower the pH using ‘Salt
Water Balance’. If the color of the water does not normalize you may need to replace the water. If pH readings
are 8.2ppm or above, a pH error will be displayed on the Top Side Controller every ve seconds until the pH is
corrected.
* Keep an eye on the pH and adjust it weekly to avoid this problem in the future.
Understanding Spa Boy®
Owners Manual - Spa Boy®
8989

Question 10 What happens if my water becomes cloudy?
1. Check you pH level to ensure it is in the target range. If high, lower the pH using Arctic Pure Salt Water Bal-
ance.
2. Check/Test the water with a drop test kit for chlorine content. If the level is below 0.5ppm or there is no read-
ing the Spa Boy Output Electrode may be exhausted and require replacement. Check Cell Life Monitor on Arc-
tic Spas App or myarcticspa.com dashboard under “Settings/Spa Boy Status”, remaining Cell life is displayed
as a green colored battery. The green band on the battery will reduce in height as the Cell becomes depleted.
3. Check that the Salinity reading is within the desired range, 2000ppm and 2500ppm. If salinity reading is
below the range it can cause the Cell Life Monitor to display as Red, which implies the Spa Boy Salt Cell is
exhausted when it may not be.
4. Check your lters as they may require replacement.
Question 11 Should I use Best Defense or another scale remover? It is recommended that calcium be re-
moved from the water in advance, during the ll process with the aid of a pre-lter and when establishing initial
correct water chemistry, rather than adding a scale remover after the fact. Calcium readings below 150ppm
should be maintained.
Question 12 What is the impact of phosphates on the Spa Boy system? High levels of phosphates (above
250 ppb) may reduce the eectiveness of sanitizer output.
Question 13 Can I use softened water with my Spa Boy system? Yes, you probably have a water softener
because your water is quite hard. Your water softener removes calcium from your water and helps you achieve
water with calcium content near the target range, between 50 - 150 ppm.
Question 14 Prior to draining spa water for rell purposes, should a system ush be carried out? Yes
you can, Arctic Pure ‘Fresh Start’. Use in accordance with the instructions on the container. Flushing the system
components and hoses is helpful when you get biolm and calcium build-up. It is good practice to do this at
least once a year.
Question 15 If I am going to have a very heavy bather load, is there a way to manually active the Spa
Boy System to generate additional sanitizer (Increase ORP Level)? Yes you can. Pressing the Boost But-
ton through the App or dashboard in myarcticspas.com will manually activate the Spa Boy System for 30 min-
utes. Boost button can be activated in such cases when you know you are going to have a heavy bather load.
CAUTION: Only press the Boost Button once.
When the Boost Button is pressed:
• The Lightning Bolt on the Boost Button will illuminate and then,
• The Spa Boy Generator will turn On and O TWICE along with the Lightning Bolt, and then,
• The Boost function commences its 30-minute cycle. During this cycle the Lightning Bolt remains illuminated.
Pressing the Boost button more than once will cause the Boost function not to activate.
Understanding Spa Boy®
Owners Manual - Spa Boy®
9090

1.12 Arctic Spas Spa Boy Maintenance Schedule
The following table (pages 91 - 92) outlines the typical water maintenance program required for an Arctic Spa
tted with Spa Boy Version 1 R1.
To help ensure chemicals dissolve appropriately it is good practice to rst mix/dissolve the chemical in an un-
contaminated container of hot water before carefully adding to the spa water. There are two methods to check
the target range:
• My Arctic Spa Application, if your spa has Wi-Fi and access to the internet through your home network or
portable device such as iPad or smart phone, you can log onto My Arctic Spa and open the Settings Page and
go to Spa Boy Status page to review the readings (To access My Arctic Spa you must rst register your details
on the My Arctic Spa web site: www.myarcticspa.com.
• Drop Test Kit or by taking a water sample to your local spa dealer.
Understanding Spa Boy®
Owners Manual - Spa Boy®
9191
Item Frequency Maintenance Task Target Range
pH Weekly Check the Potential Hydrogen (pH) to en-
sure it is in the target range.
Always rst check to ensure the pH is within
the target range. If the pH is out of the
target range pH must be adjusted before
making any adjustments to chlorine levels
7.2 – 7.6 pH As Salt systems naturally drive pH levels upwards, it is most critical to the performance/life of
the salt system to maintain the pH within the target range.
High pH reduces the eectiveness of chlorine.
• pH level of 7.2 makes chlorine 62% eective (38% loss of eectiveness).
• pH level of 7.5 makes chlorine 50% eective (50% loss of eectiveness).
• pH level of 8 makes chlorine 21% eective (79% loss of eectiveness).
Therefore, high pH causes your Spa Boy system to produce more chlorine thus increasing pH
even higher and reducing the eectiveness of chlorine even further.
Strive to achieve a Low pH level 7.2. pH must not exceed 7.6. If pH is slightly below 7.0ppm do
not adjust.
Low pH - Can be raised by adding. Adjust Up to the spa water.
High pH - Can be lowered by adding Arctic Pure Salt Water Balance, Adjust Down to spa water.
ORP Weekly
(& before
each use)
Check the Free Chlorine Level to ensure it
is in the
target range.
545–550 mV /ORP
Using a Drop
Test Kit, 0.5ppm
Chlorine reading
= approximately
550mV
545-550 mV is the Optimum Range factory default setting.
The user may adjust higher if preferred by contacting their dealer to have it adjusted. Spa Boy
will strive to maintain ORP within the Optimum Range.
Depending on the water chemistry which will be aected by bather load and spa usage, at
times the ORP value will overshoot or undershoot the Optimum Range.
Sodium
Chloride
Monthly Check the Sodium Chloride Level to ensure
it is in the target range.
Version 1 R1 2000
– 25000 ppm
Once Sodium Chloride reading is in the target range salt concentration will only change if
water is splashed or drained out. Do not add salt unless this test conrms the level is below the
chemical acceptable range.
High Sodium Chloride - add water above 2500ppm
Low Sodium Chloride - add salt below 2000ppm
Shock Weekly Shock the spas water with Arctic Pure,
Refresh
N/A At a minimum 1 capful per week should be added for a spa and 2 caps full for an AWP. This
amount can be reduced if your spa is equipment with an Arctic Spas OZONE System.
Filter 6 Monthly Change the lter(s) N/A Change the lter(s) in accordance with Owners Manual instructions. (Pg.16)
Water 6 Monthly Change the water N/A Change the water in accordance with Owners Manual instructions. (Pg.21)
Understanding Spa Boy®
Owners Manual - Spa Boy®
9292
Maintenance Action to Adjust/Correct
pH Weekly Check the Potential Hydrogen (pH) to en-
sure it is in the target range.
Always rst check to ensure the pH is within
the target range. If the pH is out of the
target range pH must be adjusted before
making any adjustments to chlorine levels
7.2 – 7.6 pH As Salt systems naturally drive pH levels upwards, it is most critical to the performance/life of
the salt system to maintain the pH within the target range.
High pH reduces the eectiveness of chlorine.
• pH level of 7.2 makes chlorine 62% eective (38% loss of eectiveness).
• pH level of 7.5 makes chlorine 50% eective (50% loss of eectiveness).
• pH level of 8 makes chlorine 21% eective (79% loss of eectiveness).
Therefore, high pH causes your Spa Boy system to produce more chlorine thus increasing pH
even higher and reducing the eectiveness of chlorine even further.
Strive to achieve a Low pH level 7.2. pH must not exceed 7.6. If pH is slightly below 7.0ppm do
not adjust.
Low pH - Can be raised by adding. Adjust Up to the spa water.
High pH - Can be lowered by adding Arctic Pure Salt Water Balance, Adjust Down to spa water.
ORP Weekly
(& before
each use)
Check the Free Chlorine Level to ensure it
is in the
target range.
545–550 mV /ORP
Using a Drop
Test Kit, 0.5ppm
Chlorine reading
= approximately
550mV
545-550 mV is the Optimum Range factory default setting.
The user may adjust higher if preferred by contacting their dealer to have it adjusted. Spa Boy
will strive to maintain ORP within the Optimum Range.
Depending on the water chemistry which will be aected by bather load and spa usage, at
times the ORP value will overshoot or undershoot the Optimum Range.
Sodium
Chloride
Monthly Check the Sodium Chloride Level to ensure
it is in the target range.
Version 1 R1 2000
– 25000 ppm
Once Sodium Chloride reading is in the target range salt concentration will only change if
water is splashed or drained out. Do not add salt unless this test conrms the level is below the
chemical acceptable range.
High Sodium Chloride - add water above 2500ppm
Low Sodium Chloride - add salt below 2000ppm
Shock Weekly Shock the spas water with Arctic Pure,
Refresh
N/A At a minimum 1 capful per week should be added for a spa and 2 caps full for an AWP. This
amount can be reduced if your spa is equipment with an Arctic Spas OZONE System.
Filter 6 Monthly Change the lter(s) N/A Change the lter(s) in accordance with Owners Manual instructions. (Pg.16)
Water 6 Monthly Change the water N/A Change the water in accordance with Owners Manual instructions. (Pg.21)
Understanding Spa Boy®
Owners Manual - Spa Boy®
9393
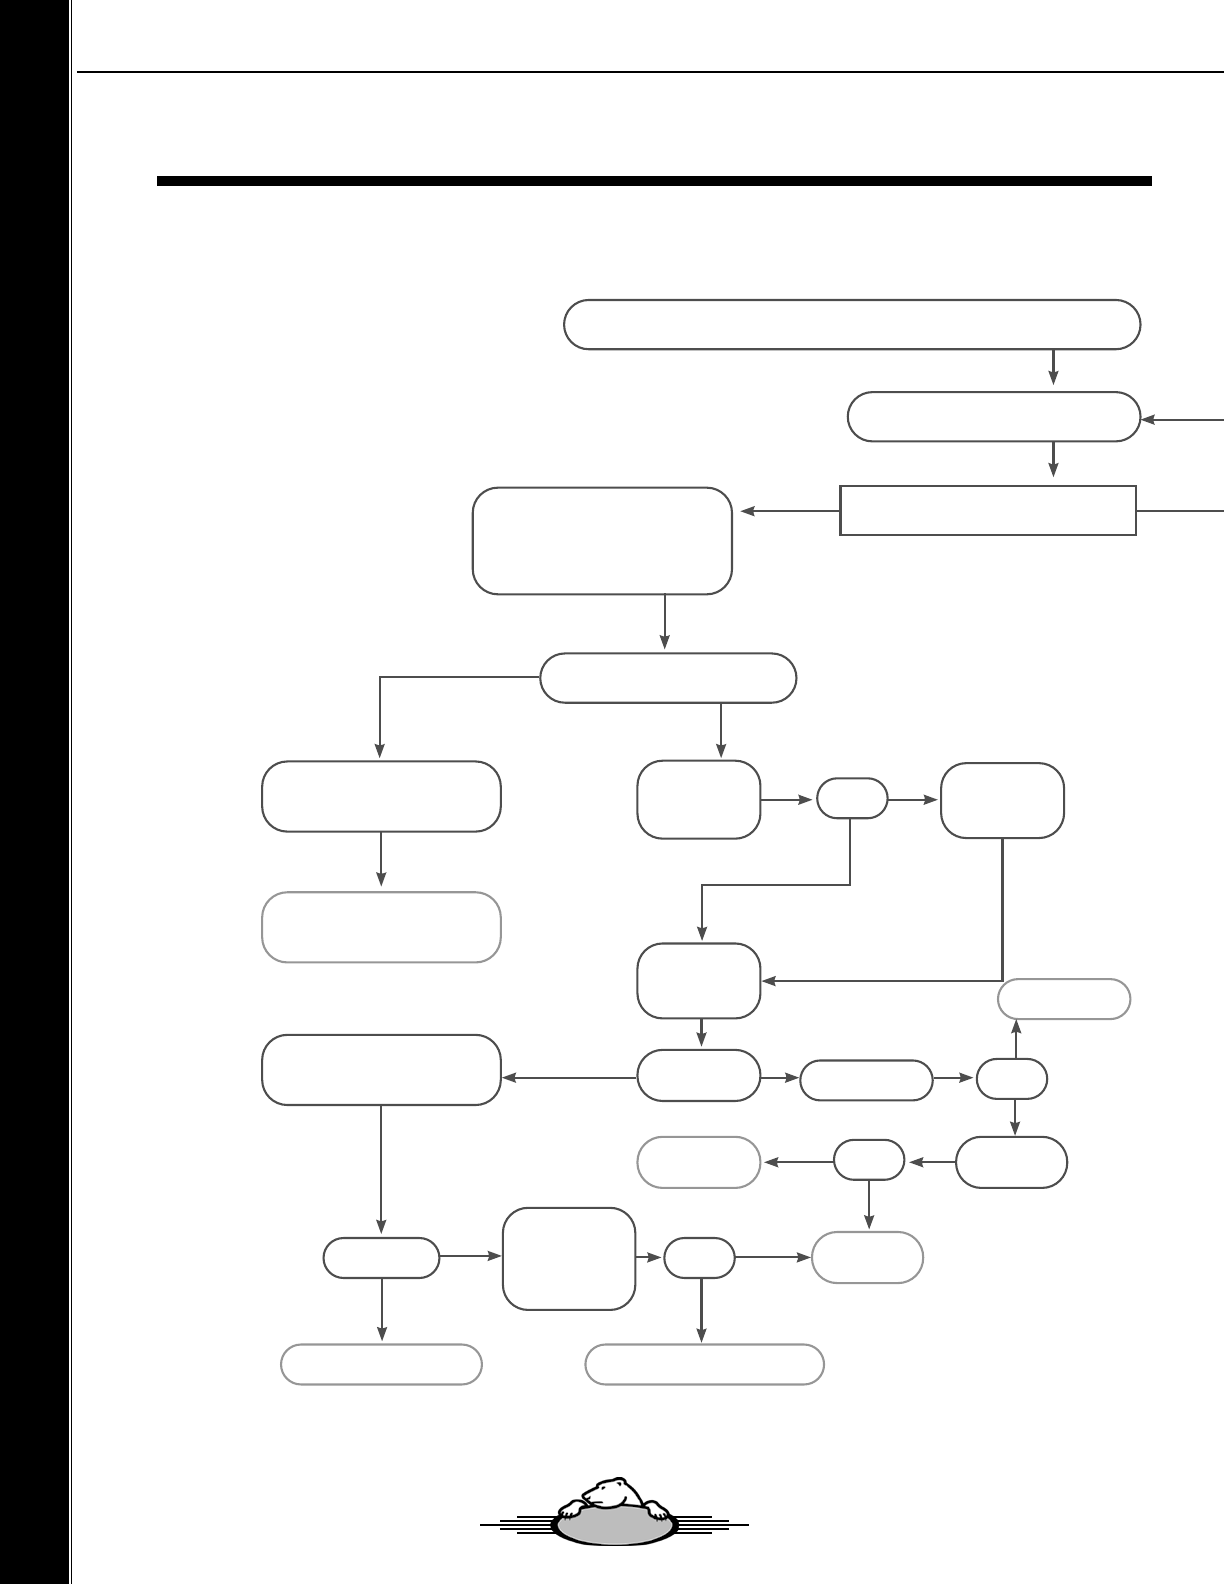
Replace Spaboy Output Electrode.
Replace Spaboy Communication Cable.
Low ORP (Chlorine) reading detected
(Run pumps on high speed for a 20 minute cycle to mix the water. If the reading is still low move on to the next step)
Press Spaboy Boost button. Electrode will
immediately turn on for 30 minutes
Does Spaboy Output Electrode Generate smoke
during the 30 minutes period?
Reset the Spas Breaker (Turn power off and on
at the spa breaker). Spaboy will do a Polarity
Test off the Spaboy Output Electrode for 3
seconds per side immediately on Start -up
Does Electrode smoke?
Electrode Smokes for 3 seconds/
pause/3 seconds but does not stay on
for 30 minutes.
Check connection of
Spayboy Niche to
Spayboy Generator.
Check Spaboy
Generator supply
voltage direct power.
Connect Spayboy
Niche to Spayboy
Generator.
Replace Spaboy Output Electrode.
Note: If this does not correct the problem
also replace the Spaboy Niche.
Unplug Spaboy Output Electrode, test
to ensure 12-13 volts DC is maintained
indefinetly.
12-13 volts DC?
Check Spaboy Com
-
munication Cable from
Generator to Pack
(Location P7, P8, P9)
Ok?
Ok?
Ok?
Replace Spaboy
Generator.
Check Spaboy fuse.
Replace Spaboy Fuse.
Replace
Motherboard.
Is Spaboy Generator
powered?
Check Spaboy volt
-
age supply
NO
NO
NO
NO
NO
NO
NO
NO
YES
YES
YES
YES
YES
YES
YES
Ok?
1.13 Spa Boy® Start-Up Guide / Low ORP Troubleshooting Flow Chart
Understanding Spa Boy®
Owners Manual - Spa Boy®
9494
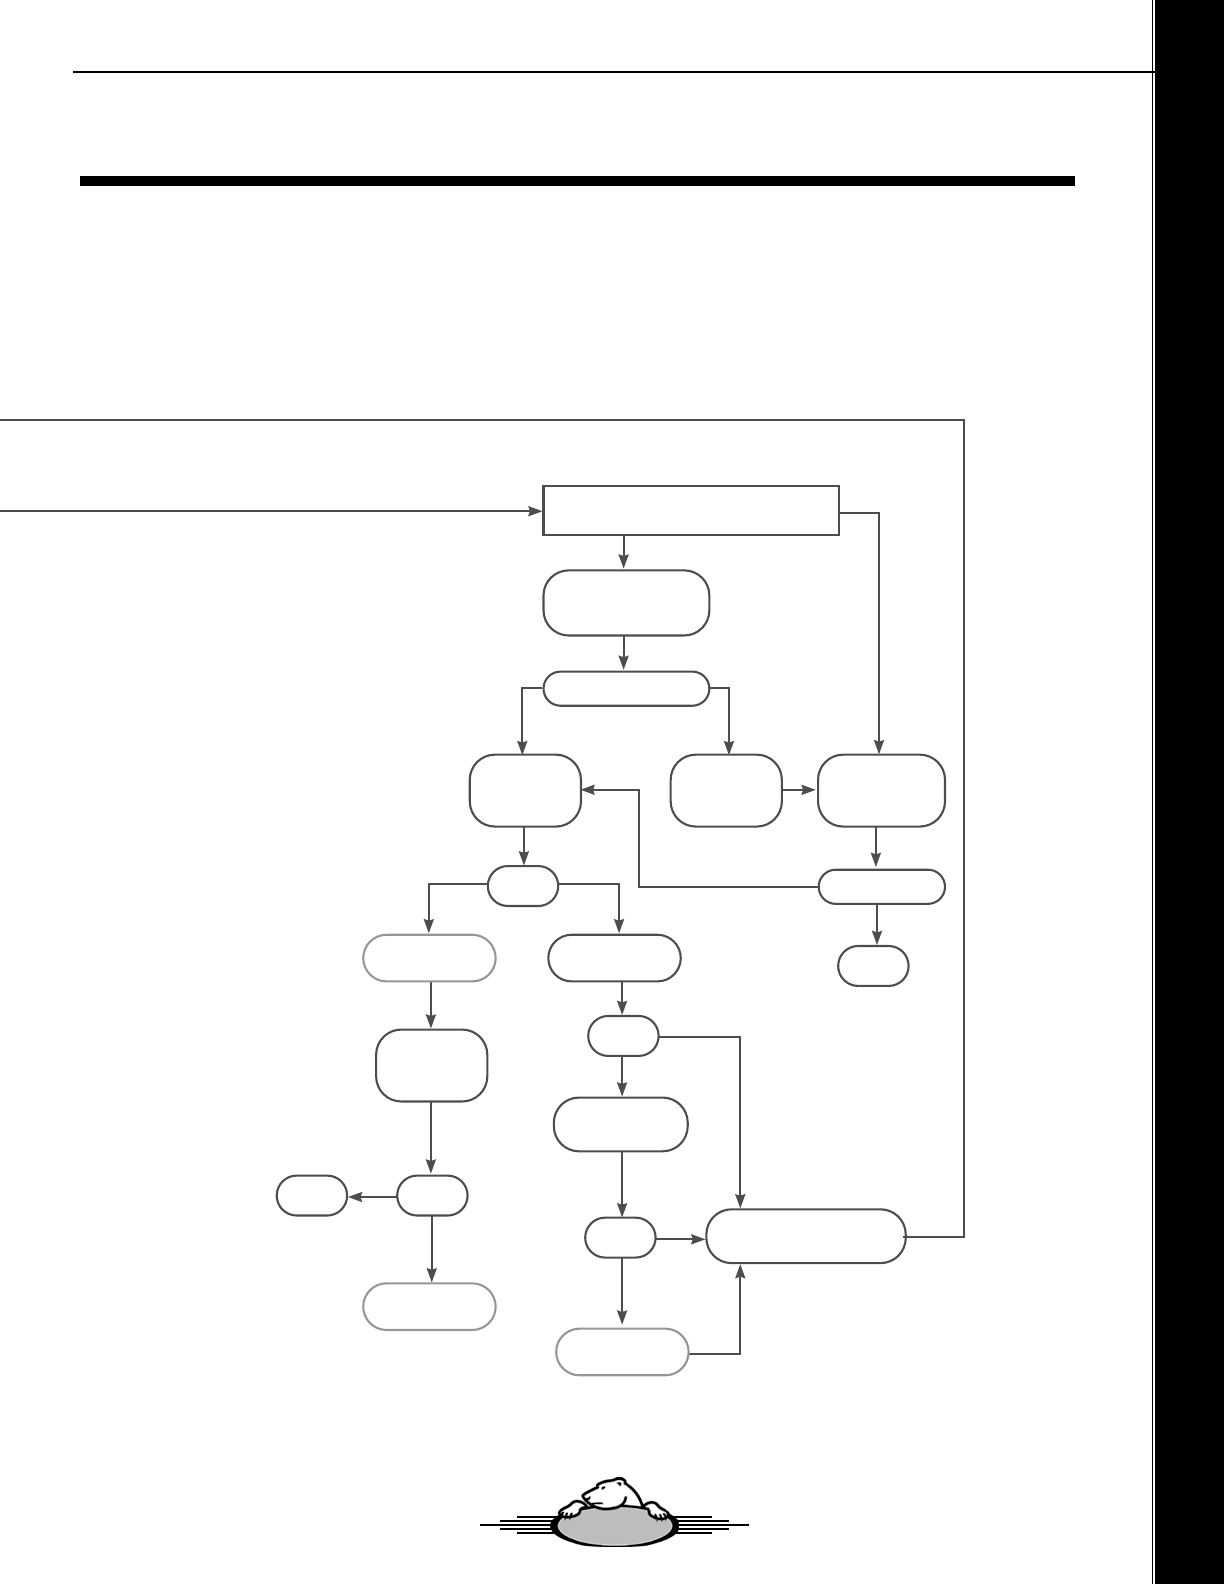
YES
Has Spa been used recently?
Verify salinity level is between
2000ppm – 2500ppm
Check Battery read
-
ing of Spaboy Output
Electrode.
Adjust Salinity level
accordingly
Replace Spaboy
Output Electrode.
Manually test
Chlorine level
Check Spaboy
Sensor Probe.
Replace Spaboy
Sensor Probe
Check Battery read
-
ing of Spaboy Output
Electrode.
Wait 24 hrs to see if Spaboy
automatically corrects ORP level
Replace Spaboy
Niche.
Low?
Wait 24 hrs to see if
Spaboy automatically
corrects ORP level
ORP level ok?
Salinity Level ok?
YES
NO
Ok?
Ok?End
End
Ok?
YES
NO YES
YES
YES
YES
YES
NO
NO
NO
NO
NO
Understanding Spa Boy®
Owners Manual - Spa Boy®
9595
9696
Onzen
™

9797
Eco PAK
Electrolytic Cell
Onzen™ Controller
The Onzen™ Salt Water system is Arctic Spas® proprietary salt water system that produces sanitizer
from Dead Sea salts through the process of electrolysis. Salt-water sanitizer generation has several
advantages over traditional sanitizer methods. Firstly, sanitizer is created, rather than added to the
system and so there is very little on-going cost related to this system. The resulting spa water is much
more gentle to skin and eyes, and has a similar salinity to a human tear.
Onzen™ has many unique features that have overcome previous challenges tied to salt water systems
for spas. The rst is that Onzen™ has a user-replaceable electrode cartridge. Electrolysis is a sacricial
process the electrodes will eventually deteriorate and require replacement.
The replacement of the Onzen™ titanium electrode cartridge is a simple and inexpensive maintenance
item that does not require the tub to be drained. The second key feature of Onzen™ is the ability
to control the system either from the topside control, or via the Arctic Spas® smartphone App.
This user adjustment can be used to match the sanitizer output of the Onzen™ system to the current,
or anticipated bather load.
The use of the Onzen™ Salt Water system can signicantly reduce the eort required to maintain clear
and safe spa water, but we do suggest adding Peak Ozone to maximize the benet of the Onzen™ Salt
Water system.
ONZEN™
SALT WATER SYSTEM

1.0 Onzen™ Technical Guide
1.1 Obtaining Technical Data For Your Spa. To ensure you have the current appropriate technical data for your
spa it is recommended that you obtain such data from your authorized retailer or from the Arctic Spas Web Site
http://www.arcticspas.com.
1.2 Revision Summary. This publication has been fully revised to provide the supporting details Onzen Version
8, and spas with the Eco-Pak spa controller.
1.3 What is Onzen™? Onzen is an all-natural, salt-water softening and maintenance system.
1.4 What Does Onzen™ Do?
• Softens water.
• Claries water.
• Adds back up sanitizing (Chlorine) agents, automatically.
1.5 What Are The Benets of Onzen™?
• Makes skin feel soft and smooth.
• Makes water look sparkling clean.
• Reduces contact with harsh chemicals.
• Dramatically reduces time and money needed to maintain spa water.
• Reduces impact to the environment:
1. Fewer trips to the spa store for supplies.
2. Less packaging wasted on chemical containers.
3. Less industrial waste produced making spa chemicals.
1.6 How Does Onzen™ Work?
• Natural mineral sea salt blend is added to water when spa is lled.
• Sanitizing agents (Chlorine) are produced and mixed with water, automatically.
• Output is easily controlled to suit very low to very high use.
1.7 How to Determine Spa Production Date? The Spa production date can be determined from the Spa Serial
Number recorded on the Spa Identication Plate mounted on the cabinet usually under the topside controller.
Example
When the Boost Button is pressed:
• The two digits following the rst letter represent the year that the Spa was built 10 = 2010.
• The letter following the rst two digits represent the month that the Spa was built H = August.
9898
Owners Manual - Onzen™
Table of Contents
1.8 Denitions of Terms
TERM DEFINITION
Onzen™ An all-natural, salt-water softening and maintenance system.
Onzen™ Output Electrode Three plate platinum-iridium Titanium electrode - equipped salt cell converts the
saltwater solution to sanitizer, and as this solution reverts back to its natural form
(salt) after sanitizing. Unless large volumes of water are added to the spa you
never have to add more salt. The Three plate electrode plastic outer casing is
black in color.
Note: When the Onzen System has activated the Output Electrode to generate
sanitizer, the electrode gives o smoke eect.
Onzen™ Output Electrode
Version
Modication status of the electrode tted to the spa.
Calcium Hardness (CH) Calcium Hardness is a measure of the total amount of dissolved calcium salts in
the water.
CH helps determine how scaling or corrosive the water is. It is believed that
calcium helps control the corrosive nature of water.
Calcium has two major problems in Hot Water Chemistry:
1. CH has a tendency to precipitate (fall out of suspension in high tempera
-
tures, ,
where pH is above 7.8ppm)
2. High pH will cause calcium to precipitate. The problem with calcium falling
out of suspension is that it collects on the heater and pump, and shortens
their life. High pH also reduces the life of the Onzen Output Electrode.
Any natural corrosiveness in the water can be combated by maintaining a slightly
higher Total Alkalinity Level.
Alkalinity
Total Alkalinity (TA)
A measure of how stable the pH is (a measure of the total levels of carbonates,
bicarbonates, hydroxides, and other alkaline substances in the water).
TA is referred to as the water’s “”pH buer””. In other words, it’s a measure of the
ability of the water to resist changes in pH level.
If the TA is too low, the pH level will uctuate widely from high to low. Fluctuations
in pH can cause corrosion or scaling of the spa components.
Low TA can be corrected by adding Arctic Pure, Perfect Balance to the spa water.
If the Total Alkalinity is too high, the water will be more susceptible to scale and
high pH. High pH may be dicult to bring down.
Note: Salt systems naturally drive pH levels to increase.
High TA can be lowered by adding Arctic Pure Salt Water Balance to the spa
water.
Once the TA is Balanced, it normally remains stable, although some sanitizers,
and the addition of more water with a high or low alkalinity will raise or lower the
TA reading of the water.
9999
Owners Manual - Onzen™
Understanding Onzen™
TERM DEFINITION
Potential Hy-
drogen
(pH)
The pH level is the measure of alkalinity.
pH is measured between 0 and 14 denoting various degrees of acidity or alkalinity.
Neutral water has a pH of 7.0 Water below 7.0 is acidic and becomes more acidic as it approaches
zero.
Water above 7.0 is alkaline and alkalinity increases as it approaches 14.
When the pH of water is 7.0 or below, chlorine will act primarily as a sanitizer. At this level, it is very
eective at killing bacteria.
At 7.4, chlorine will act equally as a sanitizer and oxidizer.
Above 7.8, chlorine will act principally as an oxidizer.
The pH of chlorine is 11.7ppm.
Spa water is considered balanced if the pH level is within the target range, between 7.2pH to 7.6pH.
Adding chlorine either automatically through a salt system or manually, into spa water with high
pH, above 7.6pH, will further increase the pH level and dramatically reduce the eectiveness of the
chlorine as a sanitizer. This must be avoided by rst reducing the pH level into the target range 7.2pH
- 7.6pH.
The chart below reects the loss of sanitizer eectiveness/sanitizer eectiveness based on the spas
water pH level:
pH Level Sanitizer (Chlorine)
Loss of Effectiveness
based on pH Level
Sanitizer (Chlorine)
Effectiveness
based on pH Level
7.0 pH 27% 73%
7.2 pH 38% 62%
7.5 pH 50% 50%
8.0 pH 78% 21%
8.5 pH 90% 10%
6.0 pH 4% 96%
6.5 pH 10% 90%
Maintaining a Balanced pH level between 7.2pH and 7.6pH is extremely important for:
• Optimizing the eectiveness of the sanitizer.
• Maintaining water that is comfortable for the user.
• Preventing equipment deterioration.
• Note: Salt systems naturally drive pH levels to increase, strive to achieve a balanced pH level.
If the spa water’s pH level is too low, the following may result:
• The sanitizer will dissipate rapidly.
• The water may become irritation to spa users.
• The spa’s equipment may corrode reducing life expectancy.
Low pH can be raised by adding Arctic Pure, Adjust Up to the spa water.
If the pH level is too high, the following may result:
• The sanitizer is less eective.
• Scale will form on the spa shell surface and the equipment.
• High pH will cause calcium to precipitate (fall out of suspension).
• The water may become cloudy.
High pH can be lowered by adding Arctic Pure, Salt Water Balance to the spa water.
It is important to check the pH on a regular basis. The pH will be aected by the bather load, the addition of
new water, the addition of various chemicals, and the type of sanitizer used.
100100
Understanding Onzen™
Owners Manual - Onzen™

TERM DEFINITION
Chlorine
Free Chlorine (FCL)
FCL is the active form of chlorine that actually kills bacteria and algae (It is a Sani-
tizer).
Sanitizer is extremely important for killing algae, bacteria and viruses, and prevent-
ing unwanted organisms for growing in the spa. At the same time, you don’t want
too high a sanitizer level, or it can irritate your skin, lungs and eyes.
Always maintain the sanitizer level in your spa within the recommended range.
Also refer ORP
Chlorine Residual The actual level of chlorine in the water after the chlorine demand has been satis-
ed.
Sanitizer Chemical used to kill bacteria.
Generic names: Chlorine, Bromine and Biguanide.
Arctic Pure, Boost
Adding Arctic Pure BOOST should be avoided unless the CI level is very low.
Parts Per Million (ppm) ppm: parts per million, a standard measure of chemical or mineral concentration.
Organic waste Debris such as microorganisms, perspiration, urine, etc. which needs to be burned
up or “oxidized” regularly to prevent haze, algae, chloramines, etc.
Shock An oxidizer that “burns o” the organic wastes which cause cloudiness and algae. It
is a generic term for a chemical used to oxidize organic wastes. Arctic Pure, Boost.
1.9 Water Chemistry Abbreviations/Acronyms & Levels
ABBREVIATION/ACRONYMS
DEFINITION CORRECT CHEMICAL LEVELS
CH Calcium Hardness 50 - 150 ppm
TA Total Alkalinity 80-100 ppm
pH Potential Hydrogen 7.2 – 7.6 ppm
FCL Free Chlorine 1 – 3 ppm
ORP Oxidation–Reduction Potential 600 - 1000
101101
Understanding Onzen™
Owners Manual - Onzen™
ABBREVIATION/ ACRO-
NYMS
DEFINITION
Fd Filter Cycle Duration
Fd 00 = no ltration.
Fd 01 = 1 hour/cycle.
Fd 02 = 2 hour/cycle.
Fd 03 = 3 hour/cycle.
Fd 04 = 4 hour/cycle.
Fd 05 = 5 hour/cycle.
Fd 06 = 6 hour/cycle.
FF FF
Filter Cycle Frequency
FF 1 = 1 cycle in 24 hours.
FF 2 = 2 cycles in 24 hours.
FF 3 = 3 cycles in 24 hours.
FF 4 = 4 cycles in 24 hours.
On Onzen Cycle Duration
0-24 Hours per day
* Cycles are divided into 4
ie: If 8 hours is selected, the system will perform 4 x 2 hour cycles per day.
1.9 Settings Abbreviations Acronyms
102102
Understanding Onzen™
Owners Manual - Onzen™
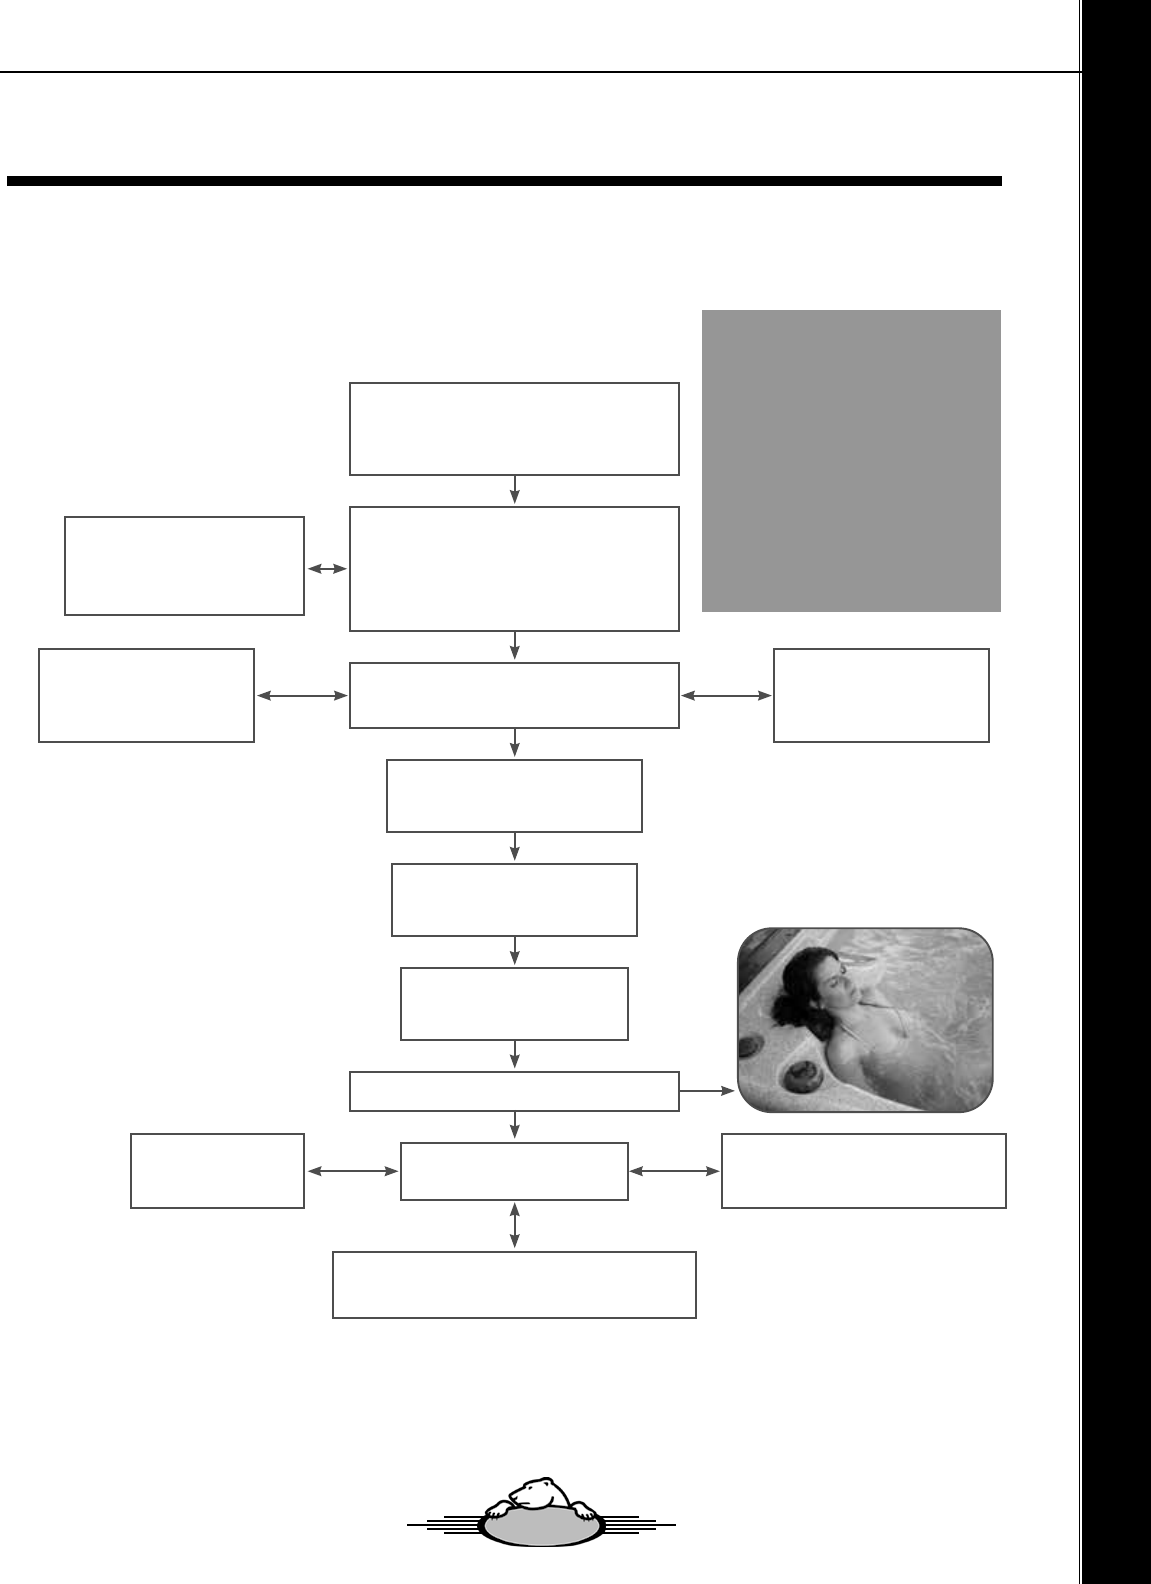
1.10 Onzen™ Start - Up Guide
1.10.1 Onzen™ Start - Up Overview Flowchart
NOTE:
This owchart provides an
overview of the Onzen start-
up process.
The detailed support proce-
dures are contained in this
document.
All checks and test should be
carried out in accordance with
the Arctic Spas Spa Boy Own-
ers Manual.
Spa has been positioned in accor-
dance with the Arctic Spas Owners
Manual.
Establishing Correct Water Chemistry.
Relax and Enjoy Your Spa
Arctic Spas Onzen maintenance Schedule
Program ltration & Onzen
Settings
Conducting a sanitizer
production test.
Sanitizer readings
Maintain Correct Water
Chemistry
Fill Spa With Water, Power Up Spa
and Set Water Temperature.
Have electrical power to
Spa connected in accor-
dance with
Arctic Spas Owners Manual
Arctic Spas Onzen Salt
Dose Guidance Table.
Using Sodium Chloride
Test Strips.
Onzen Frequently
Asked Questions
Arctic Spas Cloudy Water/Onzen
Troubleshooting Flowchart
103103
Understanding Onzen™
Owners Manual - Onzen™

1.10.2 Fill Spa with Water.
Power up Spa and Set Water Temperature. The following steps provide guidance to help establish correct chem-
ically balanced water. To help ensure chemicals dissolve appropriately it is good practice to rst mix/dissolve the
chemical in an uncontaminated container of hot water before carefully adding to the spa water.
Steps to Fill Spa With Water Power Up Spa and Set Water Temperature
Step 1. Fill Spa Fill your spa through the lter intake as
shown
to the appropriate level (just under the head rests). If
you have sediment or high mineral content a “carbon
lled pre-lter”, as pictured, can help. (This is optional
and will prolong the ll time).
Step 2. Connect/Turn on Electrical Power to the spa
once the spa is lled to the proper level, and turn the
power on to the spa on.
Step 3. Set Water Temperature Set the water tempera-
ture control on the Topside Controller to the desired
temperature (between 100ºF and 104ºF or 38°C and
40°C).
104104
Understanding Onzen™
Owners Manual - Onzen™
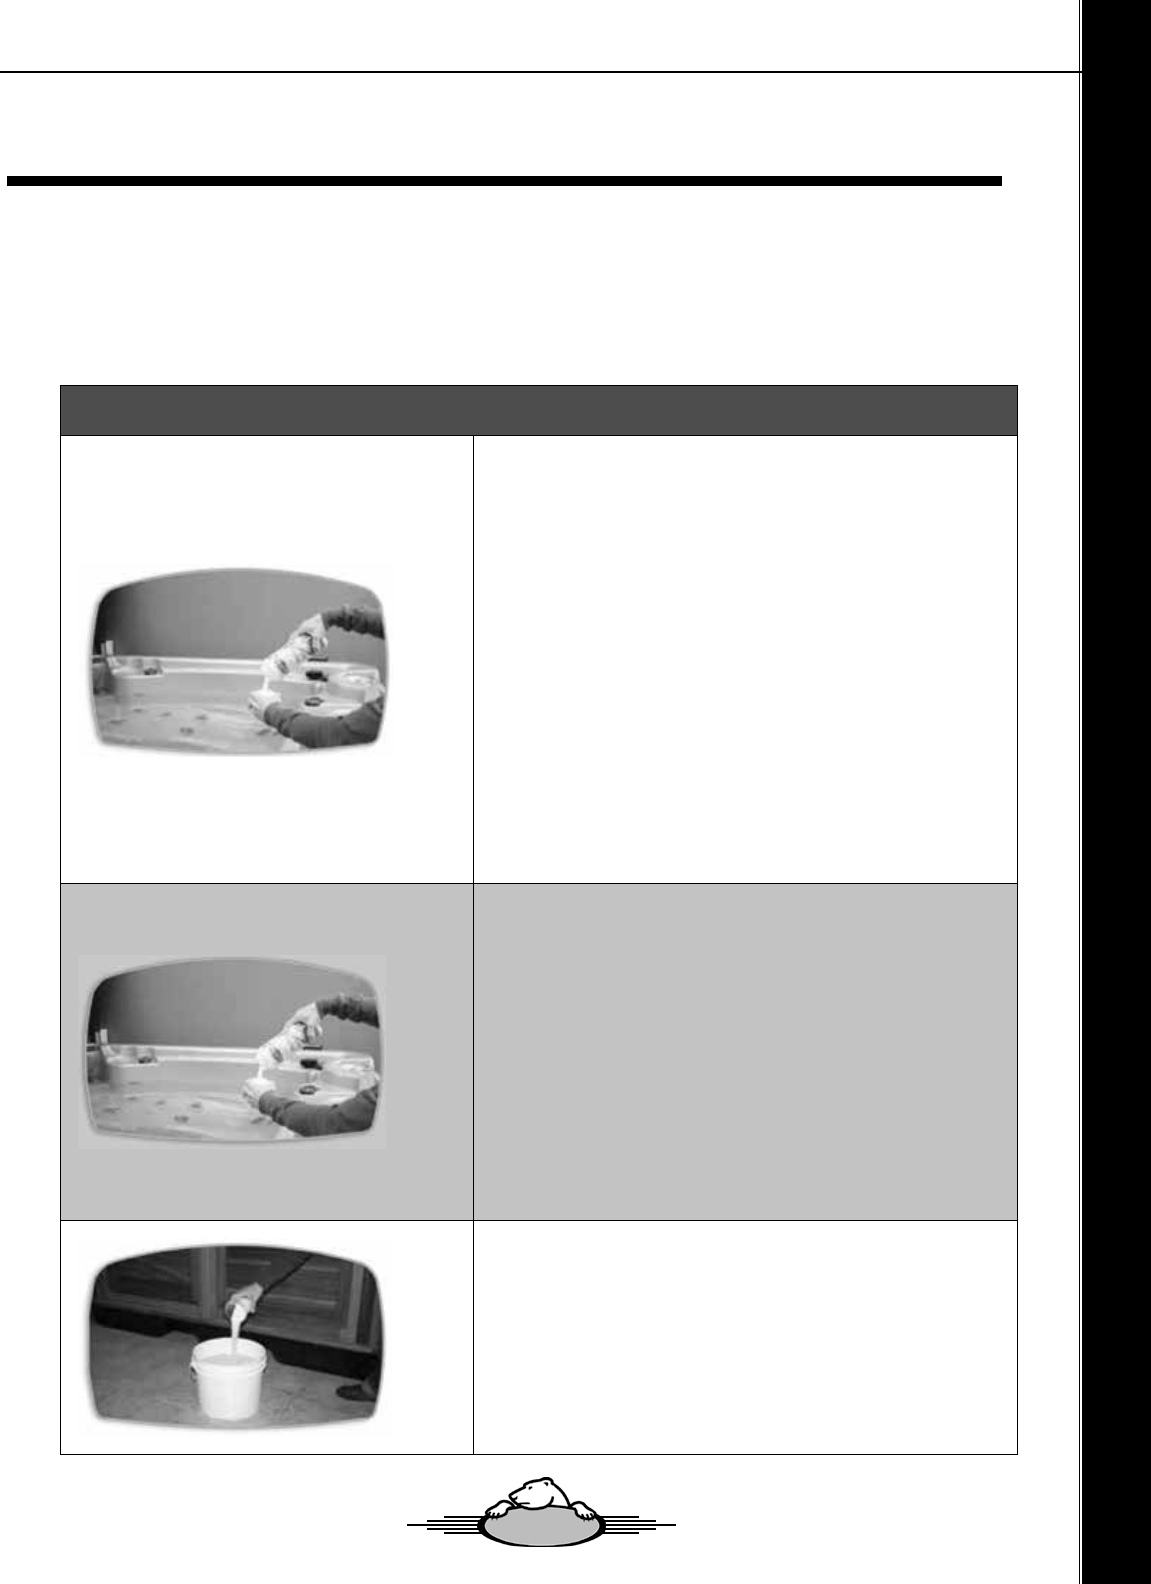
1.10.3 Establishing Correct Water Chemistry
The following steps provide guidance to help establish correct chemically balanced water. To help ensure chemi-
cals dissolve appropriately it is good practice to rst mix/dissolve the chemical in an uncontaminated container of
hot water before carefully adding to the spa water.
Steps to Establish Chemically Balanced Water With Onzen
Step 1. Test and Adjust Calcium / Total Alkalinity
(a) Test Calcium hardness. Level should be between
50-150 ppm.
If high, lower with a stain & scale controller such as
Arctic Pure, Best Defence, to help hold the Calcium in
suspension.
NOTE: Salt systems perform best with Low Calcium
levels.
(b) Test Total Alkalinity. It should be 80 – 100 ppm
(100 max). If high, lower Total Alkalinity with Arctic Pure,
Adjust Down (pH Down) or muriatic acid. Do not raise
Total Alkalinity!
WARNING: Skipping these steps on Start-up can cause
scaling problems and cloudy water that may not be
covered under warranty.
NOTE: Use all products according to directions on the
bottle.
Step 2. Test and Adjust pH
Test pH. Levels should be between 7.2 – 7.6.
If pH is high, (over 7.6) add Arctic Pure, Adjust Down. If
pH is low, (under 7.2) add Arctic Pure, Adjust Up.
NOTE: Use all products according to directions on the
bottle.
NOTE: Salt systems naturally drive pH levels to increase,
strive to achieve a Balanced pH level.
NOTE: High pH will cause calcium to precipitate (fall out
of suspension). The problem with calcium falling out of
suspension is that it collects on the heater and pump,
and shortens their life.
Step 3. Mix Salt Crystals
Dissolve 1/3 of the minimum recommended salt dosage
in a 5 Gallon (20
litre) pail of hot water.
Refer Arctic Spas – Onzen Salt Dosage Chart contained
in this guide.
105105
Understanding Onzen™
Owners Manual - Onzen™
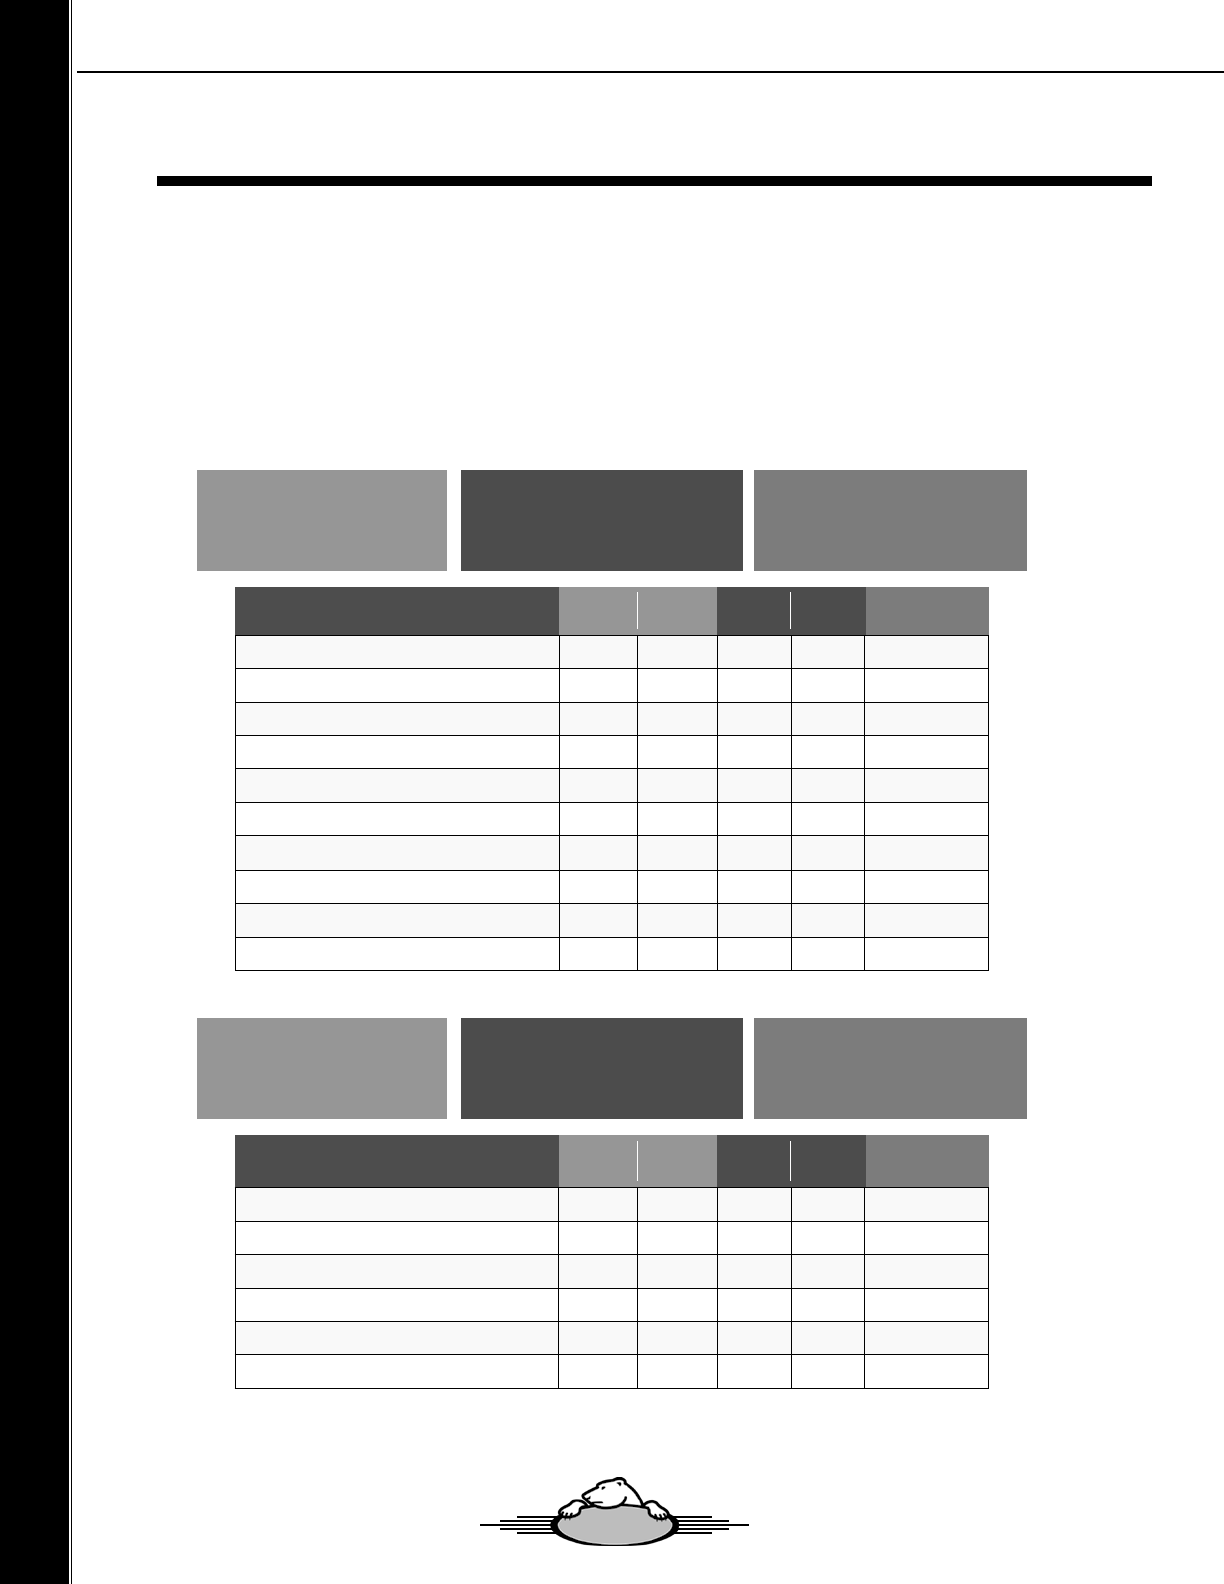
1.10.4 Arctic Spas Onzen™ Salt Dose Guidance Table
The following table identies the salt quantity required for each Arctic spa model and estimated impact of adding
half pound (225g) of salt. For startup, it is recommended to strive for the minimum salt dosage. Once a Sodium
Chloride reading has been taken and the minimum salt dosage achieved, it can be increased slightly to accom-
modate spa usage and bather load, if increasing the Onzen run time does not adequately increase the Chlorine
Residual. Having the minimum amount of salt concentration unless the Onzen system is unable to maintain the
proper Chlorine residual, will reduce potential corrosion and increase the life of the Onzen Output Electrode.
NOTE: The above table provides a guideline to achieve a salinity level of 2200 ppm. Due to diering levels of
compounds and chemicals in water in dierent suburbs and countries, please ensure you conrm salinity level
is in the desired salinity range using Aquacheck Salt Test Strips
Custom Salt Dosage Chart
Classic Salt Dosage Chart
Water Volume Metered Fill Point
(Approximately Bottom of Head Rest)
Required Salt Dosage to Achieve 2200ppm
(Salinity Range for Spa Boy Version 1 R1 must
be between 2000 ppm - 2500 ppm)
Added Salt 225 Grams (1/2 Lb)
Water Volume Metered Fill Point
(Approximately Bottom of Head Rest)
Required Salt Dosage to Achieve 2200ppm
(Salinity Range for Spa Boy Version 1 R1 must
be between 2000 ppm - 2500 ppm)
Added Salt 225 Grams (1/2 Lb)
Custom Spa Model Litres US Gal Kg Lb PPM
Summit XL 2033 537 4.5 9.9 111
Summit 1363 360 3.0 6.6 165
Tundra 1556 411 3.4 7.6 145
Kodiak 1295 342 2.8 6.3 174
Klondiker 1412 373 3.1 6.9 159
Frontier 1268 335 2.8 6.2 177
Yukon 1264 334 2.8 6.1 178
Cub 1041 275 2.3 5.1 216
Arctic Fox 787 208 1.7 3.8 286
All Weather Pools 5100 1347 11.2 24.8 44
Classic Spa Model Litres US Gal Kg Lb PPM
Mustang 1400 370 3.1 6.8 161
McKinley 1700 449 3.7 8.3 132
Totem 1360 360 3.0 6.6 165
Eagle 1185 313 2.6 5.8 190
Timberwolf 916 242 2.0 4.4 246
All Weather Pools 5100 1347 11.2 24.8 44
106106
Understanding Onzen™
Owners Manual - Onzen™

1.10.5 Using Sodium Chloride Test Strips. The following steps provide guidance to help ensure sodium chloride
test strips are used correctly.
Steps to Help Ensure Sodium Chloride Test Strips are Used Correctly Continued
Step 6. Sodium Chloride Adjustment
The following levels are ideal:
Minimum Maximum
2000 ppm 2500 ppm
Note: The Arctic Spas Onzen Salt Chart in this guide
provides the estimated impact of adding 1⁄2 lb (225 Grams)
of salt to your spa.
Add or dilute water as needed.
· If Sodium Chloride reading is greater than the maximum
level, add water.
· If Sodium Chloride reading is less than the minimum level,
add salt.
Note: Once Sodium Chloride reading is in the ideal range
salt concentration will only change if water is splashed or
drained out and spa is replenished with water. Do not add
salt unless this test conrms the level is below the ideal
range.
Warranty: Use of salt other than Arctic Pure sea salt blend
will damage the components and void the warranty. The
Arctic Pure blend has been developed to protect Onzen
components from damage and the use of alternative salt
blends will be easily detected by technicians.
Steps to Stabilize Water
Step 1. Stabilize Spa Water
Once Filtration cycles and ltration duration low level set-
tings have been programmed place the insulated cover
on the spa and allow the water temperature to stabilize
(approximately 16 hours). Make sure you secure the cover
in place using the cover locks. Periodically check the spa
water temperature. When the water temperature climbs
above 85°F, (29°C) proceed to the next step.
Note: As heat impacts both Calcium and Total Alkalinity a
little it is best to heat the water above 29°C (85°F) before
advancing to Establishing Correct Water Chemistry.
Filter Cycle Suspension
During a Filter cycle, if an accessory (a pump, the blower, or the light) is used manually, the Filter cycle is
suspended during the time that the accessories are used.
Once all accessories are turned o (whether manually or by built-in timer), the Filtration cycle remains
suspended for an extra 40 minutes. When a Filtration cycle is suspended the Filtration cycle icon will blink.
107107
Understanding Onzen™
Owners Manual - Onzen™
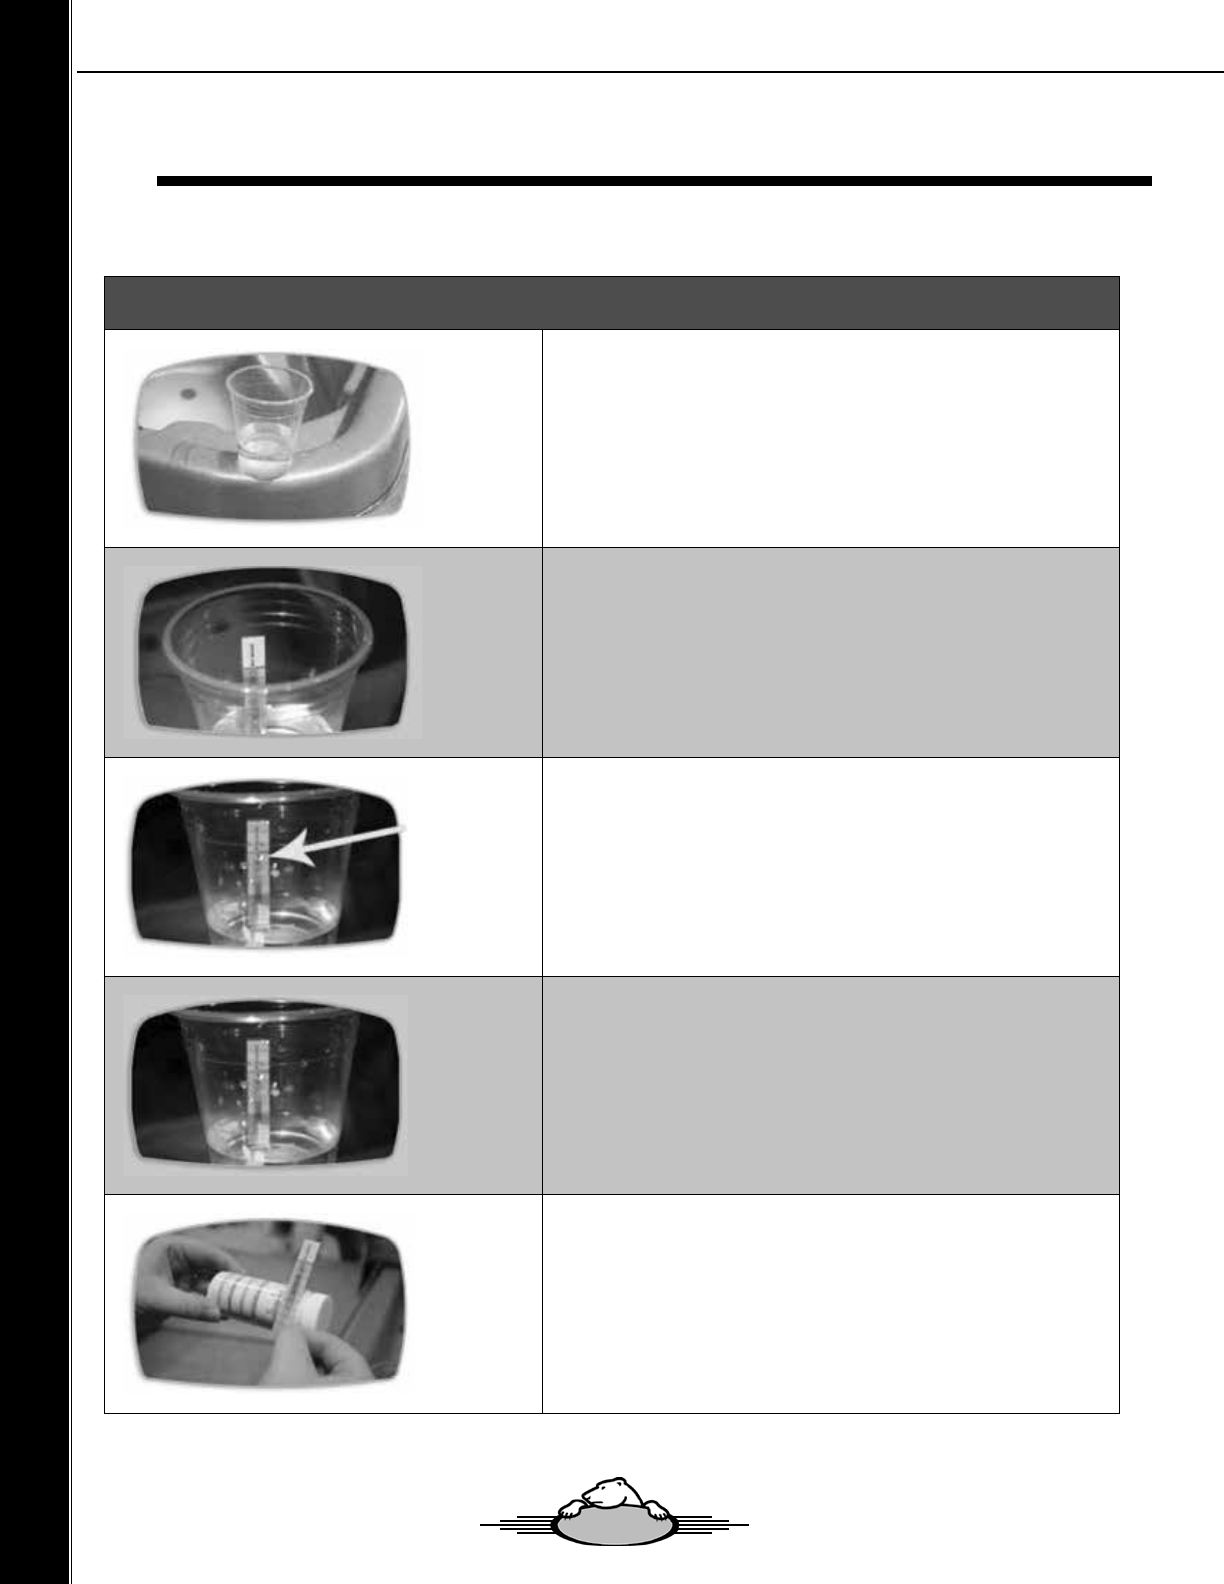
Steps to Help Ensure Sodium Chloride Test Strips are Used Correctly
Step 1. Take Water Sample Take a sample of water from the
spa in a small cup (about 25mm / 1” full).
NOTE: Always take water samples 25-30cm (12”-18”) below
the water surface.
Step 2. Place Test Strip in Water Sample Place the lower
end of the strip into the water.
IMPORTANT Keep top half of strip COMPLETELY dry to get
an accurate reading.
Step 3. Test Duration Period Leave strip in water for 3 – 5
minutes until yellow band at top of strip turns dark.
Step 4. Obtain Readings Obtain your reading: where top of
white peak falls on the number scale.
Read top of peak to the nearest 0.2 division.
Step 5. Correspond Test Result Reading Correspond the test
result reading number with the numbers on the bottle.
108108
Understanding Onzen™
Owners Manual - Onzen™
1.10.6 CUSTOM Program Filtration & Onzen™ Settings.
The Onzen™ Chlorine Production (Onzen™ Cycle Duration) settings need to be programmed: The following
steps provide guidance on how to program the Onzen™ system settings:
Refer to appropiate Topside function sectin for instructions on setting Onzen™ Cycles (hours ran per day)
Custom - Page 34
Classic - Page 47
Core - Page 64
Step 1 - Enter the ltration options through the topside controller.
Press and hold the lter button to enter into your ltration options. Your display will show “SETT”
and from here, you will choose your settings.
Step 2 - Enter Onzen™ Settings Through Topside Controller.
Press your Filter again until you see 0n.
Your display will now show the settings for your Onzen™ system.
Step 3 - Onzen™ Cycle Duration.
Use your arrow keys to select your Onzen™ Cycle Duration. You can select from 1 to 24 hours per
day. * Cycles are divided into 4. If 8 hours is selected, the system will perform 4 x 2 hour cycles/day.
Step 4 - Filter Duration.
Press your Filter button again. Your display will now show the settings for your Filter Duration.
Step 6 - Filter Cycle Frequency.
Press your Filter button again. Your display will now show the settings for your Filter Cycle Fre-
quency.
Step 5 - Setting Filter Duration.
Use your arrow keys to select your Filter Duration in hours.
You can select from 0 to 6 hours, the number of hours your ltration will run each time.
Step 7 - Setting Filter Cycle Frequency.
Use your arrow keys to select your Filter Cycle Frequency. You can select from 1 to 4 times per
day. You can move backwards through the settings by pressing the Pump 3 button. The Pump 1
button will allow you to exit without saving any changes. When you get to the end of the options,
press the lter key one last time to save changes and begin a lter cycle immediately. If you do
not press the lter key again your changes will be saved and the lter cycle will begin when you
have programmed it to do so. * Press your Filter button again to start the next cycles immediately
(Pumps will purge for 20 seconds).
To SAVE & EXIT but not start the cycle simply let the display time out.
109109
Understanding Onzen™
Owners Manual - Onzen™

1.10.7 Sanitizer Readings.
The following provides guidance on the establishment and maintenance of sanitizer readings.
Sanitizer Readings
You should have sanitizer (Chlorine) readings within 24 hours.
On Start-up, you can add one capful of Arctic Pure “Boost” to the spa water.
Adding a capful of Arctic Pure Boost (Stabilized Chlorine) will establish an instant Free Chlorine level while the
Onzen system is producing the residual. This will allow you to safely use the spa until an adequate residual is
established.
If levels get too high, turn Sanitizer Production setting down. If you are not getting any readings, turn Sanitizer
Production up.
The closer you monitor spa usage, bather load, monitor FCL and adjust Onzen Sanitizer Production Levels ac-
cordingly the less sanitizer you will need to add to your spa water.
Use Arctic Pure, Boost to sanitize the water after heavy usage, or if the Chlorine Level is too low.
Important: Always test and balance the pH and Chlorine levels before each spa use.
* Expect the pH to increase slowly over each week and when it gets too high use Arctic Pure, Salt Water Bal-
ance to correct it.
High Ph will cause premature failure of the system, cloudy water, and decreased eectiveness of the sanitizer.
The Onzen™ system works best with low levels of calcium. Check your calcium hardness levels monthly to en-
sure long life of the spa equipment and maximum user enjoyment.
You must use an oxidizer treatment Arctic Pure, Refresh in your spa once a week and after heavy bather loads,
add one cap of Arctic Pure, Refresh to your spa, leave the cover open for a minimum of 20 minutes to allow the
oxidizer gas to vent. A high concentration of trapped oxidizer gas, which may exist as a result of the shock treat-
ment, may eventually cause discoloration or vinyl degeneration to the bottom of the cover. This type of damage
is considered chemical abuse and not covered under warranty.
110110
Understanding Onzen™
Owners Manual - Onzen™
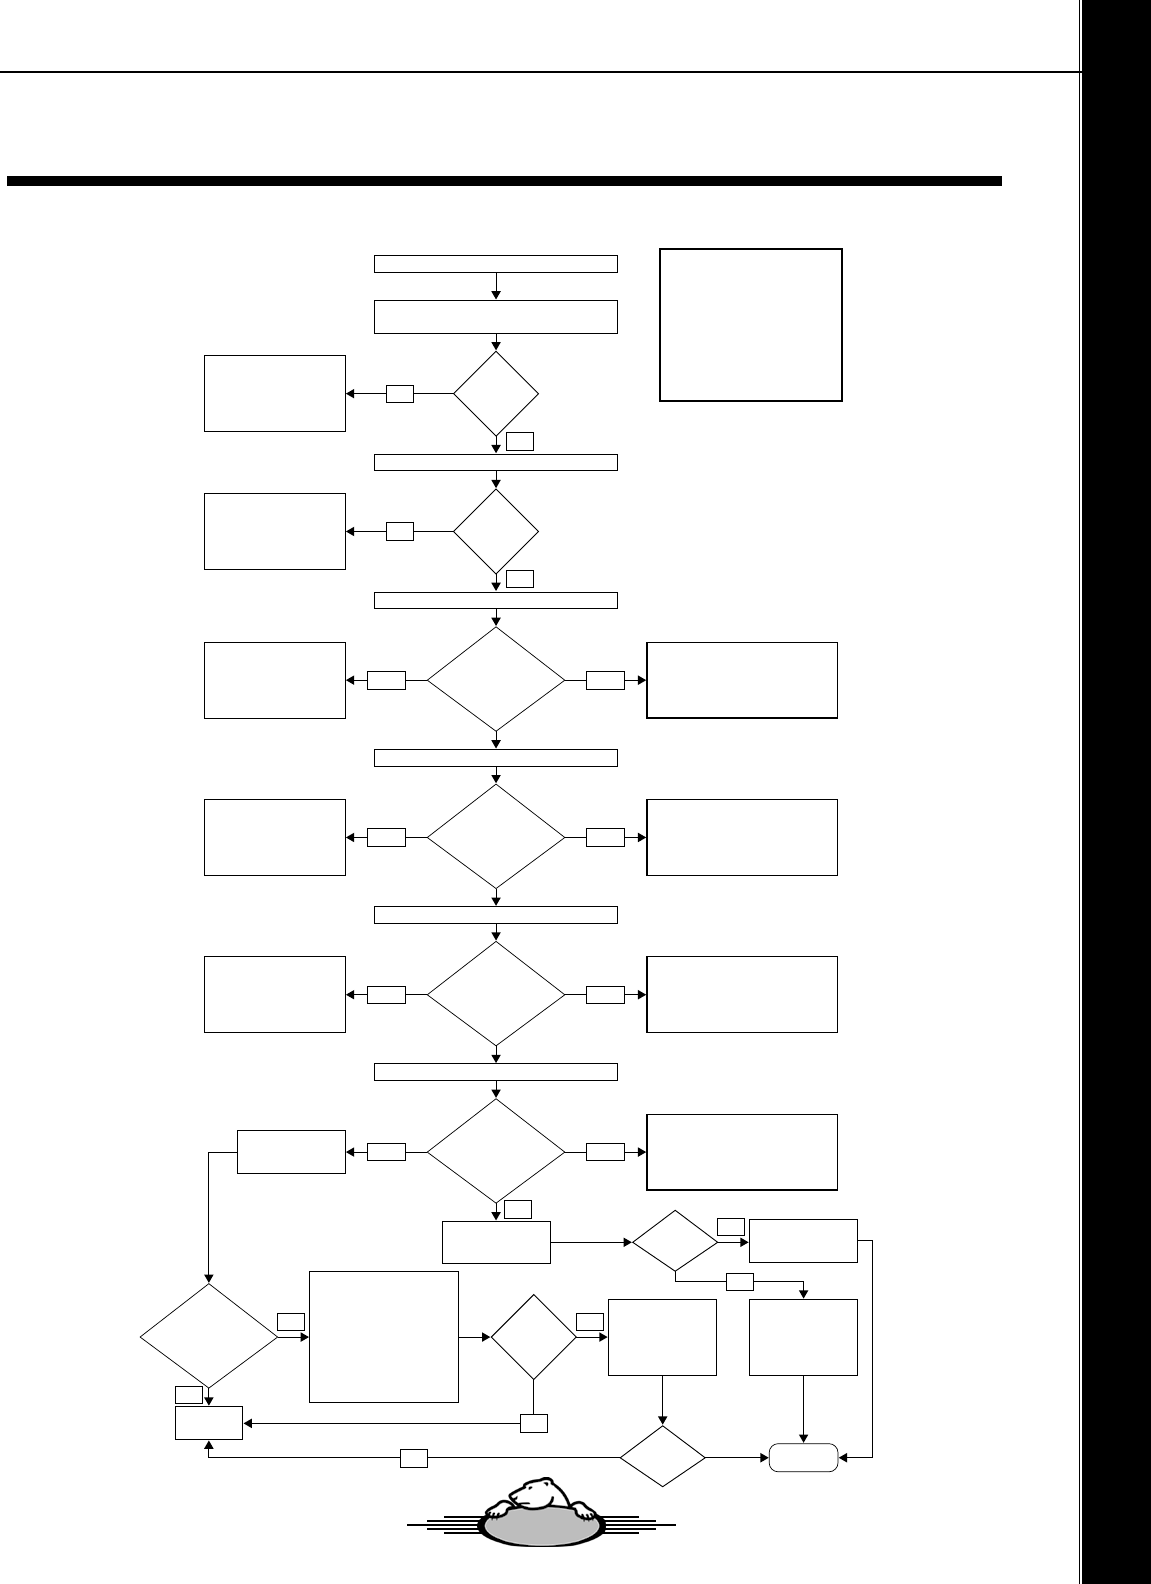
1.11 Onzen Cloudy Water Troubleshooting Flowchart
Onzen™ System is
producing Chlorine.
Balance the water
again and wait 24
hours. FCL should rise
Drain water. Re-ll
Spa. Be carefull not to
let the PH level go
above 7.6
Turn the setting up in the
programing. Add Arctic Spas
Boost to rise levels munually.
Monitor the FCL daily as you
may need to turn down the
Onzen™ Cycle Duration time
to prevent over-chlorination.
Watch for bubbles frequently
over the next few hours
Call Service
Are small
bubbles coming
from the Onzen™ Output
electode?
Do the
Bubbles cut
out?
FCL
increased?
Monitor
I have an Onzen™ System and my water is cloudy
Carry out a CH Sodium Chloride test
Carry out a Sodium Chloride test
Carry out a TA test (Total Alkalinnity)
Carry out a PH test (Potential Hydrogen)
Carry out a FCL test (Free Chlorine)
Check that all settings are set in accordance with
the settings on this manual
Add required amount of salt
in accordance with the chart
on this mannual ensuring TA
& PH are tested and adjusted
as required
Reduce Sodium level by drining water
from the Spa and replenishing with
fresh water and test/adjust TA, PH and
Sodium in accordance with
the settings on this manual
Add Arctic Pure Salt Water Balance in
accordance with the instructions on the
bottle to lower TA accordingly
Add Arctic Pure Salt Water Balance in
accordance with the instructions on the
bottle to lower PH accordingly
Add Arctic Pure Perfect
Balance in accordance with
the instructions on the
bottle to rise TA accordingly
Add Arctic Pure Adjust Up
in accordance with the
instructions on the bottle to
rise PH accordingly
Add Arctic Pure Adjust Down in
accordance with the instructions on the
bottle to lower PH accordingly
Carry out a Sanitizer
Production test
Use Calcium Reducing Prod-
uct such as Arctic Pure Best
Defence to lower CH to
below 150 ppm
Adjust settings in
accordance with the settings
on this manual
Are the
Settings
correct?
Is
CH below
150 ppm?
Is Sodium
Chloride between the
required range:
2000 - 2500 ppm?
Is TA
between the
required range:
80 - 100 ppm?
Is PH
between the
required range:
7.2 - 7.6 ppm?
Is FCL
between the
required range:
1 - 3 ppm?
Carry out a Sanitizer
Production test
Replace Filtert
Are there
Signs?
Yes
Yes
No
No
Below
Below
Above
Above
Below Above
Below Above
Yes
Yes
Yes
Yes
No
No
No
No
NOTE: All checks
and tests should
be carried out in
accordance with
this Arctic Spas®
Onzen ™ Guide.
111111
Understanding Onzen™
Owners Manual - Onzen™
Onzen Questions
Question 1: How do I know if the Onzen system is working?
Conduct a “Sanitizer Production test” (Also known as a Smoke test).
This procedure activates the Onzen System while de-activating the ltration pump so you can see the
mist of gas bubbles produced by the Onzen System.
Question 2: What should I do if it fails the “Sanitizer Production test”?
First, conrm you have the correct concentration of salt in the water “using sodium chloride test strips”.
Then, start maintaining your water manually using “Boost” granular chlorine to sanitize and Adjust Up /
Arctic Pure Salt Water Balance to balance pH. Continue to do this daily until the system is repaired by an
authorized service technician.
* Keep enjoying your hot tub!
Question 3: What should I do if the chlorine levels are too high?
Turn the Onzen Output down (decrease “On” settings).
Unless you added granular chlorine or shock to the water high chlorine levels mean the system is staying
on too long for your circumstances. It may take a day or two for levels to normalize, or you can speed this
process up by using a chlorine neutralizer, such as “X-it”.
Question 4: What should I do if the pH keeps increasing?
Conrm that your Total Alkalinity is at the recommended level and reduce it manually with Arctic Pure Salt
Water Balance. This is normal; all spa salt systems cause pH to increase.
Question 5: Will the salted water damage my lawn?
This is very unlikely.
The recommended concentration of salt is used is approximately 10% of the concentration of sea water.
Question 6: Why is my water bright yellow, or bright green, or a rusty colour suddenly?
This can happen if the pH gets too high.
Lower the pH using Arctic Pure Salt Water Balance. High pH is a sign that the Onzen Output may be
turned up too high, so you may need to adjust the Onzen Output After balancing the pH and adjusting the
Onzen Output wait about 48 hours. If the colour of the water does not normalize you may need to replace
the water.
* Keep an eye on the pH and adjust it weekly to avoid this problem in the future.
Question 7: What is the typical amount of maintenance I need to do with Onzen?
1. Change the water twice a year.
2. Change the lter 4 times a year.
3. Check the Total Alkalinity weekly to make sure it is in the target range (Under 100).
4. Adjust the pH once a week. Salt systems naturally drive pH levels to increase, strive to achieve a Low
pH level 7.2
must not exceed 7.6.
5. Check Calcium level monthly to ensure it is in the target range. Salt systems perform best with Low
Calcium levels;
strive for a target range between 50 - 150 ppm.
6. Adjust the Onzen Output “On” if hot tub use changes signicantly.
7. Adjust the chlorine levels using “Boost” granular chlorine, after heavy use or if the Onzen Output is too
low. Refer: Onzen Maintenance Schedule for further details.
1.12 Onzen Frequently Asked Questions
112112
Understanding Onzen™
Owners Manual - Onzen™
1.12 Onzen Frequently Asked Questions
Onzen Questions Continued
Question 8 Should I use Best Defence or another scale remover?
It is recommended that calcium be removed from the water in advance rather than adding a scale remover after the
fact.
Question 9: What is the impact of phosphates on the Onzen system?
High levels of phosphates (above 250 ppb) may reduce the eectiveness of sanitizer output. Question 13 What
happens if my water becomes cloudy?
1. Test the water for chlorine content. If the level is low add Boost.
2. Check your lters as they may require replacement.
3. Check you pH level you may need to adjust you pH down.
Question 10 : Can I use softened water with my Onzen system?
Yes. You probably have a water softener because your water is quite hard. Your water-softener removes calcium
from your water and helps you achieve water with calcium content near the target range, between 50 - 150 ppm.
Question 11: Prior to draining spa water for rell purposes should any form of system ush be carried out?
Yes you can, Arctic Pure ‘Fresh Start’. Use in accordance with the instructions on the container. Flushing the system
components and hoses is helpful when you get biolm and calcium build-up.
It is good practice to do this at least once a year.
113113
Understanding Onzen™
Owners Manual - Onzen™

*** IMPORTANT NOTICE ONZEN V8 ***
These cells are considered a consumable item and are now designed to be replaced by the
customer in order to be more user friendly. DO NOT GET THE INTERNAL CONNECTION WET!
To change your salt cell remove the set screw on your salt cell with a Phillips screwdriver. Now
unthread the salt cell from the housing turning counter clockwise. This will require you to use your
muscles as the cell is threaded in quite tight to prevent any water from getting on to the 12 volt
connection. Before threading in the new cell put a generous amount of dielectric grease in and
around the 12 volt connections in the centre of the housing and on the end of the cell. Now thread
the new cell into the housing. There is a notch built into the threads that will stop the cell precisely
where the set screw needs to be installed. If the cell is changed under water the connection will
get wet and corrode. The corrosion will destroy the connection between the salt cell and the salt
cell housing. This corrosion will be visibly noticeable upon inspection. Warranty will be void If
corrosion between the salt cell and salt cell housing is detected.
114114
Understanding Onzen™
Owners Manual - Onzen™
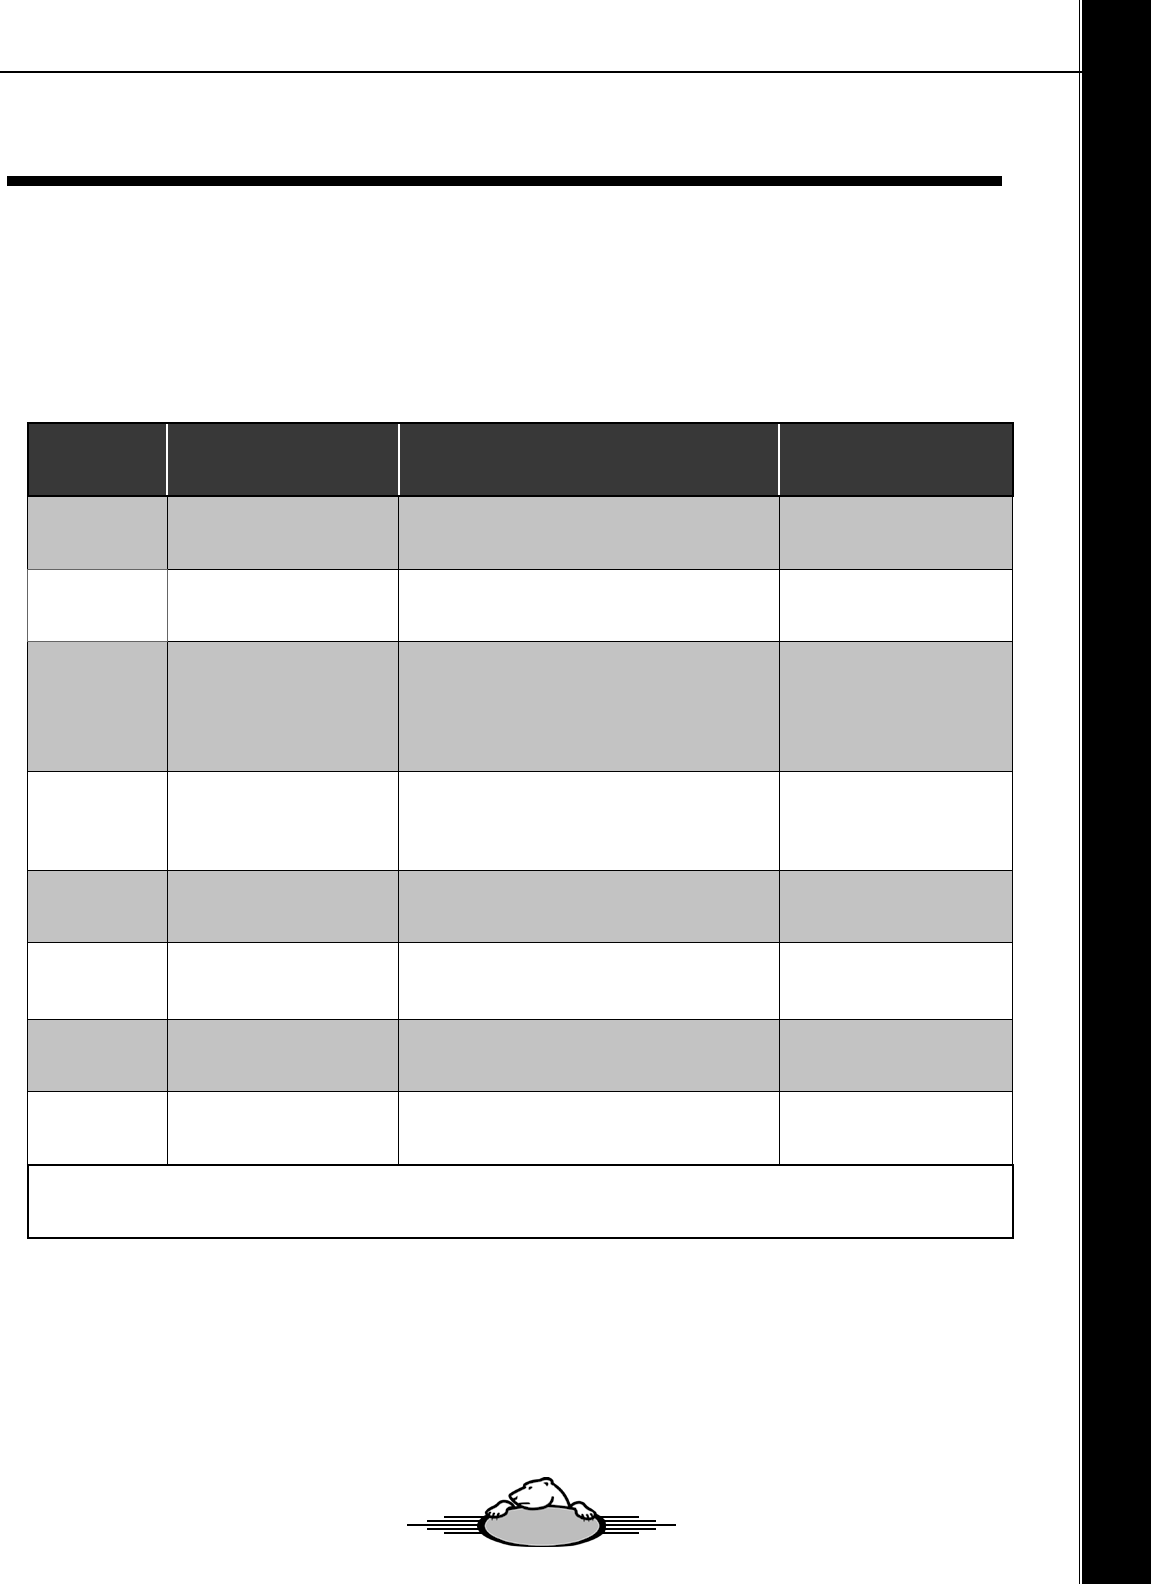
1.13 Arctic Spas Onzen Maintenance Schedule
The following table outlines the typical water maintenance program required for an Arctic Spa
tted with Onzen. To help ensure chemicals dissolve appropriately it is good practice to rst
mix/dissolve the chemical in an uncontaminated container of hot water before carefully adding
to the spa water.
Item Frequency Maintenance Task Target Range
TA Weekly
Check the Total Alkalinity to ensure it
is in the target range.
80 – 100 ppm.
pH Weekly
Check the Potential Hydrogen to en-
sure it is in the target range.
7.2 – 7.6 ppm
FCL
Weekly (& before
eachuse)
Check the Free Chlorine Level to en-
sure it is in the target range.
Adjust the chlorine levels using “Boost”
granular chlorine, after heavy use or if
the Onzen Output is too low
1 – 3 ppm
CH Monthly
Check Calcium Hardness level to en-
sure it is in the target range. Salt sys-
tems perform best with Low Calcium
Hardness levels.
50-150 ppm
Sodium
Chloride
Monthly
Check the Sodium Chloride Level to
ensure it is in the target range.
Version 8 2000-2500
ppm
Onzen
Output
As required
If spa use changes signicantly, adjust
the output level of Onzen Chlorine
Production ( “On” )
2 - 4 Hours per day
suggested
Filter Every 3 Months Change the lter N/A
Water Every 6 Months Change the water N/A
Note: It is also good practice to take a water sample on a regular basis and have the water independently
tested by your local spa/pool store.
115115
Understanding Onzen™
Owners Manual - Onzen™
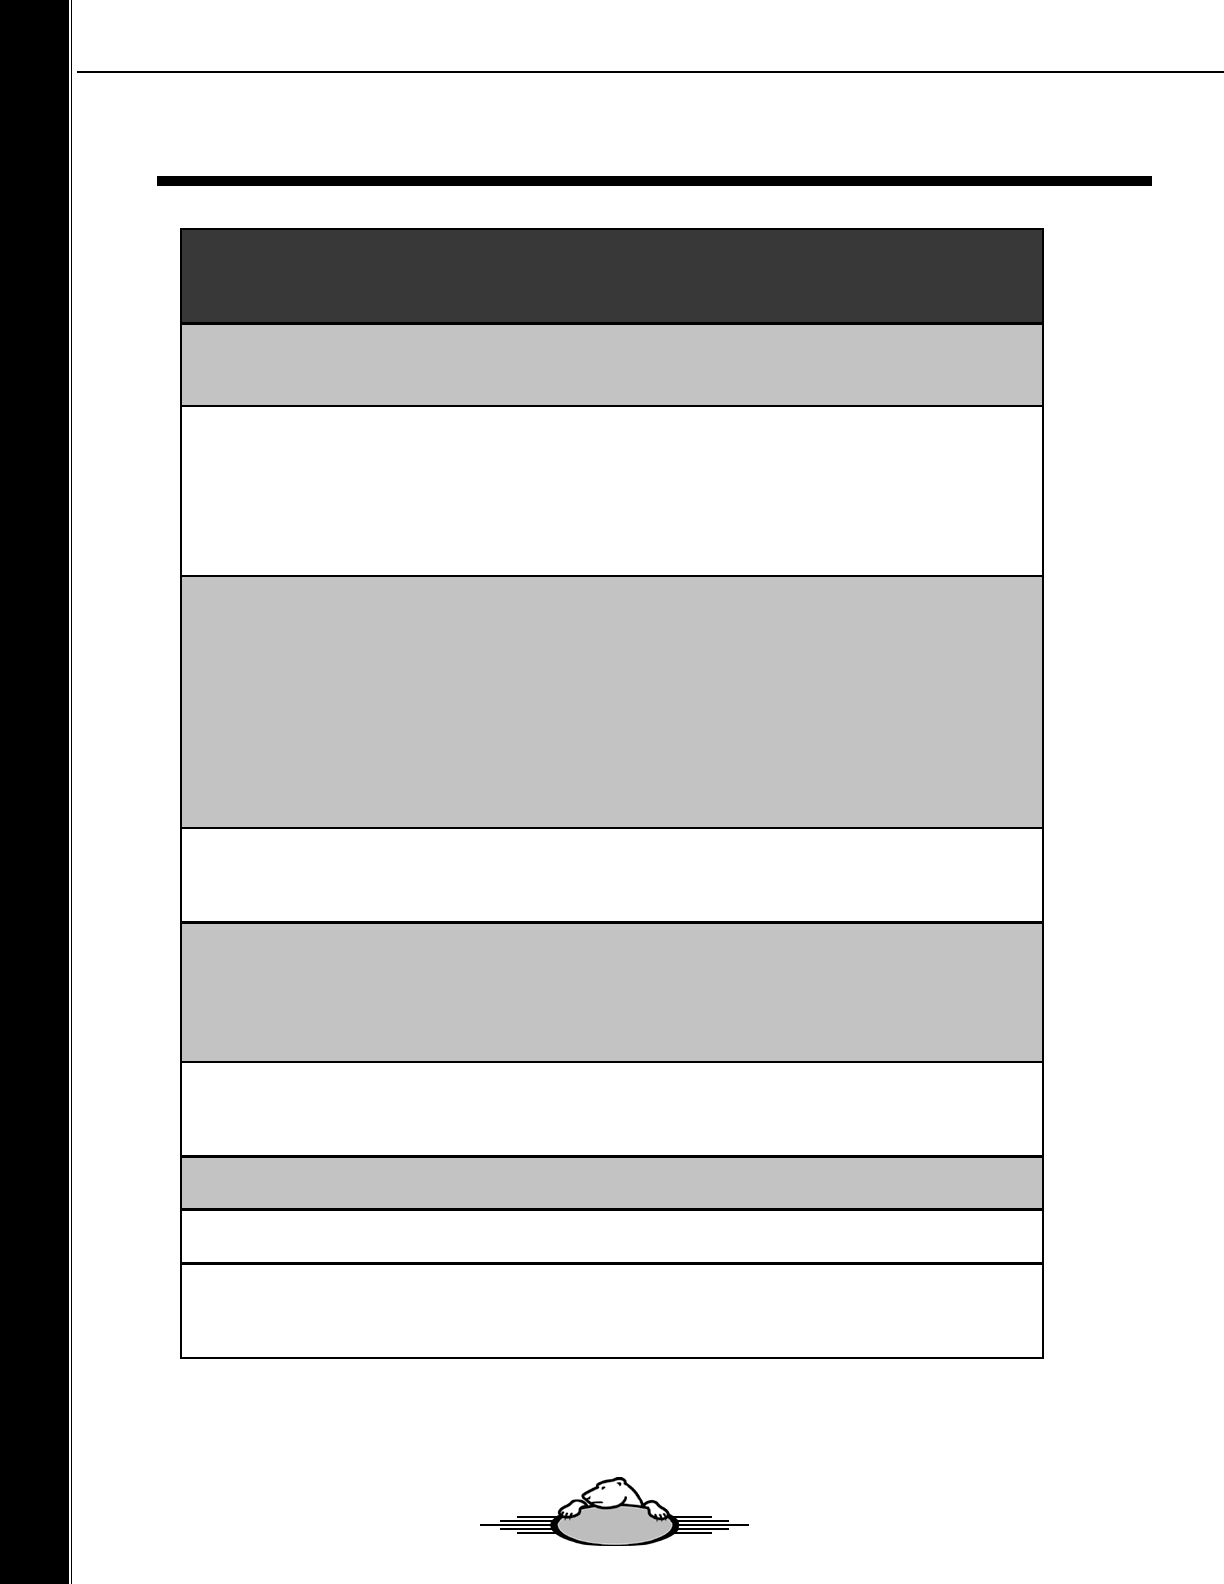
Maintenance
Low TA - Can be raised by adding Arctic Pure, Perfect Balance to spa water. High TA - Can be
lowered by adding Arctic Pure Salt Water Balance to spa water.
Salt systems naturally drive pH levels to increase, strive to achieve a Low pH level 7.2. pH
must not exceed 7.6.
Low pH - Can be raised by adding Arctic Pure, Adjust Up to the spa water.
High pH - Can be lowered by adding Arctic Pure Salt Water Balance to spa water.
Low FCL - Can be raised by adding Arctic Pure, Boost and or turning Onzen Cycle Duration
(Chlorine Production On) Level up.
High FCL - Can be lowered by:
• Natural cause over a few days.
• Turning Onzen Cycle Duration (Chlorine Production On) down.
• Adding Arctic Pure, X-it.
The above is dependent on FCL level, spa usage and bather load.
High CH - lower with a stain & scale controller such as Arctic Pure, Best Defence, to help hold
Calcium in suspension.
Once Sodium Chloride reading is in the ideal range salt concentration will only change if water
is splashed or drained out. Do not add salt unless this test conrms the level is below the
chemical target range.
High Sodium Chloride - add water.
Low Sodium Chloride - add salt.
Go into low level settings and adjust Onzen Cycle Duration (Chlorine Production On) accord-
ingly.
Adjust to suit spa usage and bather load.
Change the lter in accordance with Owners Manual instructions.
Change the water in accordance with Owners Manual instructions.
Note: It is also good practice to take a water sample on a regular basis and have the water
independently tested by your local spa/pool store.
116116
Owners Manual - Onzen™
Understanding Onzen™
117117
OnSpa®
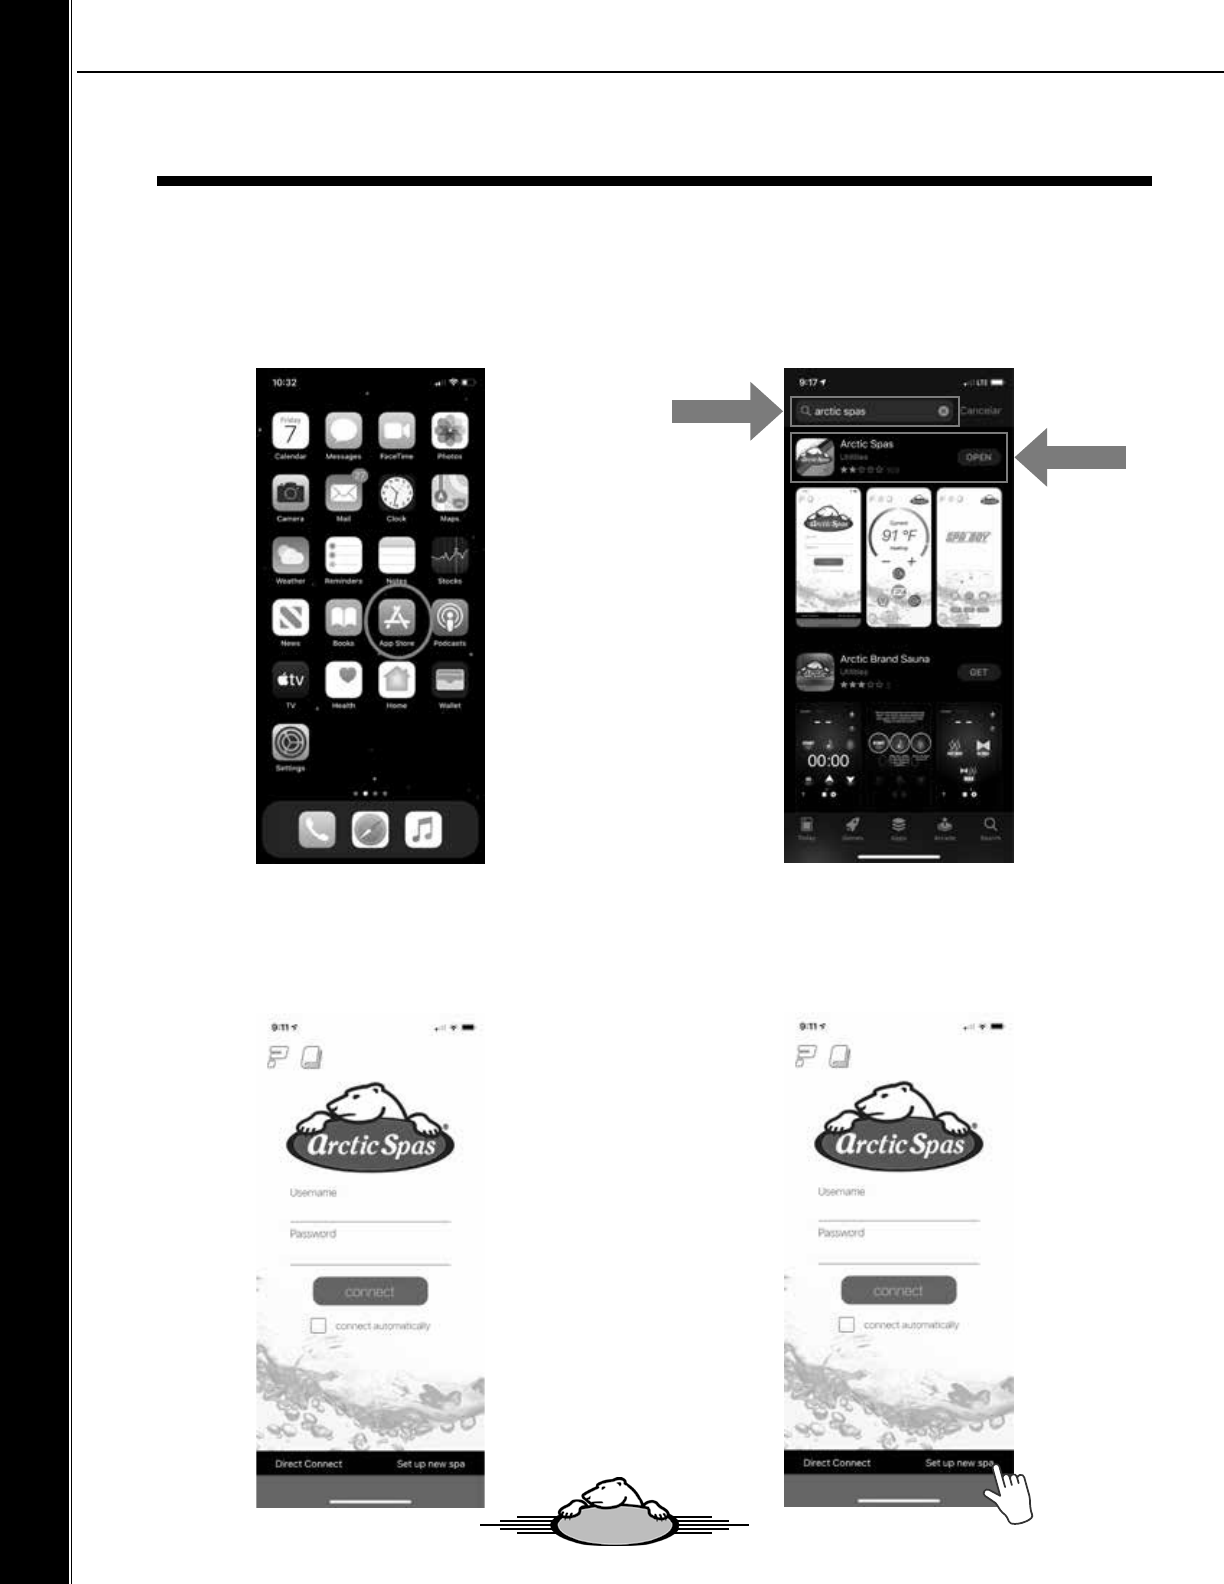
Download the Arctic Spa App on your iOS or Android
3 - Have you downloaded the App to your device?
1 - Go into the App Store on your personal device. 2 - Type “Arctic Spas” into the search bar and then
select. Click on the App and select “GET” (“OPEN” will
display if it is already downloaded).
4 - Select Setup a New Spa in the lower right corner of the screen.
2020 Connecting the Linux Pack using Built-In WiFi
Owners Manual - OnSpa®
118118
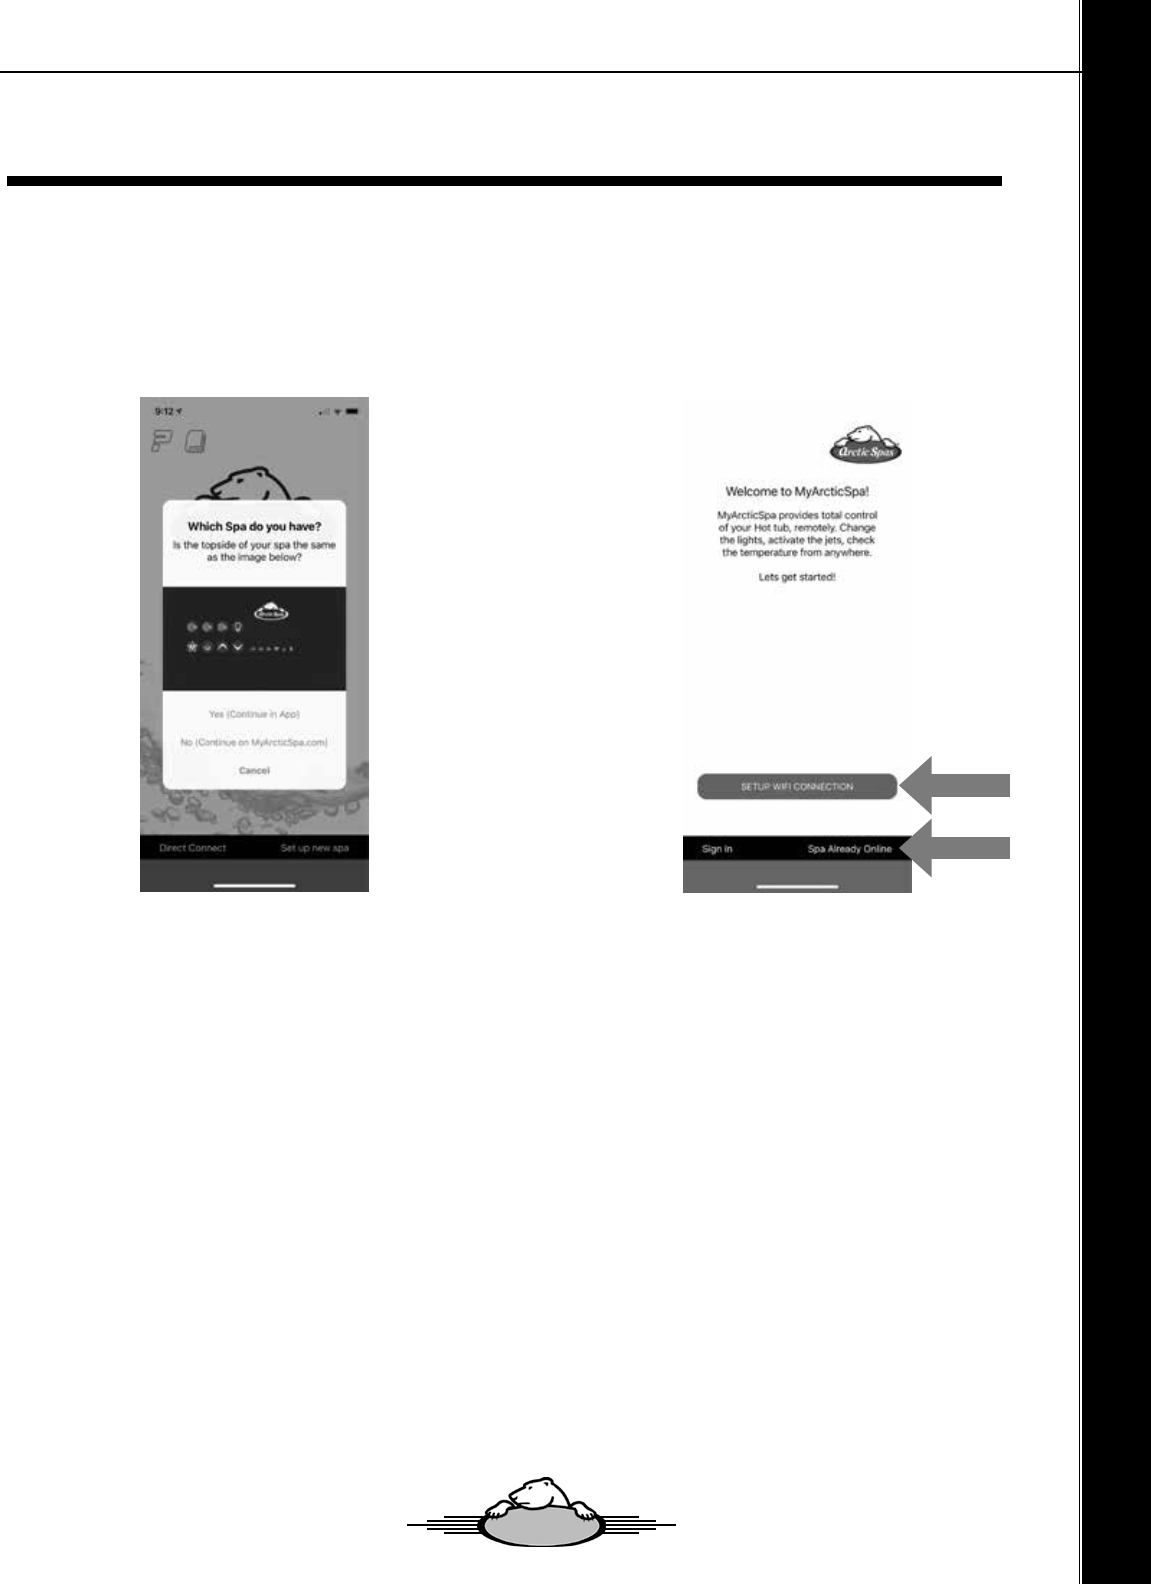
5 - Please note: If the Spa is a 2020, it may have come
without the updated topside overlay, in which case the
answer here is still ‘YES’.
6 - Setup the WiFi Connection.
Select SETUP WIFI CONNECTION button on the screen
if this is the rst time the spas been online.
2020 Connecting the Linux Pack using Built-In WiFi
Owners Manual - OnSpa®
119119
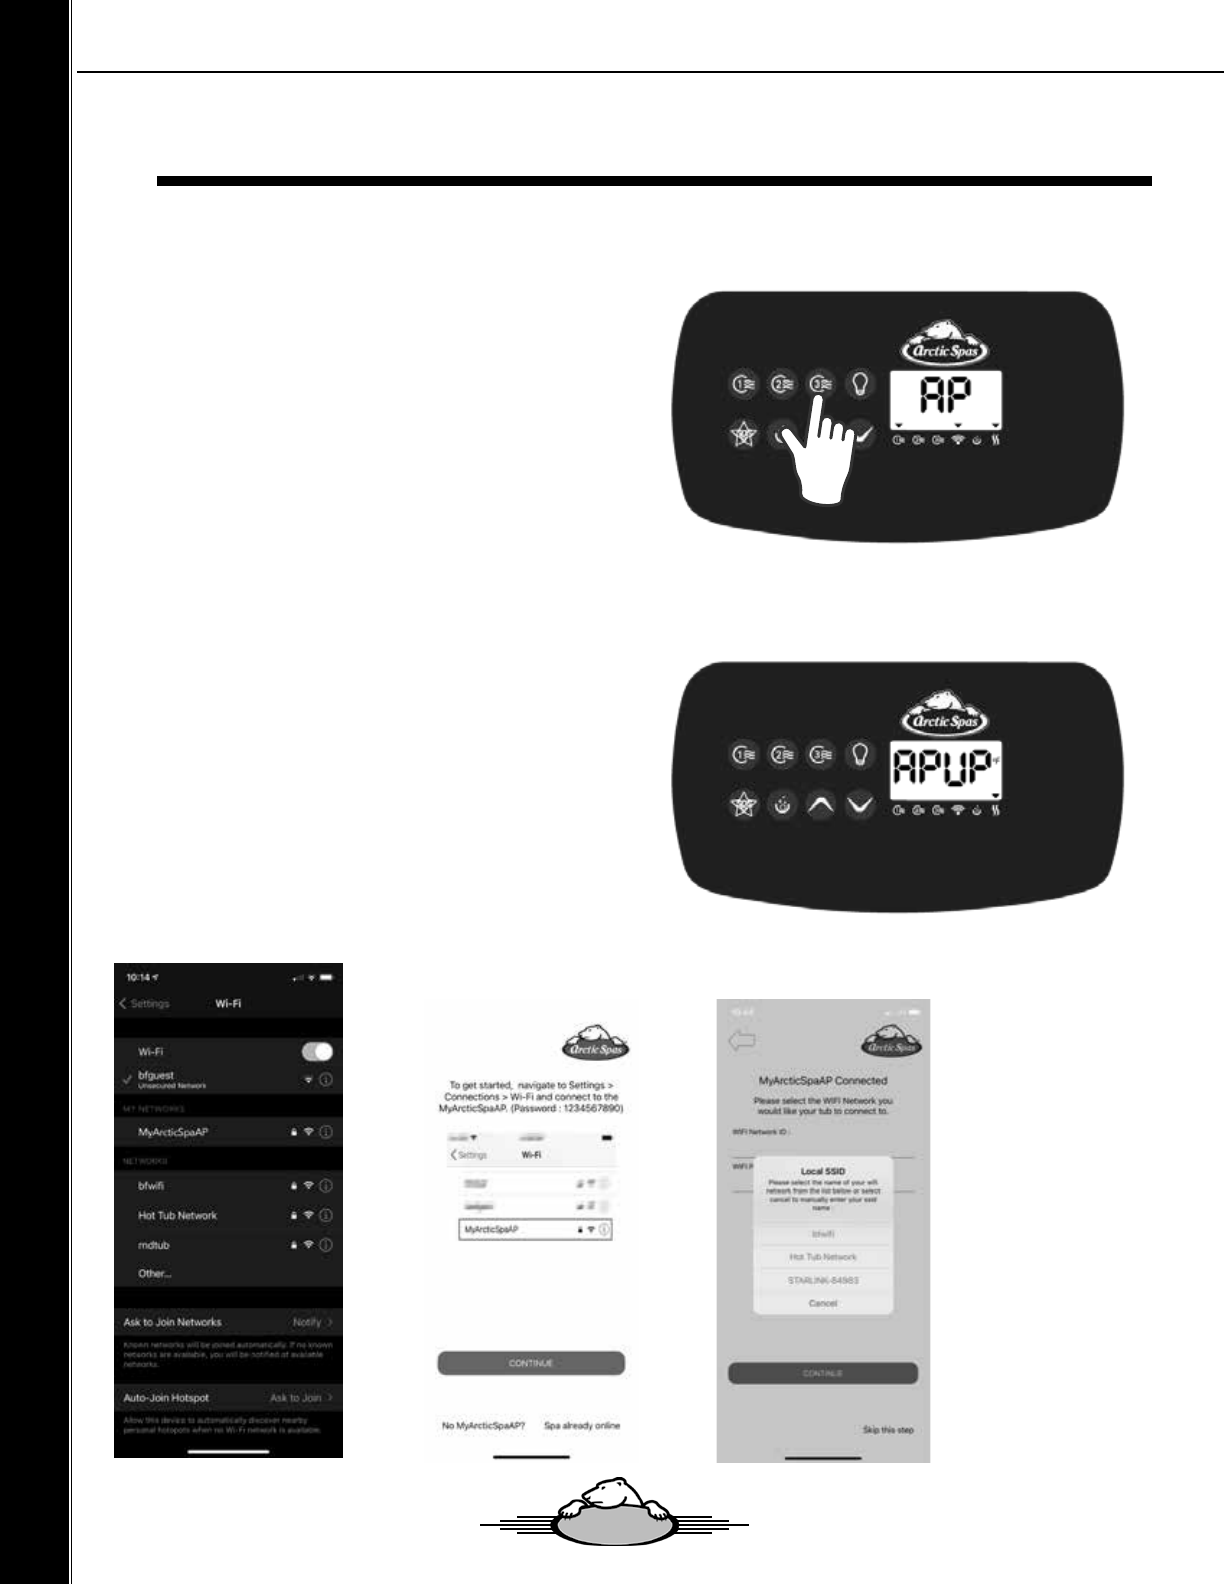
Next “APUP” will display, telling us the Spa’s Access
Point is now discoverable.
On device, exit the app screen and go into set-
tings > Wi > MyArcticSpaAP.
The password for this connection is:
1234567890
Join the Hotspot.
6.1 - Set up a new connection
The 2020 Spa’s AP (Access Point) should automatically
launch when the Spa is rst powered up.
If the Spa’s Access Point didn’t automatically come up,
you can manually launch it.
To set up the Spa’s Access Point ‘AP’ press and hold the
pump 3 button on the topside until the display reads ‘AP’
then release. The AP is up when APUP is displayed on
the screen.
(PLEASE NOTE: This will be the ‘BLOWER’ button if the
spa hasn’t received the new topside overlay yet).
Re-open the Arctic Spa app
and press CONTINUE
Find your home net-
work and select it
from the available
networks, then enter
your WiFi password.
120120
2020 Connecting the Linux Pack using Built-In WiFi
Owners Manual - OnSpa®
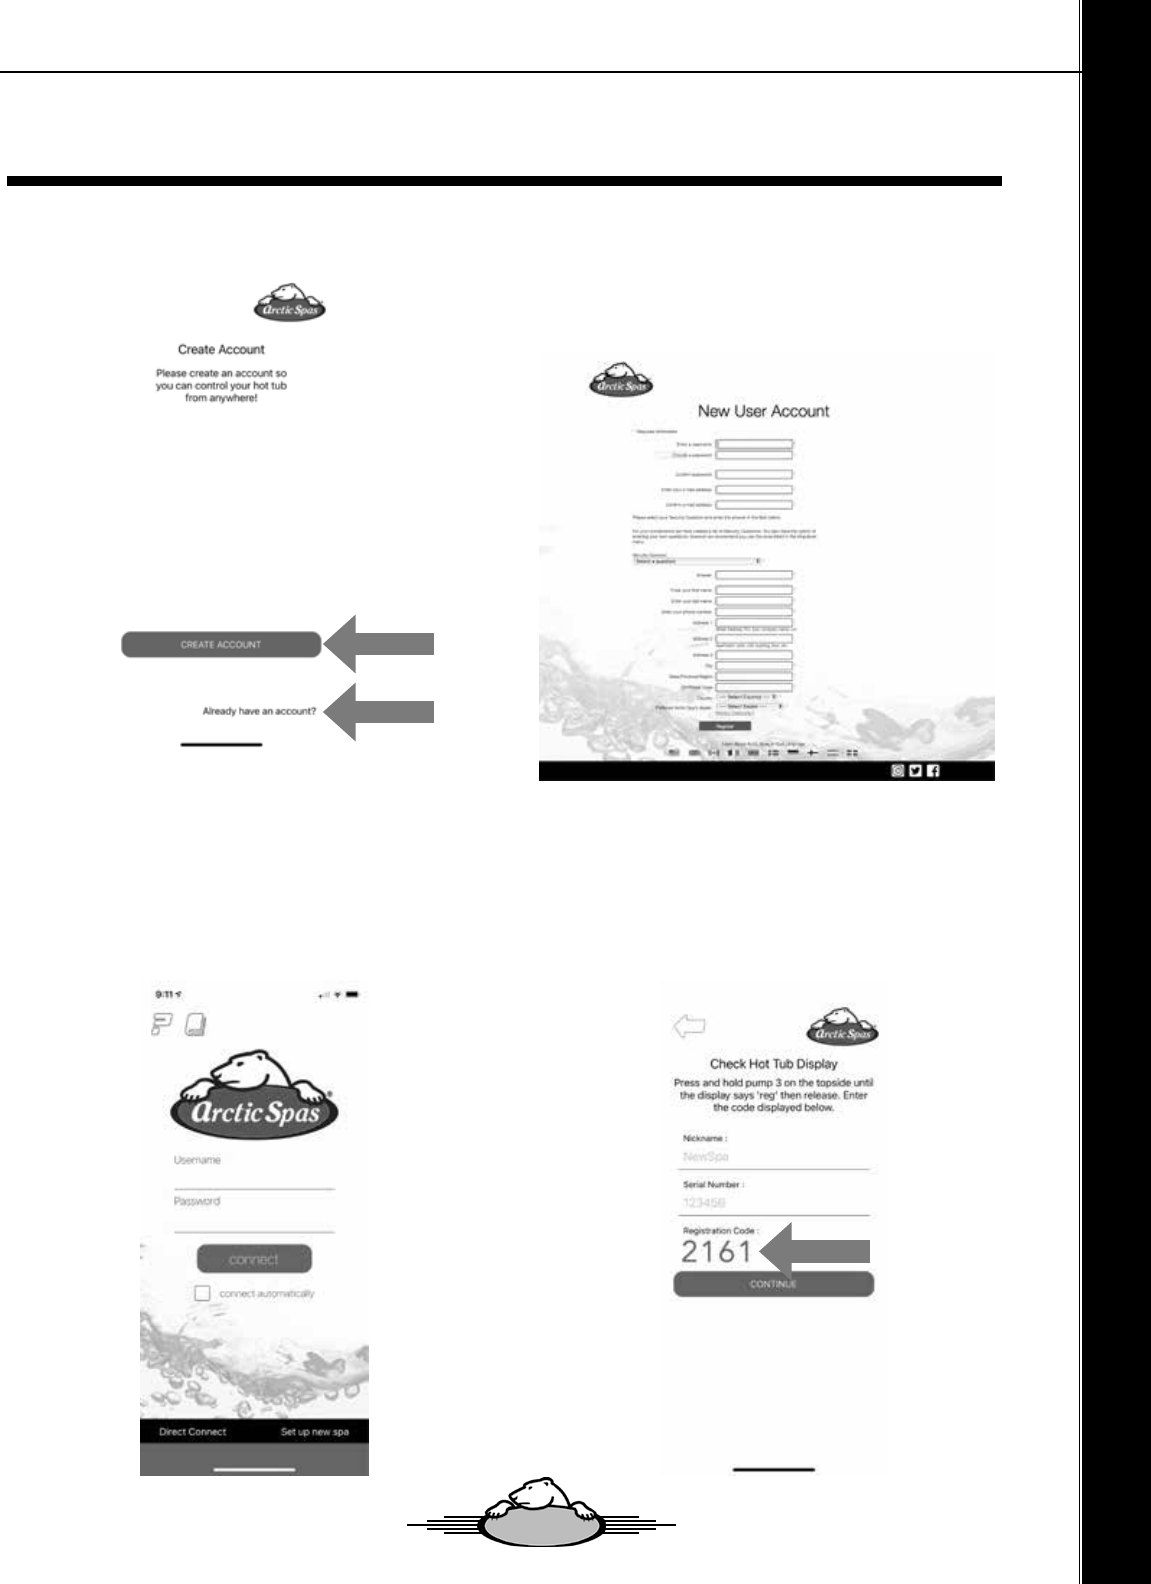
7 - From this screen Select ‘Create Account’.
8 - Please enter your Username and Password, then
press CONNECT.
9 - Enter a Spa Nickname, the Spa’s Serial number then
the Registration Code.
Please Note: If your phone is connected to the same
WiFi Network as the Spa, it will not prompt for the Regis-
tration Code.
7.1 - Enter the Required information into the elds, then
press Register at the bottom of the screen.
(PLEASE NOTE: If you already have a User Account you
can Login at the top of this page).
2020 Connecting the Linux Pack using Built-In WiFi
121121
Owners Manual - OnSpa®
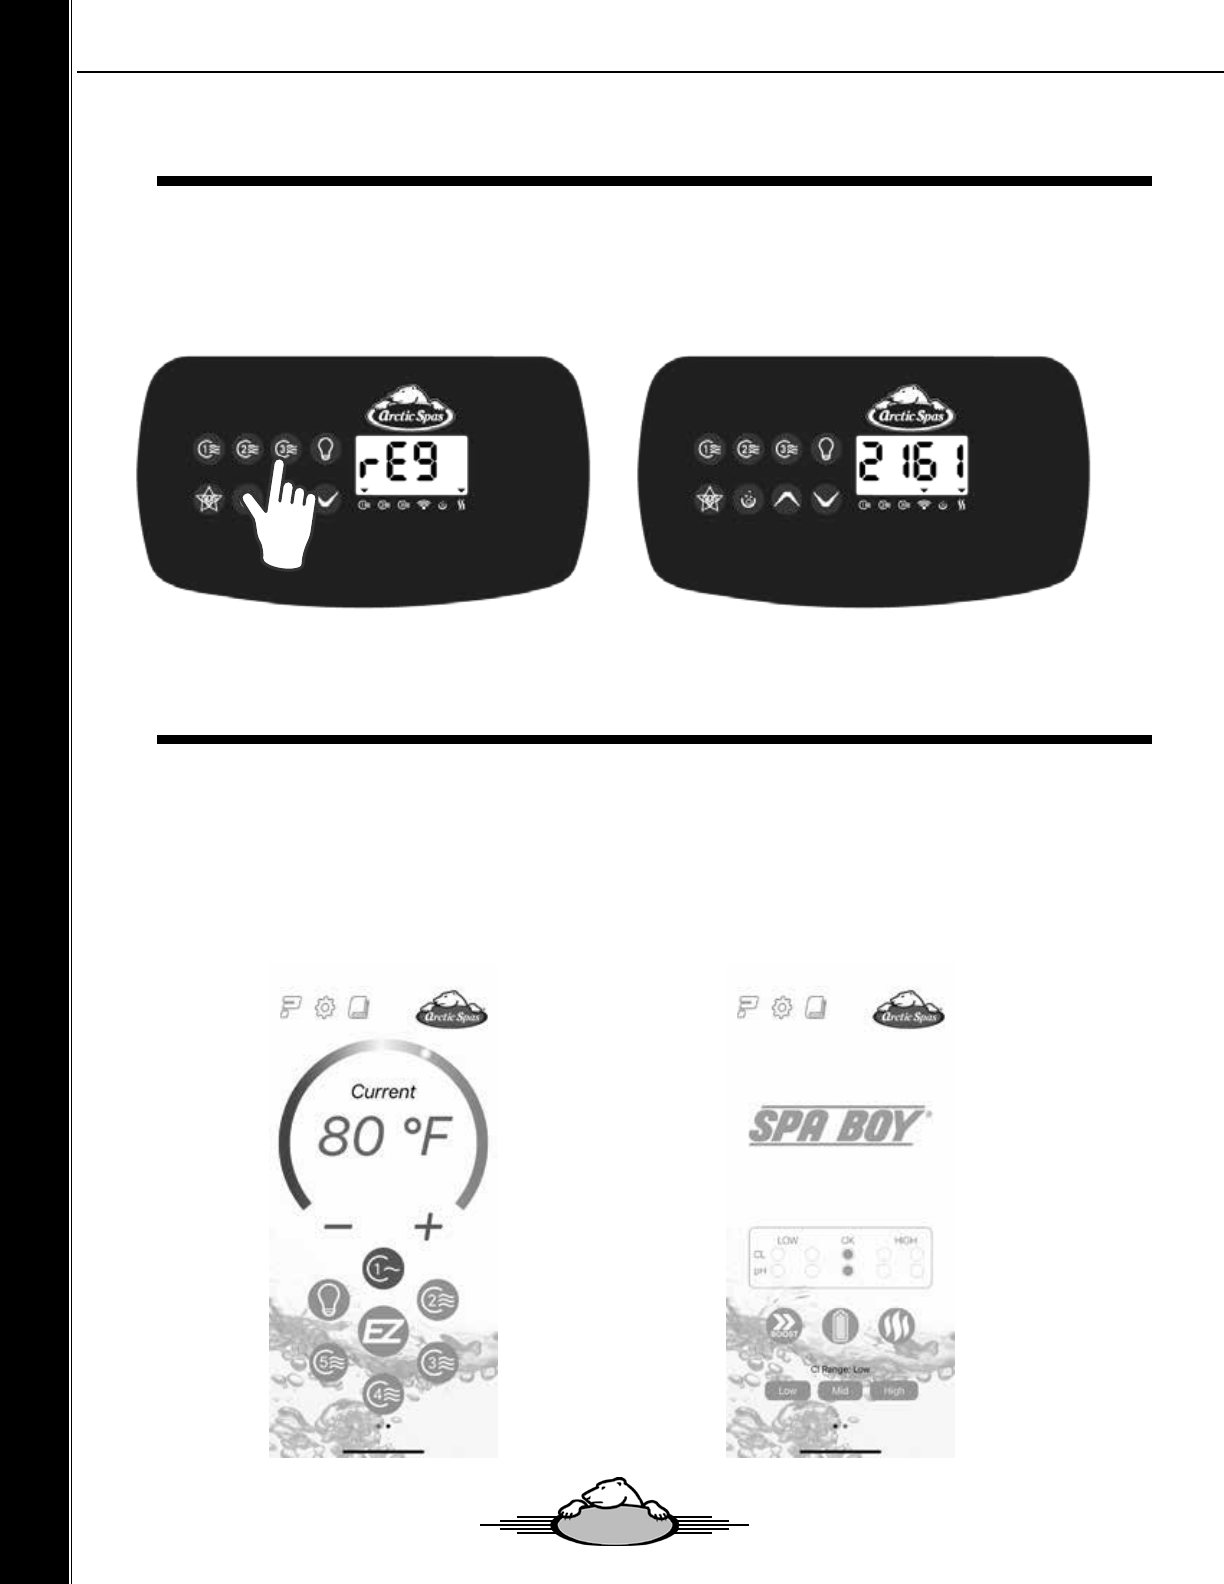
9.1 - Locate the registration code
Press and hold Pump 3 (or the Blower Button if still the old overlay) on the topside until the display says ‘rEG’ then
release. Enter the code displayed then press Continue.
The temperature can be adjusted using the + and - buttons or by moving the small circle around the loop.
• Press the Pump Control buttons to turn Pumps On and O.
• The EZ button will turn All Pumps On and O.
• Swipe the screen to the left and you will see the Spa Boy screen, if Spa Boy is installed in your spa
2020 Connecting the Linux Pack using Built-In WiFi
Owners Manual - OnSpa®
122122
Adjusting Temperature & Pumps
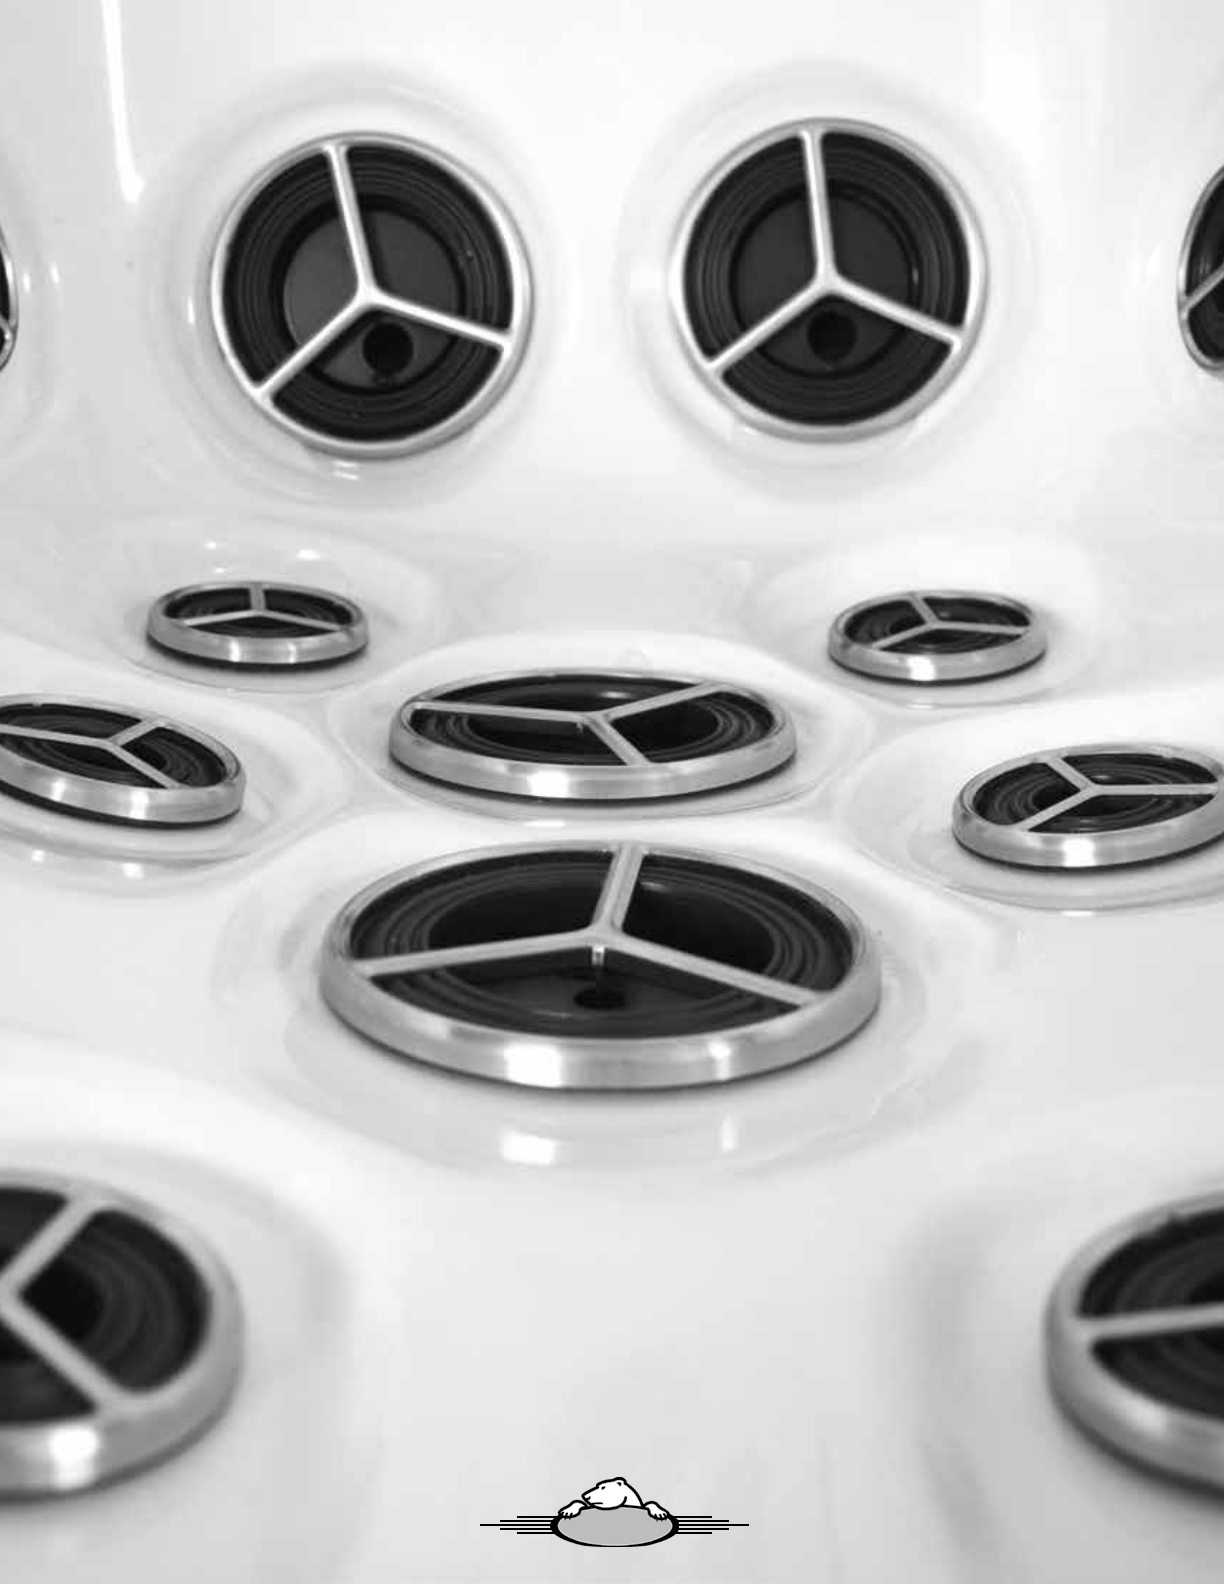

V2-12202021
